
Making an HTML5 Canvas Based Game: A Tutorial Using AngularJS and CreateJS
There are many programming platforms used to develop games, and there are a plethora of devices to play them on, but when it comes to playing games in a web browser, Flash-based development still leads the way.
What if we could port these games to HTML5 Canvas technology and play them on mobile browsers as well? In this article, Toptal engineer Avinash Kaza gave a solution to this.

Avinash is a senior developer with experience designing & developing data visualizations.
Previously At

Game development is one of the more interesting, advanced programming techniques that constantly challenges the software development industry.
There are many programming platforms used to develop games, and there are a plethora of devices to play them on, but when it comes to playing games in a web browser, Flash-based development still leads the way.
Rewriting Flash-based games to HTML5 Canvas technology would let us play them on mobile browsers as well. And, with Apache Cordova, skilled web developers could easily wrap them into cross platform mobile game apps.
Folks at CreateJS set out to do that and more.
EaselJS, part of CreateJS’s suite, makes drawing on HTML5 Canvas simple. Imagine building custom data visualization with high performance and thousands of elements. Scalable Vector Graphic (SVG) is not the right choice, because it uses DOM elements. Browsers become overwhelmed when, at around 600 DOM elements, initial renderings, re-draws, and animation become expensive operations. With HTML5 Canvas, we can easily get around these problems; Canvas drawings are like ink on paper, no DOM elements and their associated costs.
This means that Canvas based development needs more attention when it comes to separating elements, and attaching events and behaviors to them. EaselJS comes to the rescue; we can code as if we are dealing with individual elements, letting EaselJS library handle your mouse-overs, clicks, and collisions.
SVG-based coding has one big advantage: SVG has an old specification, and there are a lot of design tools that export SVG assets for use in development, so that cooperation between designers and developers works well. Popular libraries, such as D3.JS, and newer, more powerful libraries like SnapSVG, bring much to the table.
If designer-to-developer workflow is the only reason you would use SVGs, consider extensions for Adobe Illustrator (AI) that generate code from shapes created in AI. In our context, such extensions generate EaselJS code or ProcessingJS code, both of which are HTML5 Canvas-based libraries
Bottom line, if you are starting a new project, there is no reason to use SVGs anymore!
SoundJS is part of the CreateJS suite; it provides a simple API for HTML5 Audio specification.
PreloadJS is used to preload assets such as bitmaps, sound files, and the like. It works well in combination with other CreateJS libraries.
EaselJS, SoundJS, and PreloadJS make game development super easy for any JavaScript ninja. Its API methods are familiar to anyone who used Flash-based game development.
“This is all great. But, what if we have a team of developers converting a bunch of games from Flash to HTML5? Is it possible to do that with this suite?”
The answer: “Yes, but only if all of your developers are at Jedi level!”.
If you have a team of varying skill set developers, which is often the case, it can be a little scary to use CreateJS and expect a scalable and modular code. What if we bring together CreateJS suite with AngularJS? Can we mitigate against this risk by bringing in the best and most adopted front-end JS framework?
Yes, and this HTML5 Canvas game tutorial will teach you how to create a basic game with CreateJS and AngularJS!

Planting the Seed
AngularJS significantly reduces complexity by enabling your development team with the following:
- Adding code modularity, so that team members can focus on different aspects of the game.
- Breaking the code into separate testable and maintainable pieces.
- Enabling code re-use, so that one factory class can be instantiated multiple times, and re-used to load different but similar assets and behaviors.
- Speeding up the development because multiple team members can work in parallel, without stepping on each other’s toes.
- Protecting developers from using bad patterns (Javascript carries notoriously bad parts with it and JSLint can only help us so much).
- Adding a solid testing framework.
If, like me, you are a “tinkerer” or a tactile learner, you should get the code from GitHub and start learning. My suggestion is to look through my check-ins and understand the steps I took to gain benefits of adding AngularJS goodness to CreateJS code.
Running Your AngularJS Seed Project
If you haven’t already done so, you need to install nodeJS before you can run this demo.
After creating an AngularJS seed project, or downloading it from GitHub, run npm install to download all dependencies to your app folder.
To run your application, execute npm start from same folder and navigate to http://localhost:8000/app/#/view1 in your browser. Your page should look like the image below.

EaselJS Meets AngularJS
Add CreateJS library reference to your AngularJS seed project. Make sure that CreateJS script is included after AngularJS.
<script src="http://code.createjs.com/createjs-2014.12.12.min.js"></script>
Next, clean up the application:
- Delete view2 folder from your app folder
- Remove menu and AngularJS version info from index.html, by deleting the code shown below:
<ul class="menu">
    <li><a href="#/view1">view1</a></li>
    <li><a href="#/view2">view2</a></li>
</ul>
…
<div>Angular seed app: v<span app-version></span></div>
…
<script src="view2/view2.js"></script>
Remove view2 module from app.js, by deleting the following line
myApp.view2,
If you haven’t used AngularJS before, and are not familiar with AngularJS directives, check this tutorial. Directives in AngularJS are a way to teach HTML some new tricks. They are the most well thought out feature in the framework, and make AngularJS powerful and extensible.
Whenever you need a specialized DOM functionality or a component, search for it online; there is a good chance it is already available in places like Angular modules.
The next thing we need to do is create a new AngularJS directive that will implement the example from EaselJS. Create a new directive called spriteSheetRunner in a new file located in /app/view1/directives/spriteSheetRunner.js.
angular.module('myApp.directives', [])
.directive('spriteSheetRunner', function () {
"use strict";
return {
restrict : 'EAC',
replace : true,
scope :{
},
template: "<canvas width='960' height='400'></canvas>",
link: function (scope, element, attribute) {
var w, h, loader, manifest, sky, grant, ground, hill, hill2;
drawGame();
function drawGame() {
//drawing the game canvas from scratch here
//In future we can pass stages as param and load indexes from arrays of background elements etc
if (scope.stage) {
scope.stage.autoClear = true;
scope.stage.removeAllChildren();
scope.stage.update();
} else {
scope.stage = new createjs.Stage(element[0]);
}
w = scope.stage.canvas.width;
h = scope.stage.canvas.height;
manifest = [
{src: "spritesheet_grant.png", id: "grant"},
{src: "sky.png", id: "sky"},
{src: "ground.png", id: "ground"},
{src: "hill1.png", id: "hill"},
{src: "hill2.png", id: "hill2"}
];
loader = new createjs.LoadQueue(false);
loader.addEventListener("complete", handleComplete);
loader.loadManifest(manifest, true, "/app/assets/");
}
function handleComplete() {
sky = new createjs.Shape();
sky.graphics.beginBitmapFill(loader.getResult("sky")).drawRect(0, 0, w, h);
var groundImg = loader.getResult("ground");
ground = new createjs.Shape();
ground.graphics.beginBitmapFill(groundImg).drawRect(0, 0, w groundImg.width, groundImg.height);
ground.tileW = groundImg.width;
ground.y = h - groundImg.height;
hill = new createjs.Bitmap(loader.getResult("hill"));
hill.setTransform(Math.random() * w, h - hill.image.height * 4 - groundImg.height, 4, 4);
hill.alpha = 0.5;
hill2 = new createjs.Bitmap(loader.getResult("hill2"));
hill2.setTransform(Math.random() * w, h - hill2.image.height * 3 - groundImg.height, 3, 3);
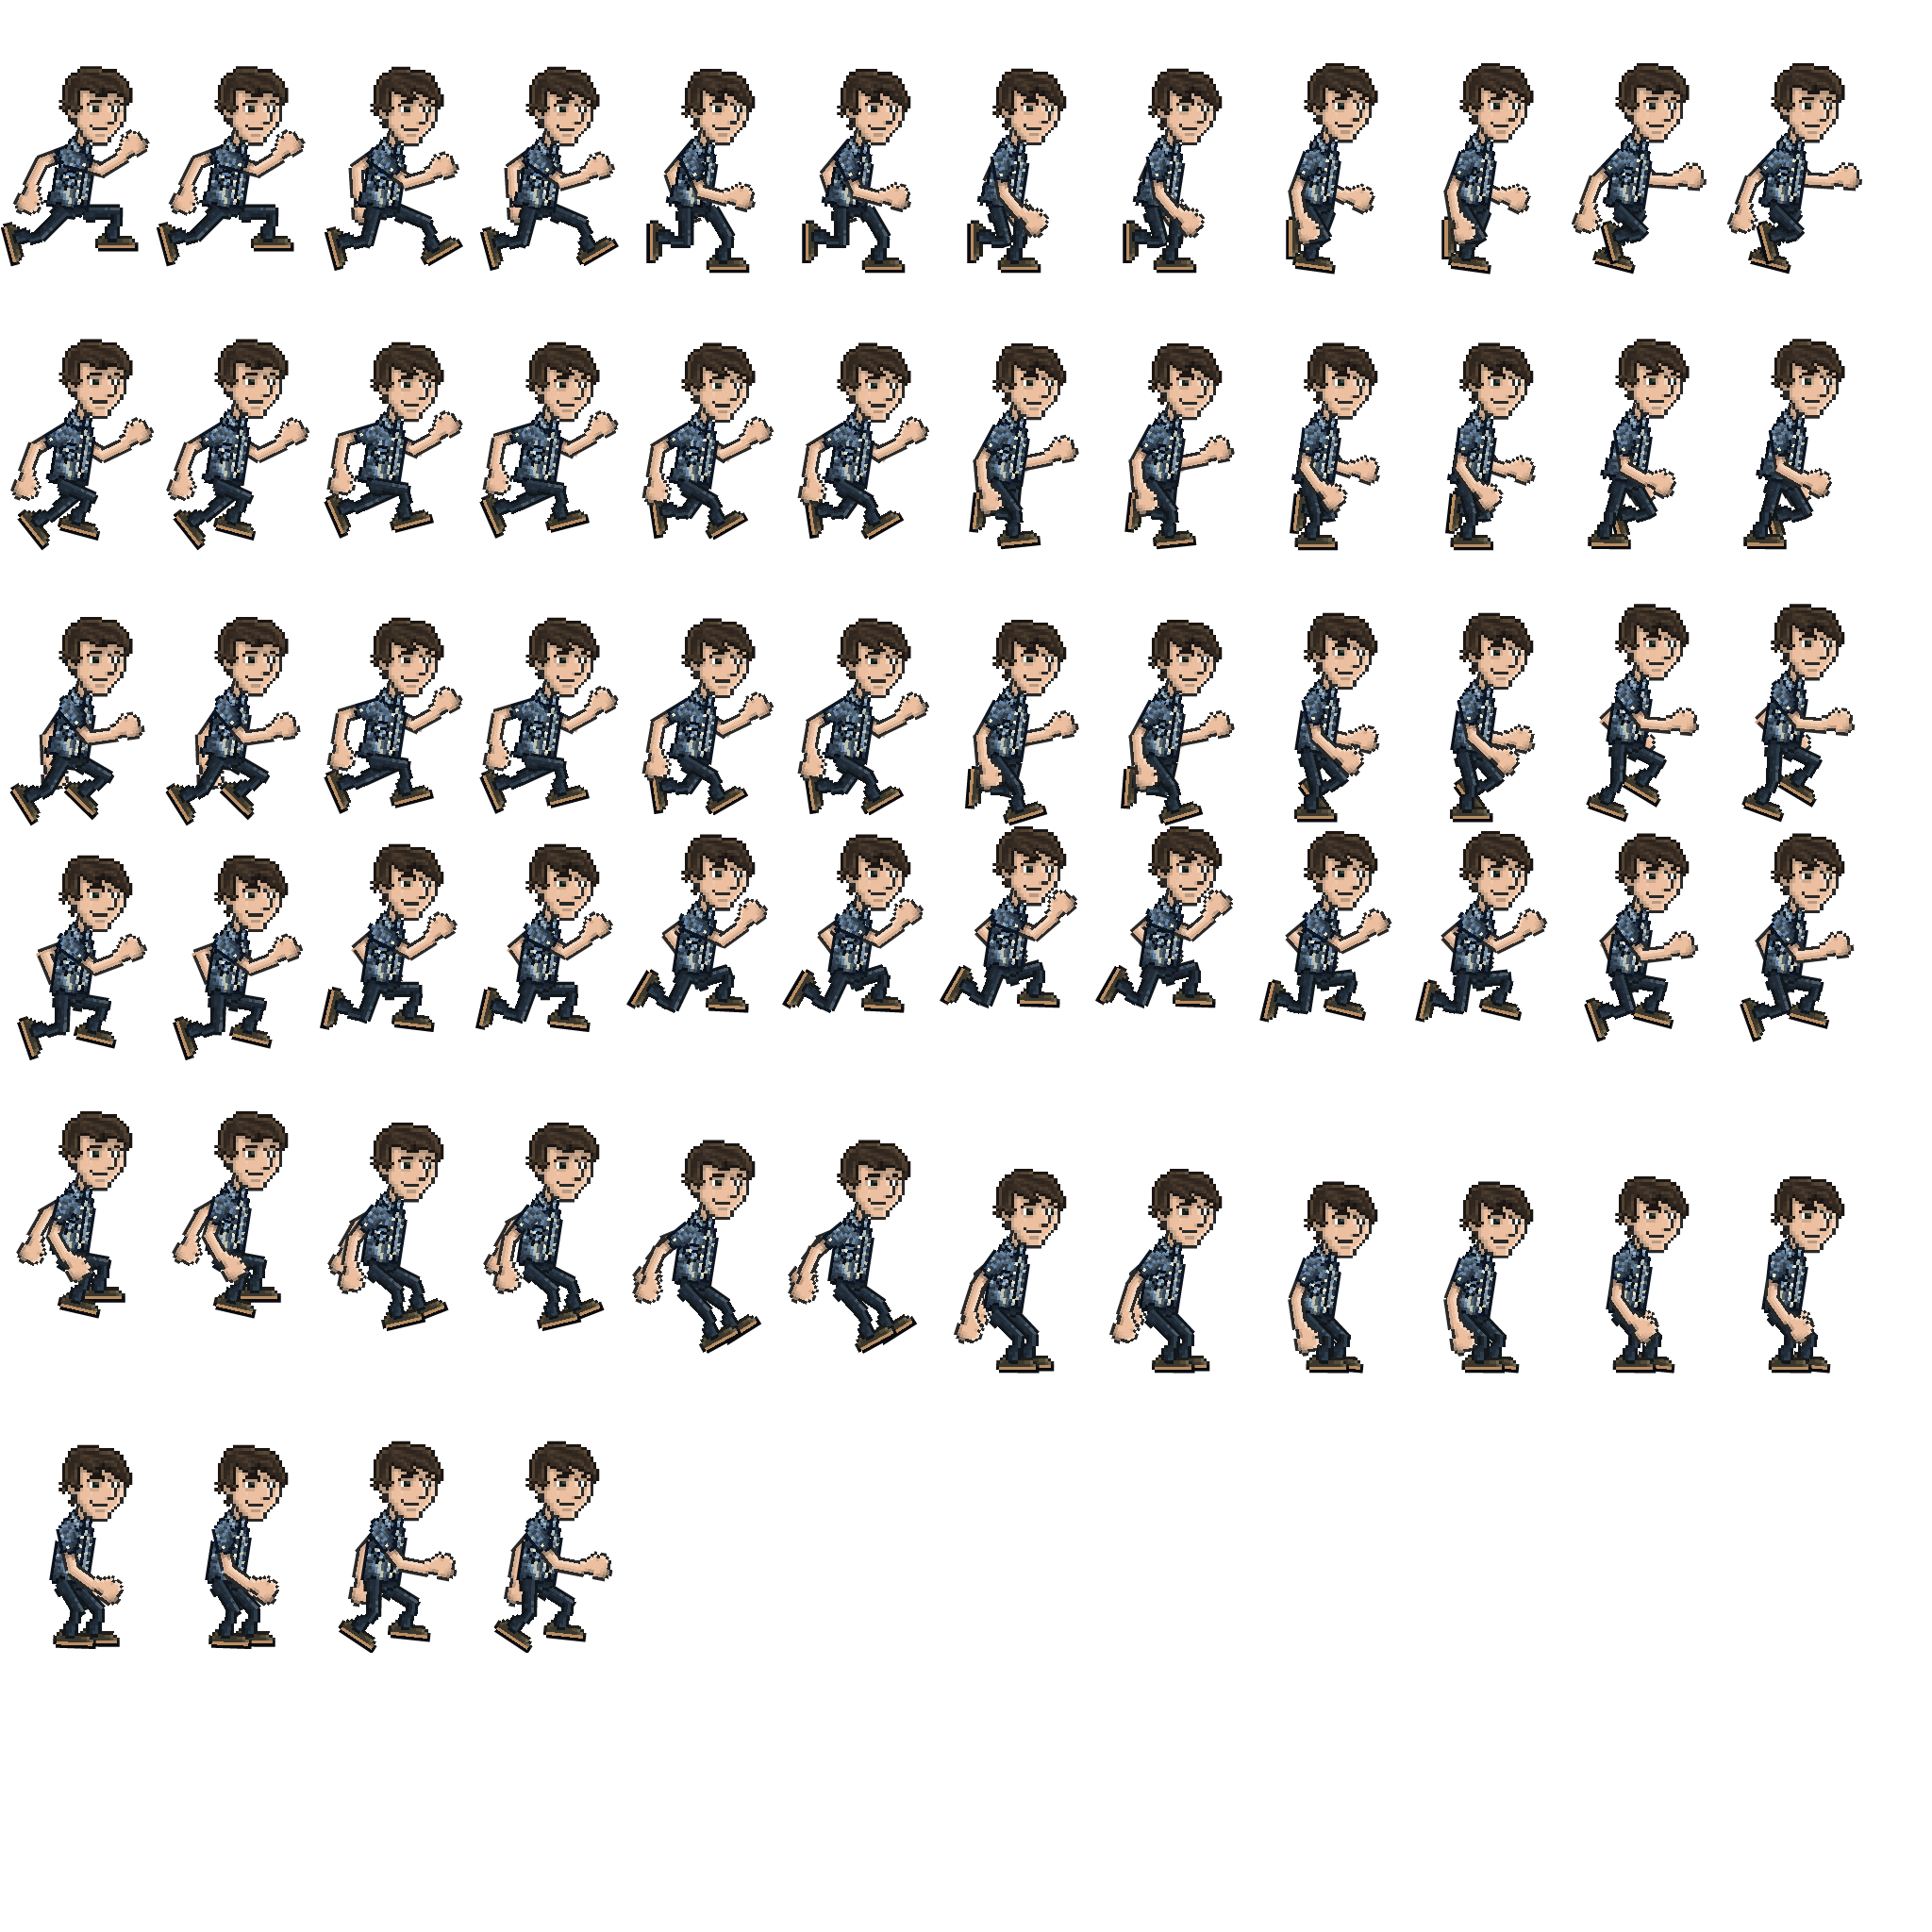
var spriteSheet = new createjs.SpriteSheet({
framerate: 30,
"images": [loader.getResult("grant")],
"frames": {"regX": 82, "height": 292, "count": 64, "regY": 0, "width": 165},
// define two animations, run (loops, 1.5x speed) and jump (returns to run):
"animations": {
"run": [0, 25, "run", 1.5],
"jump": [26, 63, "run"]
}
});
grant = new createjs.Sprite(spriteSheet, "run");
grant.y = 35;
scope.stage.addChild(sky, hill, hill2, ground, grant);
scope.stage.addEventListener("stagemousedown", handleJumpStart);
createjs.Ticker.timingMode = createjs.Ticker.RAF;
createjs.Ticker.addEventListener("tick", tick);
}
function handleJumpStart() {
grant.gotoAndPlay("jump");
}
function tick(event) {
var deltaS = event.delta / 1000;
var position = grant.x 150 * deltaS;
var grantW = grant.getBounds().width * grant.scaleX;
grant.x = (position >= w grantW) ? -grantW : position;
ground.x = (ground.x - deltaS * 150) % ground.tileW;
hill.x = (hill.x - deltaS * 30);
if (hill.x hill.image.width * hill.scaleX <= 0) {
hill.x = w;
}
hill2.x = (hill2.x - deltaS * 45);
if (hill2.x hill2.image.width * hill2.scaleX <= 0) {
hill2.x = w;
}
scope.stage.update(event);
}
}
}
});
Once your directive is created, add a dependency to the app by updating /app/app.js as below:
'use strict';
// Declare app level module which depends on views, and components
angular.module('myApp',[
    'ngRoute',
    'myApp.view1',
    'myApp.version',
    'myApp.services',
    'myApp.uiClasses',
    'myApp.directives'])
    .config(['$routeProvider', function($routeProvider) {
           $routeProvider.otherwise({redirectTo: '/view1'});
   }]);
Include the directive code in index.html by adding a reference to spriteSheetRunner.js.
<script src="view1/directives/spriteSheetRunner.js"></script>
We are almost ready! Copy the game assets to your app folder. I’ve prepared the images, so feel free to download them and save in your app/assets folder.
- app/assets/spritesheet_grant.png
- app/assets/ground.png
- app/assets/hill1.png
- app/assets/hill2.png
- app/assets/sky.png
As a final step, add our newly created directive to the page. To do so change your app/view/view1.html file, and make it a one-liner:
<sprite-sheet-runner></sprite-sheet-runner>
Start your application and you will get your runner in motion :)

If this is your first AngularJS or first CreateJS application, celebrate, you just made something really cool!
Preloading Assets in a Service
Services in AngularJS are singletons used primarily to share the code and the data. We will use a service to share the ‘game assets’ across the application. To learn more about AngularJS services check the AngularJS documentation.
AngularJS development services provide an effective mechanism for loading and managing all assets in one place. Asset changes are propagated to each individual instance of a service, making our code much easier to maintain.
Create new JS file named loaderSvc.js in your /app/view1/services folder.
//app/view1/services/loaderSvc.js
myServices.service('loaderSvc', function () {
   var manifest = [
       {src: "spritesheet_grant.png", id: "grant"},
       {src: "sky.png", id: "sky"},
       {src: "ground.png", id: "ground"},
       {src: "hill1.png", id: "hill"},
       {src: "hill2.png", id: "hill2"}
   ],
   loader = new createjs.LoadQueue(true);

   this.getResult = function (asset) {
       return loader.getResult(asset);
   };
   this.getLoader = function () {
       return loader;
   };
   this.loadAssets = function () {
       loader.loadManifest(manifest, true, "/app/assets/");
   };
});
AngularJS requires us to register any service we are using. To do so, update your app.js file to include reference to myApp.services.
'use strict';
// Declare app level module which depends on views, and components

angular.module('myApp',[
    'ngRoute',
    'myApp.view1',
    'myApp.version',
    'myApp.services',
    'myApp.directives'])
    .config(['$routeProvider', function($routeProvider) {
        $routeProvider.otherwise({redirectTo: '/view1'});
    }]);

    var myServices = angular.module('myApp.services', []);
Update your directive code, in app/view1/directives/spriteSheetRunner.js file, to remove the preloading code and use the service instead.
angular.module('myApp.directives', [])
.directive('spriteSheetRunner', ['loaderSvc', function (loaderSvc) {
       "use strict";
       return {
           restrict : 'EAC',
           replace : true,
           scope :{
           },
           template: "<canvas width='960' height='400'></canvas>",
           link: function (scope, element, attribute) {
               var w, h, manifest, sky, grant, ground, hill, hill2;
               drawGame();
               function drawGame() {
                   //drawing the game canvas from scratch here
                   //In future we can pass stages as param and load indexes from arrays of background elements etc
                   if (scope.stage) {
                       scope.stage.autoClear = true;
                       scope.stage.removeAllChildren();
                       scope.stage.update();
                   } else {
                       scope.stage = new createjs.Stage(element[0]);
                   }
                   w = scope.stage.canvas.width;
                   h = scope.stage.canvas.height;
                   loaderSvc.getLoader().addEventListener("complete", handleComplete);
                   loaderSvc.loadAssets();
               }
               function handleComplete() {
                   sky = new createjs.Shape();
                   sky.graphics.beginBitmapFill(loaderSvc.getResult("sky")).drawRect(0, 0, w, h);
                   var groundImg = loaderSvc.getResult("ground");
                   ground = new createjs.Shape();
                   ground.graphics.beginBitmapFill(groundImg).drawRect(0, 0, w + groundImg.width, groundImg.height);
                   ground.tileW = groundImg.width;
                   ground.y = h - groundImg.height;
                   hill = new createjs.Bitmap(loaderSvc.getResult("hill"));
                   hill.setTransform(Math.random() * w, h - hill.image.height * 4 - groundImg.height, 4, 4);
                   hill.alpha = 0.5;
                   hill2 = new createjs.Bitmap(loaderSvc.getResult("hill2"));
                   hill2.setTransform(Math.random() * w, h - hill2.image.height * 3 - groundImg.height, 3, 3);
                   var spriteSheet = new createjs.SpriteSheet({
                       framerate: 30,
                       "images": [loaderSvc.getResult("grant")],
                       "frames": {"regX": 82, "height": 292, "count": 64, "regY": 0, "width": 165},
                       // define two animations, run (loops, 1.5x speed) and jump (returns to run):
                       "animations": {
                           "run": [0, 25, "run", 1.5],
                           "jump": [26, 63, "run"]
                       }
                   });
                   grant = new createjs.Sprite(spriteSheet, "run");
                   grant.y = 35;
                   scope.stage.addChild(sky, hill, hill2, ground, grant);
                   scope.stage.addEventListener("stagemousedown", handleJumpStart);
                   createjs.Ticker.timingMode = createjs.Ticker.RAF;
                   createjs.Ticker.addEventListener("tick", tick);
               }
               function handleJumpStart() {
                   grant.gotoAndPlay("jump");
               }
               function tick(event) {
                   var deltaS = event.delta / 1000;
                   var position = grant.x + 150 * deltaS;
                   var grantW = grant.getBounds().width * grant.scaleX;
                   grant.x = (position >= w + grantW) ? -grantW : position;
                   ground.x = (ground.x - deltaS * 150) % ground.tileW;
                   hill.x = (hill.x - deltaS * 30);
                   if (hill.x + hill.image.width * hill.scaleX <= 0) {
                       hill.x = w;
                   }
                   hill2.x = (hill2.x - deltaS * 45);
                   if (hill2.x + hill2.image.width * hill2.scaleX <= 0) {
                       hill2.x = w;
                   }
                   scope.stage.update(event);
               }
           }
       }
   }]);
Creating UI Elements Factory
Re-using and repeating sprites in game development is very important. In order to enable instantiation of UI classes (which are sprites in our case) we will use AngularJS Factories.
Factory is registered in the application just like any other AngularJS module. To create uiClasses factory, modify your app.js file to look like this:
'use strict';
// Declare app level module which depends on views, and components
angular.module('myApp',[
 'ngRoute',
 'myApp.view1',
 'myApp.version',
 'myApp.services',
 'myApp.uiClasses',
 'myApp.directives'])
 .config(['$routeProvider', function($routeProvider) {
     $routeProvider.otherwise({redirectTo: '/view1'});
  }]);

var uiClasses = angular.module('myApp.uiClasses', []);
var myServices = angular.module('myApp.services', []);
Let’s use the new factory to create sky, hill, ground, and our runner. To do so, create JavaScript files as listed below.
- app/view1/uiClasses/sky.js
uiClasses.factory("Sky", [
 'loaderSvc',
 function (loaderSvc) {
     function Sky(obj) {
         this.sky = new createjs.Shape();
         this.sky.graphics.beginBitmapFill(loaderSvc.getResult("sky")).drawRect(0, 0, obj.width, obj.height);
     }

     Sky.prototype = {
          addToStage: function (stage) {
                stage.addChild(this.sky);
          },
          removeFromStage: function (stage) {
              stage.removeChild(this.sky);
          }
     };

     return (Sky);
}]);
- app/view1/uiClasses/hill.js
uiClasses.factory("Hill", [
 'loaderSvc',
 function (loaderSvc) {
    function Hill(obj) {
       this.hill = new createjs.Bitmap(loaderSvc.getResult(obj.assetName));
       this.hill.setTransform(Math.random() * obj.width,                              obj.height - this.hill.image.height * obj.scaleFactor - obj.groundHeight,
                              obj.scaleFactor, obj.scaleFactor);
    }
    Hill.prototype = {
       addToStage: function (stage) {
           stage.addChild(this.hill);
       },
       removeFromStage: function (stage) {
           stage.removeChild(this.hill);
       },
       setAlpha: function (val) {
           this.hill.alpha = val;
       },
       getImageWidth: function () {
           return this.hill.image.width;
       },
       getScaleX: function () {
           return this.hill.scaleX;
       },
       getX: function () {
           return this.hill.x;
       },
       getY: function () {
           return this.hill.y;
       },
       setX: function (val) {
           this.hill.x = val;
       },
       move: function (x, y) {
           this.hill.x = this.hill.x + x;
           this.hill.y = this.hill.y + y;

       }
   };
   return (Hill);
}]);
- app/view1/ground.js
uiClasses.factory("Ground", [
 'loaderSvc',
 function (loaderSvc) {
   function Ground(obj) {
       var groundImg = loaderSvc.getResult("ground");
       this.ground = new createjs.Shape();
       this.ground.graphics.beginBitmapFill(groundImg).drawRect(0, 0, obj.width + groundImg.width, groundImg.height);
       this.ground.tileW = groundImg.width;
       this.ground.y = obj.height - groundImg.height;
       this.height = groundImg.height;
   }
   Ground.prototype = {
       addToStage: function (stage) {
           stage.addChild(this.ground);
       },
       removeFromStage: function (stage) {
           stage.removeChild(this.ground);
       },
       getHeight: function () {
           return this.height;
       },
       getX: function () {
         return this.ground.x;
       },
       setX: function (val) {
         this.ground.x =  val;
       },
       getTileWidth: function () {
         return this.ground.tileW;
       },
       move: function (x, y) {
           this.ground.x = this.ground.x + x;
           this.ground.y = this.ground.y + y;
       }
   };
   return (Ground);

}]);
- app/view1/uiClasses/character.js
uiClasses.factory("Character", [
 'loaderSvc',
 function (loaderSvc) {
   function Character(obj) {
       var spriteSheet = new createjs.SpriteSheet({
           framerate: 30,
           "images": [loaderSvc.getResult(obj.characterAssetName)],
           "frames": {"regX": 82, "height": 292, "count": 64, "regY": 0, "width": 165},
           // define two animations, run (loops, 1.5x speed) and jump (returns to run):
           "animations": {
               "run": [0, 25, "run", 1.5],
               "jump": [26, 63, "run"]
           }
       });

       this.grant = new createjs.Sprite(spriteSheet, "run");
       this.grant.y = obj.y;
   }

   Character.prototype = {
       addToStage: function (stage) {
           stage.addChild(this.grant);
       },
       removeFromStage: function (stage) {
           stage.removeChild(this.grant);
       },
       getWidth: function () {
         return this.grant.getBounds().width * this.grant.scaleX;
       },
       getX: function () {
           return this.grant.x;
       },
       setX: function (val) {
           this.grant.x =  val;
       },
       playAnimation: function (animation) {
           this.grant.gotoAndPlay(animation);
       }
   };
   return (Character);
}]);
Do not forget to add all these new JS files in your index.html.
Now, we need to update the game directive.
myDirectives.directive('spriteSheetRunner', ['loaderSvc','Sky', 'Ground', 'Hill', 'Character', function (loaderSvc, Sky, Ground, Hill, Character) {
       "use strict";
       return {
           restrict : 'EAC',
           replace : true,
           scope :{
           },
           template: "<canvas width='960' height='400'></canvas>",
           link: function (scope, element, attribute) {
               var w, h, sky, grant, ground, hill, hill2;
               drawGame();
               function drawGame() {
                   //drawing the game canvas from scratch here
                   if (scope.stage) {
                       scope.stage.autoClear = true;
                       scope.stage.removeAllChildren();
                       scope.stage.update();
                   } else {
                       scope.stage = new createjs.Stage(element[0]);
                   }
                   w = scope.stage.canvas.width;
                   h = scope.stage.canvas.height;
                   loaderSvc.getLoader().addEventListener("complete", handleComplete);
                   loaderSvc.loadAssets();
               }
               function handleComplete() {
                   sky = new Sky({width:w, height:h});
                   sky.addToStage(scope.stage);
                   ground = new Ground({width:w, height:h});
                   hill = new Hill({width:w, height:h, scaleFactor: 4, assetName: 'hill', groundHeight: ground.getHeight()});
                   hill.setAlpha(0.5);
                   hill.addToStage(scope.stage);
                   hill2 = new Hill({width:w, height:h, scaleFactor: 3, assetName: 'hill2', groundHeight: ground.getHeight()});
                   hill2.addToStage(scope.stage);
                   ground.addToStage(scope.stage);
                   grant = new Character({characterAssetName: 'grant', y: 34})
                   grant.addToStage(scope.stage);
                   scope.stage.addEventListener("stagemousedown", handleJumpStart);
                   createjs.Ticker.timingMode = createjs.Ticker.RAF;
                   createjs.Ticker.addEventListener("tick", tick);
               }

               function handleJumpStart() {
                   grant.playAnimation("jump");
               }

               function tick(event) {
                   var deltaS = event.delta / 1000;
                   var position = grant.getX() + 150 * deltaS;
                   grant.setX((position >= w + grant.getWidth()) ? -grant.getWidth() : position);
                   ground.setX((ground.getX() - deltaS * 150) % ground.getTileWidth());
                   hill.move(deltaS * -30, 0);
                   if (hill.getX() + hill.getImageWidth() * hill.getScaleX() <= 0) {
                       hill.setX(w);
                   }
                   hill2.move(deltaS * -45, 0);
                   if (hill2.getX() + hill2.getImageWidth() * hill2.getScaleX() <= 0) {
                       hill2.setX(w);
                   }
                   scope.stage.update(event);
               }
           }
       }
   }]);
Note that moving uiClasses out of the directive reduced the directive size by 20%, from 91 to 65 lines.
In addition, we can independently write tests for each factory class to simplify its maintenance.
Note: Testing is a topic that is not covered in this post but here is a good place to start.
Arrow Keys Interaction
At this point in our HTML5 Canvas game tutorial, mouse click or tap on a mobile will make our guy jump, and we cannot stop him. Let’s add arrow key controls:
- Left arrow (pause the game)
- Up arrow (jump)
- Right arrow (start running)
To do that, create the keyDown function and add an event listener as last line of handleComplete() function.
function keydown(event) {
   if (event.keyCode === 38) {//if keyCode is "Up"
       handleJumpStart();
   }
   if (event.keyCode === 39) {//if keyCode is "Right"
       if (scope.status === "paused") {
           createjs.Ticker.addEventListener("tick", tick);
           scope.status = "running";
       }
   }
   if (event.keyCode === 37) {//if keyCode is "Left"
       createjs.Ticker.removeEventListener("tick", tick);
       scope.status = "paused";
   }
}
window.onkeydown = keydown;
Try running your game again and check the keyboard controls.
Let the Music Play
Games are not fun without music, so let’s play some music.
We will first need to add MP3 files to our app/assets folder. You can download them from the URLs provided below.
Now, we need to preload these sound files using our loader service. We will use loadQueue of PreloaderJS library. Update your app/view1/services/loaderSvc.js to preload these files.
myServices.service('loaderSvc', function () {
       var manifest = [
           {src: "spritesheet_grant.png", id: "grant"},
           {src: "sky.png", id: "sky"},

           {src: "ground.png", id: "ground"},
           {src: "hill1.png", id: "hill"},
           {src: "hill2.png", id: "hill2"},
           {src: "runningTrack.mp3", id: "runningSound"},
           {src: "jump.mp3", id: "jumpingSound"}
       ],
       loader = new createjs.LoadQueue(true);

       // need this so it doesn't default to Web Audio
       createjs.Sound.registerPlugins([createjs.HTMLAudioPlugin]);

       loader.installPlugin(createjs.Sound);
       this.getResult = function (asset) {
               return loader.getResult(asset);
           };
       this.getLoader = function () {
               return loader;
           };
       this.loadAssets = function () {
               loader.loadManifest(manifest, true, "/app/assets/");
           };
});
Modify your game directive to play sounds on game events.
myDirectives.directive('spriteSheetRunner', [
 'loaderSvc',
 'Sky',
 'Ground',
 'Hill',
 'Character',
 function (loaderSvc, Sky, Ground, Hill, Character) {
       "use strict";
       return {
           restrict : 'EAC',
           replace : true,
           scope :{
           },
           template: "<canvas width='960' height='400'></canvas>",
           link: function (scope, element, attribute) {
               var w, h, sky, grant, ground, hill, hill2, runningSoundInstance, status;               drawGame();
               function drawGame() {
                   //drawing the game canvas from scratch here
                   if (scope.stage) {
                       scope.stage.autoClear = true;
                       scope.stage.removeAllChildren();
                       scope.stage.update();
                   } else {
                       scope.stage = new createjs.Stage(element[0]);
                   }
                   w = scope.stage.canvas.width;
                   h = scope.stage.canvas.height;
                   loaderSvc.getLoader().addEventListener("complete", handleComplete);
                   loaderSvc.loadAssets();
               }
               function handleComplete() {
                   sky = new Sky({width:w, height:h});
                   sky.addToStage(scope.stage);
                   ground = new Ground({width:w, height:h});
                   hill = new Hill({width:w, height:h, scaleFactor: 4, assetName: 'hill', groundHeight: ground.getHeight()});
                   hill.setAlpha(0.5);
                   hill.addToStage(scope.stage);
                   hill2 = new Hill({width:w, height:h, scaleFactor: 3, assetName: 'hill2', groundHeight: ground.getHeight()});
                   hill2.addToStage(scope.stage);
                   ground.addToStage(scope.stage);
                   grant = new Character({characterAssetName: 'grant', y: 34});                   grant.addToStage(scope.stage);
                   scope.stage.addEventListener("stagemousedown", handleJumpStart);
                   createjs.Ticker.timingMode = createjs.Ticker.RAF;
                   createjs.Ticker.addEventListener("tick", tick);
                   // start playing the running sound looping indefinitely
                   runningSoundInstance = createjs.Sound.play("runningSound", {loop: -1});
                   scope.status = "running";
                   window.onkeydown = keydown;
               }
               function keydown(event) {
                   if (event.keyCode === 38) {//if keyCode is "Up"
                       handleJumpStart();
                   }
                   if (event.keyCode === 39) {//if keyCode is "Right"
                       if (scope.status === "paused") {
                           createjs.Ticker.addEventListener("tick", tick);
                           runningSoundInstance = createjs.Sound.play("runningSound", {loop: -1});
                           scope.status = "running";
                       }
                   }
                   if (event.keyCode === 37) {//if keyCode is "Left"
                       createjs.Ticker.removeEventListener("tick", tick);
                       createjs.Sound.stop();
                       scope.status = "paused";
                   }
               }
               function handleJumpStart() {
                   if (scope.status === "running") {
                       createjs.Sound.play("jumpingSound");
                       grant.playAnimation("jump");
                   }
               }
               function tick(event) {
                   var deltaS = event.delta / 1000;
                   var position = grant.getX() + 150 * deltaS;
                   grant.setX((position >= w + grant.getWidth()) ? -grant.getWidth() : position);
                   ground.setX((ground.getX() - deltaS * 150) % ground.getTileWidth());
                   hill.move(deltaS * -30, 0);
                   if (hill.getX() + hill.getImageWidth() * hill.getScaleX() <= 0) {
                       hill.setX(w);
                   }
                   hill2.move(deltaS * -45, 0);
                   if (hill2.getX() + hill2.getImageWidth() * hill2.getScaleX() <= 0) {
                       hill2.setX(w);
                   }

                   scope.stage.update(event);
               }
           }
       }
   }]);
Adding Score and Life Indicators
Let’s add the game score and life (heart) indicators to the HTML5 Canvas game. The score will be shown as a number in the upper left corner, and heart symbols, at the top right corner, will indicate life count.
We will use an external font library to render hearts, so add the following line to your index.html file header.
<link href="//maxcdn.bootstrapcdn.com/font-awesome/4.2.0/css/font-awesome.min.css" rel="stylesheet">
Standard AngularJS binding will provide real-time updates. Add the following code to your app/view1/view1.html file:
<sprite-sheet-runner score="score" lifes-count="lifesCount"></sprite-sheet-runner>
<span class="top-left"><h2>Score: {{score}}</h2></span>
<span class="top-right"><h2>Life:
<i ng-if="lifesCount > 0" class="fa fa-heart"></i>
<i ng-if="lifesCount < 1" class="fa fa-heart-o"></i>
<i ng-if="lifesCount > 1" class="fa fa-heart"></i>
<i ng-if="lifesCount < 2" class="fa fa-heart-o"></i>
<i ng-if="lifesCount > 2" class="fa fa-heart"></i>
<i ng-if="lifesCount < 3" class="fa fa-heart-o"></i>
</h2></span>
To properly position our indicators, we need to add CSS classes for top-left and top-right in app/app.css file.
.top-left {
 position: absolute;
 left: 30px;
 top: 10px;
}
.top-right {
 position: absolute;
 right: 100px;
 top: 10px;
 float: right;
}
Initialize the score and lifesCount variables in app/view1/view1.js controller.
'use strict';
angular.module('myApp.view1', ['ngRoute'])
.config(['$routeProvider', function($routeProvider) {
 $routeProvider.when('/view1', {
   templateUrl: 'view1/view1.html',
   controller: 'View1Ctrl' });
}])
.controller('View1Ctrl', ['$scope', function($scope) {
    $scope.score = 0;
    $scope.lifesCount = 3;
}]);
To make sure that indicators are properly updated, modify your main game directive to use the scope variables.
...
replace : true,
scope :{
   score: '=score',
   lifesCount: '=lifesCount'
},
template:
...
To test the scope binding, add these three lines at the end of handleComplete() method.
scope.score = 10;
scope.lifesCount = 2;
scope.$apply();
When you run the application you should see the score and life indicators.

Additional white space, on the right of the page, will continue to be present because we are still hardcoding the game’s width and height at this point in our HTML5 game programming tutorial.
Adapting the Game Width
AngularJS is packed with useful methods and services. One of them is $window, which provides an innerWidth property that we will use to calculate the position of our elements.
Modify your app/view1/view1.js to inject $window service.
'use strict';
angular.module('myApp.view1', ['ngRoute'])
.config(['$routeProvider', function($routeProvider) {
 $routeProvider.when('/view1', {
   templateUrl: 'view1/view1.html',
   controller: 'View1Ctrl'
});
}])
.controller('View1Ctrl', ['$scope', '$window', function($scope, $window) {
     $scope.windowWidth = $window.innerWidth;
     $scope.gameHeight = 400;
     $scope.score = 0;
     $scope.lifesCount = 3;
}]);
Extend the main game directive with width and height properties and that’s it!
<sprite-sheet-runner width="windowWidth" height="gameHeight" score="score" lifes-count="lifesCount">
</sprite-sheet-runner>
...
scope :{
   width: '=width',
   height: '=height',
   score: '=score',
   lifesCount: '=lifesCount'
},

...

drawGame();
element[0].width = scope.width;
element[0].height = scope.height;
w = scope.width;
h = scope.height;
function drawGame() {

...
Now you have the game adjusting itself to width of the browser window.
If you want to port this into a mobile app, I suggest reading my other mobile app development tutorial about using Ionic framework to create mobile apps. You should be able to create an ionic seed app, copy all the code from this project, and start playing the game on your mobile device in less than an hour.
The only thing I am not covering here is collision detection. To learn more about it, I read this article.
Wrap Up
I believe that through the course of this game development tutorial you realized that AngularJS and CreateJS are a winning duo for HTML5 based game development. You’ve got all the basics and I’m sure you recognized the benefits of combining these two platforms.
You can download the code for this article from GitHub, feel free to use, share, and make it your own.
Avinash Kaza
Leesburg, VA, United States
Member since November 6, 2013
About the author
Avinash is a senior developer with experience designing & developing data visualizations.
PREVIOUSLY AT