
WebAssembly/Rust Tutorial: Pitch-perfect Audio Processing
WebAssembly gives near-native performance to web apps and allows languages other than JavaScript—plus their libraries—to be used on the web. This tutorial leverages Rust and the Web Audio API to make a basic guitar tuner app that runs at 60 FPS, even on mobile.

WebAssembly gives near-native performance to web apps and allows languages other than JavaScript—plus their libraries—to be used on the web. This tutorial leverages Rust and the Web Audio API to make a basic guitar tuner app that runs at 60 FPS, even on mobile.

Peter is a full-stack developer with 15 years of experience building apps for the web and desktop.
Expertise
Supported by all modern browsers, WebAssembly (or “Wasm”) is transforming the way we develop user experiences for the web. It is a simple binary executable format that allows libraries or even whole programs that have been written in other programming languages to run in the web browser.
Developers often look for ways to be more productive, such as:
- Using a single app codebase for multiple target platforms, but having the app run well on all of them
- Creating a UX that is smooth and beautiful on desktop and mobile environments
- Taking advantage of the open-source library ecosystem to avoid “reinventing the wheel” during app development
For front-end developers, WebAssembly provides all three, answering the search for a web app UI that truly rivals the native mobile or desktop experience. It even allows the use of libraries written in non-JavaScript languages, such as C++ or Go!
In this Wasm/Rust tutorial, we will create a simple pitch-detector app, like a guitar tuner. It will use the built-in audio capabilities of the browser, and run at 60 frames per second (FPS)—even on mobile devices. You don’t need to understand the Web Audio API or even be familiar with Rust to follow along with this tutorial; however, comfort with JavaScript is expected.
Note: Unfortunately, as of this writing, the technique used in this article—specific to the Web Audio API—does not yet work in Firefox. Therefore, for the time being, Chrome, Chromium, or Edge are recommended for this tutorial, despite the otherwise excellent Wasm and Web Audio API support in Firefox.
What This WebAssembly/Rust Tutorial Covers
- Creating a simple function in Rust and calling it from JavaScript (via WebAssembly)
- Using the modern
AudioWorkletAPI of the browser for high-performance audio processing in the browser - Communicating between workers in JavaScript
- Tying it all together into a bare-bones React application
Note: If you’re more interested in the “how” than the “why” of this article, feel free to jump straight into the tutorial.
Why Wasm?
There are several reasons why it might make sense to use WebAssembly:
- It allows executing code inside the browser that was written in conceivably any language.
- This includes making use of existing libraries (numerical, audio processing, machine learning, etc.) that are written in languages other than JavaScript.
- Depending on the choice of language used, Wasm is able to operate at near-native speeds. This has the potential to bring web application performance characteristics much closer to native experiences for both mobile and desktop.
Why Not Always Use Wasm?
The popularity of WebAssembly will surely continue to grow; however, it’s not suitable for all web development:
- For simple projects, sticking with JavaScript, HTML, and CSS will likely deliver a working product in a shorter time.
- Older browsers such as Internet Explorer do not support Wasm directly.
- Typical uses of WebAssembly require adding tools, such as a language compiler, into your toolchain. If your team prioritizes keeping development and continuous integration tooling as simple as possible, using Wasm will run counter to this.
Why a Wasm/Rust Tutorial, Specifically?
While many programming languages compile to Wasm, I chose Rust for this example. Rust was created by Mozilla in 2010 and is growing in popularity. Rust occupies the top spot for “most-loved language” in the 2020 developer survey from Stack Overflow. But the reasons to use Rust with WebAssembly go beyond mere trendiness:
- First and foremost, Rust has a small runtime which means less code is sent to the browser when a user accesses the site, helping keep the website footprint low.
- Rust has excellent Wasm support, supporting high-level interoperability with JavaScript.
- Rust provides near C/C++-level performance, yet has a very safe memory model. When compared to other languages, Rust performs extra safety checks while compiling your code, vastly reducing the potential for crashes caused by empty or uninitialized variables. This can lead to simpler error handling and a higher chance of maintaining a good UX when unanticipated issues occur.
- Rust is not garbage-collected. This means that Rust code is fully in control of when memory is allocated and cleaned up, allowing consistent performance—a key requirement in real-time systems.
The many benefits of Rust also come with a steep learning curve, so choosing the right programming language depends on a variety of factors, such as the makeup of the team that will be developing and maintaining the code.
WebAssembly Performance: Maintaining Silky-smooth Web Apps
Since we’re programming in WebAssembly with Rust, how might we use Rust to gain the performance benefits that led us to Wasm in the first place? For an application with a rapidly updating GUI to feel “smooth” to users, it must be able to refresh the display as regularly as the screen hardware. This is typically 60 FPS so our application must be able to redraw its user interface within ~16.7 ms (1,000 ms / 60 FPS).
Our application detects and shows the current pitch in real time, which means the combined detection computation and drawing would have to stay within 16.7 ms per frame. In the next section, we’ll take advantage of browser support for analyzing audio on another thread while the main thread does its work. This is a major win for performance, since computation and drawing then each have 16.7 ms at their disposal.
Web Audio Basics
In this application, we’ll use a high-performance WebAssembly audio module to perform the pitch detection. Further, we’ll ensure the computation doesn’t run on the main thread.
Why can’t we keep things simple and perform pitch detection on the main thread?
- Audio processing is often computation-intensive. This is due to the large number of samples that need to be processed every second. For example, detecting audio pitch reliably requires analyzing the spectra of 44,100 samples each second.
- The JIT compilation and garbage collection of JavaScript happen on the main thread, and we want to avoid this in the audio-processing code for consistent performance.
- If the time taken to process a frame of audio were to eat significantly into the 16.7 ms frame budget, the UX would suffer from choppy animation.
- We want our app to run smoothly even on lower-performance mobile devices!
Web Audio worklets allow apps to continue achieving a smooth 60 FPS because audio processing cannot hold up the main thread. If the audio processing is too slow and falls behind, there will be other effects, such as lagging audio. However, the UX will remain responsive to the user.
WebAssembly/Rust Tutorial: Getting Started
This tutorial assumes you have Node.js installed, as well as npx. If you don’t have npx already, you can use npm (which comes with Node.js) to install it:
npm install -g npx
Create a Web App
For this Wasm/Rust tutorial, we’ll use React.
In a terminal, we’ll run the following commands:
npx create-react-app wasm-audio-app
cd wasm-audio-app
This uses npx to execute the create-react-app command (contained in the corresponding package maintained by Facebook) to create a fresh React application in the directory wasm-audio-app.
create-react-app is a CLI for generating React-based single-page applications (SPAs). It makes it incredibly easy to start a new project with React. However, the output project includes boilerplate code that will need to be replaced.
First, although I highly recommend unit testing your application throughout development, testing is beyond the scope of this tutorial. So we’ll go ahead and delete src/App.test.js and src/setupTests.js.
Application Overview
There will be five main JavaScript components in our application:
-
public/wasm-audio/wasm-audio.jscontains JavaScript bindings to the Wasm module providing the pitch-detection algorithm. -
public/PitchProcessor.jsis where the audio processing happens. It runs in the Web Audio rendering thread and will consume the Wasm API. -
src/PitchNode.jscontains an implementation of a Web Audio node, which is connected to the Web Audio graph and runs in the main thread. -
src/setupAudio.jsuses web browser APIs to access an available audio recording device. -
src/App.jsandsrc/App.csscomprise the application user interface.
Let’s delve straight to the heart of our application and define the Rust code for our Wasm module. We’ll then code the various parts of our Web Audio-related JavaScript and end with the UI.
1. Pitch Detection Using Rust and WebAssembly
Our Rust code will calculate a musical pitch from an array of audio samples.
Get Rust
You can follow these instructions to build the Rust chain for development.
Install Tools for Building WebAssembly Components in Rust
wasm-pack allows you to build, test, and publish Rust-generated WebAssembly components. If you haven’t already, install wasm-pack.
cargo-generate helps to get a new Rust project up-and-running by leveraging a preexisting Git repository as a template. We’ll use this to bootstrap a simple audio analyzer in Rust that can be accessed using WebAssembly from the browser.
Using the cargo tool that came with the Rust chain, you can install cargo-generate:
cargo install cargo-generate
Once installation (which may take several minutes) is complete, we are ready to create our Rust project.
Create Our WebAssembly Module
From the root folder of our app, we’ll clone the project template:
$ cargo generate --git https://github.com/rustwasm/wasm-pack-template
When prompted for a new project name, we’ll enter wasm-audio.
In the wasm-audio directory, there will now be a Cargo.toml file with the following contents:
[package]
name = "wasm-audio"
version = "0.1.0"
authors = ["Your Name <you@example.com"]
edition = "2018"

[lib]
crate-type = ["cdylib", "rlib"]

[features]
default = ["console_error_panic_hook"]

[dependencies]
wasm-bindgen = "0.2.63"

...
Cargo.toml is used to define a Rust package (which Rust calls a “crate”), serving a similar function for Rust apps that package.json does for JavaScript applications.
The [package] section defines metadata that is used when publishing the package to the official package registry of Rust.
The [lib] section describes the output format from the Rust compilation process. Here, “cdylib” tells Rust to produce a “dynamic system library” that can be loaded from another language (in our case, JavaScript) and including “rlib” tells Rust to add a static library containing metadata about the produced library. This second specifier is not necessary for our purposes - it assists with development of further Rust modules that consume this crate as a dependency - but is safe to leave in.
In [features], we ask Rust to include an optional feature console_error_panic_hook to provide functionality that converts the unhandled-errors mechanism of Rust (called a panic) to console errors that show up in the dev tools for debugging.
Finally, [dependencies] lists all crates that this one depends on. The only dependency supplied out of the box is wasm-bindgen, which provides automatic generation of JavaScript bindings to our Wasm module.
Implement a Pitch Detector in Rust
The purpose of this app is to be able to detect a musician’s voice or the pitch of an instrument in real time. To ensure this executes as quickly as possible, a WebAssembly module is tasked with calculating the pitch. For single-voice pitch detection, we’ll use the “McLeod” pitch method that is implemented in the existing Rust pitch-detection library.
Much like the Node.js package manager (npm), Rust includes a package manager of its own, called Cargo. This allows easily installing packages that have been published to the Rust crate registry.
To add the dependency, edit Cargo.toml, adding the line for pitch-detection to the dependencies section:
[dependencies]
wasm-bindgen = "0.2.63"
pitch-detection = "0.1"
This instructs Cargo to download and install the pitch-detection dependency during the next cargo build or, since we’re targeting WebAssembly, this will be performed in the next wasm-pack.
Create a JavaScript-callable Pitch Detector in Rust
First we’ll add a file defining a useful utility whose purpose we’ll discuss later:
Create wasm-audio/src/utils.rs and paste the contents of this file into it.
We’ll replace the generated code in wasm-audio/lib.rs with the following code, which performs pitch detection via a fast Fourier transform (FFT) algorithm:
use pitch_detection::{McLeodDetector, PitchDetector};
use wasm_bindgen::prelude::*;
mod utils;

#[wasm_bindgen]
pub struct WasmPitchDetector {
  sample_rate: usize,
  fft_size: usize,
  detector: McLeodDetector<f32>,
}

#[wasm_bindgen]
impl WasmPitchDetector {
  pub fn new(sample_rate: usize, fft_size: usize) -> WasmPitchDetector {
    utils::set_panic_hook();

    let fft_pad = fft_size / 2;

    WasmPitchDetector {
      sample_rate,
      fft_size,
      detector: McLeodDetector::<f32>::new(fft_size, fft_pad),
    }
  }

  pub fn detect_pitch(&mut self, audio_samples: Vec<f32>) -> f32 {
    if audio_samples.len() < self.fft_size {
      panic!("Insufficient samples passed to detect_pitch(). Expected an array containing {} elements but got {}", self.fft_size, audio_samples.len());
    }

    // Include only notes that exceed a power threshold which relates to the
    // amplitude of frequencies in the signal. Use the suggested default
    // value of 5.0 from the library.
    const POWER_THRESHOLD: f32 = 5.0;

    // The clarity measure describes how coherent the sound of a note is. For
    // example, the background sound in a crowded room would typically be would
    // have low clarity and a ringing tuning fork would have high clarity.
    // This threshold is used to accept detect notes that are clear enough
    // (valid values are in the range 0-1).
    const CLARITY_THRESHOLD: f32 = 0.6;

    let optional_pitch = self.detector.get_pitch(
      &audio_samples,
      self.sample_rate,
      POWER_THRESHOLD,
      CLARITY_THRESHOLD,
    );

    match optional_pitch {
      Some(pitch) => pitch.frequency,
      None => 0.0,
    }
  }
}
Let’s examine this in more detail:
#[wasm_bindgen]
wasm_bindgen is a Rust macro that helps implement the binding between JavaScript and Rust. When compiled to WebAssembly, this macro instructs the compiler to create a JavaScript binding to a class. The above Rust code will translate to JavaScript bindings that are simply thin wrappers for calls into and from the Wasm module. The light layer of abstraction combined with the direct shared memory between JavaScript is what helps Wasm deliver excellent performance.
#[wasm_bindgen]
pub struct WasmPitchDetector {
  sample_rate: usize,
  fft_size: usize,
  detector: McLeodDetector<f32>,
}

#[wasm_bindgen]
impl WasmPitchDetector {
...
}
Rust does not have a concept of classes. Rather, the data of an object is described by a struct and its behaviour through impls or traits.
Why expose the pitch-detection functionality via an object rather than a plain function? Because that way, we only initialize the data structures used by the internal McLeodDetector once, during the creation of the WasmPitchDetector. This keeps the detect_pitch function fast by avoiding expensive memory allocation during operation.
pub fn new(sample_rate: usize, fft_size: usize) -> WasmPitchDetector {
  utils::set_panic_hook();

  let fft_pad = fft_size / 2;

  WasmPitchDetector {
    sample_rate,
    fft_size,
    detector: McLeodDetector::<f32>::new(fft_size, fft_pad),
  }
}
When a Rust application encounters an error that it cannot easily recover from, it is quite common to invoke a panic! macro. This instructs Rust to report an error and terminate the application immediately. Making use of panics can be useful particularly for early development before an error-handling strategy is in place as it allows you to catch false assumptions quickly.
Calling utils::set_panic_hook() once during setup will ensure panic messages appear in the browser development tools.
Next, we define fft_pad, the amount of zero-padding applied to each analysis FFT. Padding, in combination with the windowing function used by the algorithm, helps “smooth” the results as the analysis moves across the incoming sampled audio data. Using a pad of half the FFT length works well for many instruments.
Finally, Rust returns the result of the last statement automatically, so the WasmPitchDetector struct statement is the return value of new().
The rest of our impl WasmPitchDetector Rust code defines the API for detecting pitches:
pub fn detect_pitch(&mut self, audio_samples: Vec<f32>) -> f32 {
  ...
}
This is what a member function definition looks like in Rust. A public member detect_pitch is added to WasmPitchDetector. Its first argument is a mutable reference (&mut) to an instantiated object of the same type containing struct and impl fields—but this is passed automatically when calling, as we’ll see below.
In addition, our member function takes an arbitrary-sized array of 32-bit floating point numbers and returns a single number. Here, that will be the resulting pitch calculated across those samples (in Hz).
if audio_samples.len() < self.fft_size {
  panic!("Insufficient samples passed to detect_pitch(). Expected an array containing {} elements but got {}", self.fft_size, audio_samples.len());
}
The above code detects whether sufficient samples were provided to the function for a valid pitch analysis to be performed. If not, the Rust panic! macro is called which results in immediate exit from Wasm and the error message printed to the browser dev-tools console.
let optional_pitch = self.detector.get_pitch(
  &audio_samples,
  self.sample_rate,
  POWER_THRESHOLD,
  CLARITY_THRESHOLD,
);
This calls into the third-party library to calculate the pitch from the latest audio samples. POWER_THRESHOLD and CLARITY_THRESHOLD can be adjusted to tune the sensitivity of the algorithm.
We end with an implied return of a floating point value via the match keyword, which works similarly to a switch statement in other languages. Some() and None let us handle cases appropriately without running into a null-pointer exception.
Building WebAssembly Applications
When developing Rust applications, the usual build procedure is to invoke a build using cargo build. However, we are generating a Wasm module, so we’ll make use of wasm-pack, which provides simpler syntax when targeting Wasm. (It also allows publishing the resulting JavaScript bindings to the npm registry, but that’s outside the scope of this tutorial.)
wasm-pack supports a variety of build targets. Because we will consume the module directly from an Web Audio worklet, we will target the web option. Other targets include building for a bundler such as webpack or for consumption from Node.js. We’ll run this from the wasm-audio/ subdirectory:
wasm-pack build --target web
If successful, an npm module is created under ./pkg.
This is a JavaScript module with its very own auto-generated package.json. This can be published to the npm registry if desired. To keep things simple for now, we can simply copy and paste this pkg under our folder public/wasm-audio:
cp -R ./wasm-audio/pkg ./public/wasm-audio
With that, we have created a Rust Wasm module ready to be consumed by the web app, or more specifically, by PitchProcessor.
2. Our PitchProcessor Class (Based on the Native AudioWorkletProcessor)
For this application we will use an audio-processing standard that has recently gained widespread browser compatibility. Specifically, we’ll use the Web Audio API and run expensive computation in a custom AudioWorkletProcessor. Afterwards we’ll create the corresponding custom AudioWorkletNode class (which we’ll call PitchNode) as a bridge back to the main thread.
Create a new file public/PitchProcessor.js and paste the following code into it:
import init, { WasmPitchDetector } from "./wasm-audio/wasm_audio.js";

class PitchProcessor extends AudioWorkletProcessor {
  constructor() {
    super();

    // Initialized to an array holding a buffer of samples for analysis later -
    // once we know how many samples need to be stored. Meanwhile, an empty
    // array is used, so that early calls to process() with empty channels
    // do not break initialization.
    this.samples = [];
    this.totalSamples = 0;

    // Listen to events from the PitchNode running on the main thread.
    this.port.onmessage = (event) => this.onmessage(event.data);

    this.detector = null;
  }

  onmessage(event) {
    if (event.type === "send-wasm-module") {
      // PitchNode has sent us a message containing the Wasm library to load into
      // our context as well as information about the audio device used for
      // recording.
      init(WebAssembly.compile(event.wasmBytes)).then(() => {
        this.port.postMessage({ type: 'wasm-module-loaded' });
      });
    } else if (event.type === 'init-detector') {
      const { sampleRate, numAudioSamplesPerAnalysis } = event;

      // Store this because we use it later to detect when we have enough recorded
      // audio samples for our first analysis.
      this.numAudioSamplesPerAnalysis = numAudioSamplesPerAnalysis;

      this.detector = WasmPitchDetector.new(sampleRate, numAudioSamplesPerAnalysis);

      // Holds a buffer of audio sample values that we'll send to the Wasm module
      // for analysis at regular intervals.
      this.samples = new Array(numAudioSamplesPerAnalysis).fill(0);
      this.totalSamples = 0;
    }
  };

  process(inputs, outputs) {
    // inputs contains incoming audio samples for further processing. outputs
    // contains the audio samples resulting from any processing performed by us.
    // Here, we are performing analysis only to detect pitches so do not modify
    // outputs.

    // inputs holds one or more "channels" of samples. For example, a microphone
    // that records "in stereo" would provide two channels. For this simple app,
    // we use assume either "mono" input or the "left" channel if microphone is
    // stereo.

    const inputChannels = inputs[0];

    // inputSamples holds an array of new samples to process.
    const inputSamples = inputChannels[0];

    // In the AudioWorklet spec, process() is called whenever exactly 128 new
    // audio samples have arrived. We simplify the logic for filling up the
    // buffer by making an assumption that the analysis size is 128 samples or
    // larger and is a power of 2.
    if (this.totalSamples < this.numAudioSamplesPerAnalysis) {
      for (const sampleValue of inputSamples) {
        this.samples[this.totalSamples++] = sampleValue;
      }
    } else {
      // Buffer is already full. We do not want the buffer to grow continually,
      // so instead will "cycle" the samples through it so that it always
      // holds the latest ordered samples of length equal to
      // numAudioSamplesPerAnalysis.

      // Shift the existing samples left by the length of new samples (128).
      const numNewSamples = inputSamples.length;
      const numExistingSamples = this.samples.length - numNewSamples;
      for (let i = 0; i < numExistingSamples; i++) {
        this.samples[i] = this.samples[i + numNewSamples];
      }
      // Add the new samples onto the end, into the 128-wide slot vacated by
      // the previous copy.
      for (let i = 0; i < numNewSamples; i++) {
        this.samples[numExistingSamples + i] = inputSamples[i];
      }
      this.totalSamples += inputSamples.length;
    }

    // Once our buffer has enough samples, pass them to the Wasm pitch detector.
    if (this.totalSamples >= this.numAudioSamplesPerAnalysis && this.detector) {
      const result = this.detector.detect_pitch(this.samples);

      if (result !== 0) {
        this.port.postMessage({ type: "pitch", pitch: result });
      }
    }

    // Returning true tells the Audio system to keep going.
    return true;
  }
}

registerProcessor("PitchProcessor", PitchProcessor);
The PitchProcessor is a companion to the PitchNode but runs in a separate thread so that audio-processing computation can be performed without blocking work done on the main thread.
Mainly, the PitchProcessor:
- Handles the
"send-wasm-module"event sent fromPitchNodeby compiling and loading the Wasm module into the worklet. Once done, it letsPitchNodeknow by sending a"wasm-module-loaded"event. This callback approach is needed because all communication betweenPitchNodeandPitchProcessorcrosses a thread boundary and cannot be performed synchronously. - Also responds to the
"init-detector"event fromPitchNodeby configuring theWasmPitchDetector. - Processes audio samples received from the browser audio graph, delegates pitch-detection computation to the Wasm module, and then sends any detected pitch back to
PitchNode(which sends the pitch along to the React layer via itsonPitchDetectedCallback). -
Registers itself under a specific, unique name. This way the browser knows—via the base class of
PitchNode, the nativeAudioWorkletNode—how to instantiate ourPitchProcessorlater whenPitchNodeis constructed. SeesetupAudio.js.
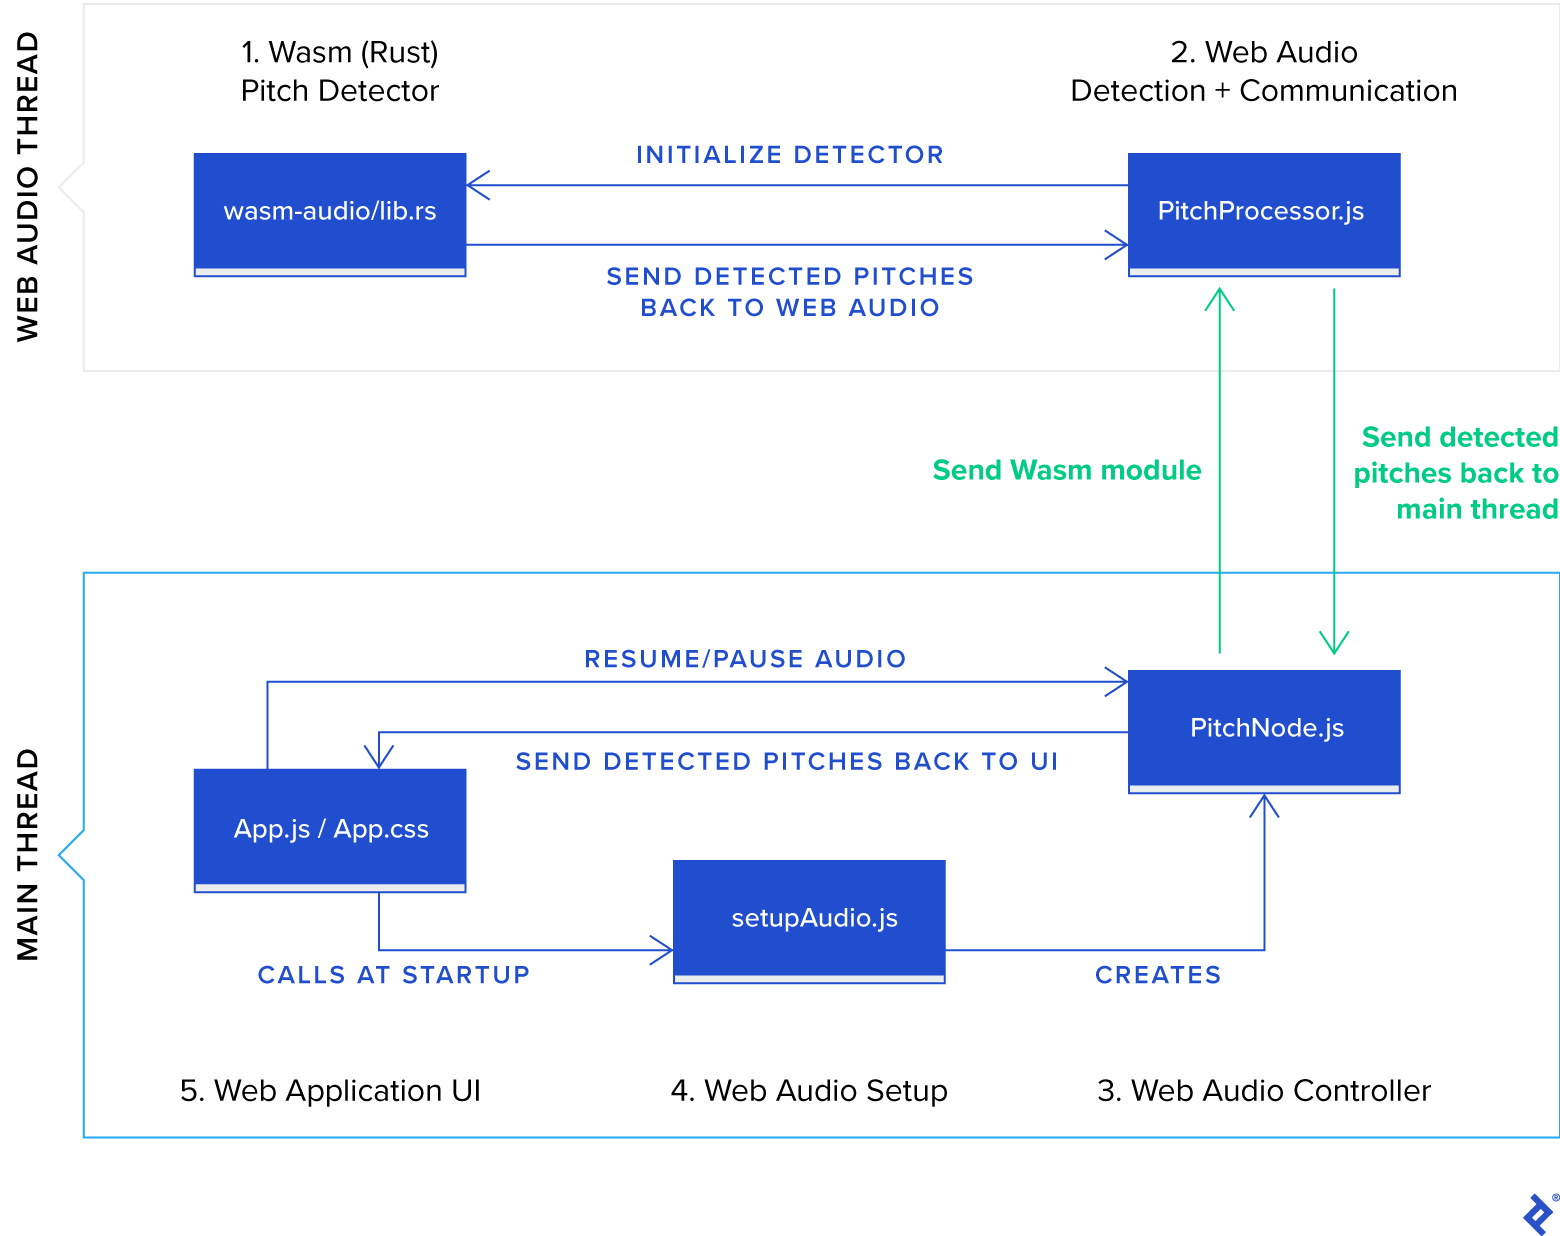
The following diagram visualizes the flow of events between the PitchNode and PitchProcessor:

3. Add Web Audio Worklet Code
PitchNode.js provides the interface to our custom pitch-detection audio processing. The PitchNode object is the mechanism whereby pitches detected using the WebAssembly module working in the AudioWorklet thread will make their way to the main thread and React for rendering.
In src/PitchNode.js, we’ll subclass the built-in AudioWorkletNode of the Web Audio API:
export default class PitchNode extends AudioWorkletNode {
  /**
   * Initialize the Audio processor by sending the fetched WebAssembly module to
   * the processor worklet.
   *
   * @param {ArrayBuffer} wasmBytes Sequence of bytes representing the entire
   * WASM module that will handle pitch detection.
   * @param {number} numAudioSamplesPerAnalysis Number of audio samples used
   * for each analysis. Must be a power of 2.
   */
  init(wasmBytes, onPitchDetectedCallback, numAudioSamplesPerAnalysis) {
    this.onPitchDetectedCallback = onPitchDetectedCallback;
    this.numAudioSamplesPerAnalysis = numAudioSamplesPerAnalysis;

    // Listen to messages sent from the audio processor.
    this.port.onmessage = (event) => this.onmessage(event.data);

    this.port.postMessage({
      type: "send-wasm-module",
      wasmBytes,
    });
  }

  // Handle an uncaught exception thrown in the PitchProcessor.
  onprocessorerror(err) {
    console.log(
      `An error from AudioWorkletProcessor.process() occurred: ${err}`
    );
  };

  onmessage(event) {
    if (event.type === 'wasm-module-loaded') {
      // The Wasm module was successfully sent to the PitchProcessor running on the
      // AudioWorklet thread and compiled. This is our cue to configure the pitch
      // detector.
      this.port.postMessage({
        type: "init-detector",
        sampleRate: this.context.sampleRate,
        numAudioSamplesPerAnalysis: this.numAudioSamplesPerAnalysis
      });
    } else if (event.type === "pitch") {
      // A pitch was detected. Invoke our callback which will result in the UI updating.
      this.onPitchDetectedCallback(event.pitch);
    }
  }
}
The key tasks performed by PitchNode are:
- Send the WebAssembly module as a sequence of raw bytes—those passed in from
setupAudio.js—to thePitchProcessor, which runs on theAudioWorkletthread. This is how thePitchProcessorloads the pitch-detection Wasm module. - Handle the event sent by
PitchProcessorwhen it successfully compiles the Wasm, and send it another event that passes pitch-detection configuration information to it. - Handle detected pitches as they arrive from the
PitchProcessorand forward them to the UI functionsetLatestPitch()viaonPitchDetectedCallback().
Note: This code of the object runs on the main thread, so it should avoid performing further processing on detected pitches in case this is expensive and causes frame rate drops.
4. Add Code to Set Up Web Audio
In order for the web application to access and process live input from the microphone of the client machine, it must:
- Gain the user’s permission for the browser to access any connected microphone
- Access the output of the microphone as an audio-stream object
- Attach code to process the incoming audio-stream samples and produce a sequence of detected pitches
In src/setupAudio.js, we’ll do that, and also load the Wasm module asynchronously so we can initialize our PitchNode with it, before attaching our PitchNode:
import PitchNode from "./PitchNode";

async function getWebAudioMediaStream() {
  if (!window.navigator.mediaDevices) {
    throw new Error(
      "This browser does not support web audio or it is not enabled."
    );
  }

  try {
    const result = await window.navigator.mediaDevices.getUserMedia({
      audio: true,
      video: false,
    });

    return result;
  } catch (e) {
    switch (e.name) {
      case "NotAllowedError":
        throw new Error(
          "A recording device was found but has been disallowed for this application. Enable the device in the browser settings."
        );

      case "NotFoundError":
        throw new Error(
          "No recording device was found. Please attach a microphone and click Retry."
        );

      default:
        throw e;
    }
  }
}

export async function setupAudio(onPitchDetectedCallback) {
  // Get the browser audio. Awaits user "allowing" it for the current tab.
  const mediaStream = await getWebAudioMediaStream();

  const context = new window.AudioContext();
  const audioSource = context.createMediaStreamSource(mediaStream);

  let node;

  try {
    // Fetch the WebAssembly module that performs pitch detection.
    const response = await window.fetch("wasm-audio/wasm_audio_bg.wasm");
    const wasmBytes = await response.arrayBuffer();

    // Add our audio processor worklet to the context.
    const processorUrl = "PitchProcessor.js";
    try {
      await context.audioWorklet.addModule(processorUrl);
    } catch (e) {
      throw new Error(
        `Failed to load audio analyzer worklet at url: ${processorUrl}. Further info: ${e.message}`
      );
    }

    // Create the AudioWorkletNode which enables the main JavaScript thread to
    // communicate with the audio processor (which runs in a Worklet).
    node = new PitchNode(context, "PitchProcessor");

    // numAudioSamplesPerAnalysis specifies the number of consecutive audio samples that
    // the pitch detection algorithm calculates for each unit of work. Larger values tend
    // to produce slightly more accurate results but are more expensive to compute and
    // can lead to notes being missed in faster passages i.e. where the music note is
    // changing rapidly. 1024 is usually a good balance between efficiency and accuracy
    // for music analysis.
    const numAudioSamplesPerAnalysis = 1024;

    // Send the Wasm module to the audio node which in turn passes it to the
    // processor running in the Worklet thread. Also, pass any configuration
    // parameters for the Wasm detection algorithm.
    node.init(wasmBytes, onPitchDetectedCallback, numAudioSamplesPerAnalysis);

    // Connect the audio source (microphone output) to our analysis node.
    audioSource.connect(node);

    // Connect our analysis node to the output. Required even though we do not
    // output any audio. Allows further downstream audio processing or output to
    // occur.
    node.connect(context.destination);
  } catch (err) {
    throw new Error(
      `Failed to load audio analyzer WASM module. Further info: ${err.message}`
    );
  }

  return { context, node };
}
This assumes a WebAssembly module is available to be loaded at public/wasm-audio, which we accomplished in the earlier Rust section.
5. Define the Application UI
Let’s define a basic user interface for the pitch detector. We’ll replace the contents of src/App.js with the following code:
import React from "react";
import "./App.css";
import { setupAudio } from "./setupAudio";

function PitchReadout({ running, latestPitch }) {
  return (
    <div className="Pitch-readout">
      {latestPitch
        ? `Latest pitch: ${latestPitch.toFixed(1)} Hz`
        : running
        ? "Listening..."
        : "Paused"}
    </div>
  );
}

function AudioRecorderControl() {
  // Ensure the latest state of the audio module is reflected in the UI
  // by defining some variables (and a setter function for updating them)
  // that are managed by React, passing their initial values to useState.

  // 1. audio is the object returned from the initial audio setup that
  //    will be used to start/stop the audio based on user input. While
  //    this is initialized once in our simple application, it is good
  //    practice to let React know about any state that _could_ change
  //    again.
  const [audio, setAudio] = React.useState(undefined);

  // 2. running holds whether the application is currently recording and
  //    processing audio and is used to provide button text (Start vs Stop).
  const [running, setRunning] = React.useState(false);

  // 3. latestPitch holds the latest detected pitch to be displayed in
  //    the UI.
  const [latestPitch, setLatestPitch] = React.useState(undefined);

  // Initial state. Initialize the web audio once a user gesture on the page
  // has been registered.
  if (!audio) {
    return (
      <button
        onClick={async () => {
          setAudio(await setupAudio(setLatestPitch));
          setRunning(true);
        }}
      >
        Start listening
      </button>
    );
  }

  // Audio already initialized. Suspend / resume based on its current state.
  const { context } = audio;
  return (
    <div>
      <button
        onClick={async () => {
          if (running) {
            await context.suspend();
            setRunning(context.state === "running");
          } else {
            await context.resume();
            setRunning(context.state === "running");
          }
        }}
        disabled={context.state !== "running" && context.state !== "suspended"}
      >
        {running ? "Pause" : "Resume"}
      </button>
      <PitchReadout running={running} latestPitch={latestPitch} />
    </div>
  );
}

function App() {
  return (
    <div className="App">
      <header className="App-header">
        Wasm Audio Tutorial
      </header>
      <div className="App-content">
        <AudioRecorderControl />
      </div>
    </div>
  );
}

export default App;
And we’ll replace App.css with some basic styles:
.App {
  display: flex;
  flex-direction: column;
  align-items: center;
  text-align: center;
  background-color: #282c34;
  min-height: 100vh;
  color: white;
  justify-content: center;
}

.App-header {
  font-size: 1.5rem;
  margin: 10%;
}

.App-content {
  margin-top: 15vh;
  height: 85vh;
}

.Pitch-readout {
  margin-top: 5vh;
  font-size: 3rem;
}

button {
  background-color: rgb(26, 115, 232);
  border: none;
  outline: none;
  color: white;
  margin: 1em;
  padding: 10px 14px;
  border-radius: 4px;
  width: 190px;
  text-transform: capitalize;
  cursor: pointer;
  font-size: 1.5rem;
}

button:hover {
  background-color: rgb(45, 125, 252);
}
With that, we should be ready to run our app—but there’s a pitfall to address first.
WebAssembly/Rust Tutorial: So Close!
Now when we run yarn and yarn start, switch to the browser, and attempt to record audio (using Chrome or Chromium, with developer tools open), we’re met with some errors:

The first error, TextDecoder is not defined, occurs when the browser attempts to execute the contents of wasm_audio.js. This in turn results in the failure to load the Wasm JavaScript wrapper, which produces the second error we see in the console.
The underlying cause of the issue is that modules produced by the Wasm package generator of Rust assume that TextDecoder (and TextEncoder) will be provided by the browser. This assumption holds for modern browsers when the Wasm module is being run from the main thread or even a worker thread. However, for worklets (such as the AudioWorklet context needed in this tutorial), TextDecoder and TextEncoder are not yet part of the spec and so are not available.
TextDecoder is needed by the Rust Wasm code generator to convert from the flat, packed, shared-memory representation of Rust to the string format that JavaScript uses. Put another way, in order to see strings produced by the Wasm code generator, TextEncoder and TextDecoder must be defined.
This issue is a symptom of the relative newness of WebAssembly. As browser support improves to support common WebAssembly patterns out of the box, these issues will likely disappear.
For now, we are able to work around it by defining a polyfill for TextDecoder.
Create a new file public/TextEncoder.js and import it from public/PitchProcessor.js:
import "./TextEncoder.js";
Make sure that this import statement comes before the wasm_audio import.
Finally, paste this implementation into TextEncoder.js (courtesy of @Yaffle on GitHub).
The Firefox Question
As mentioned earlier, the way we combine Wasm with Web Audio worklets in our app will not work in Firefox. Even with the above shim, clicking the “Start Listening” button will result in this:
Unhandled Rejection (Error): Failed to load audio analyzer WASM module. Further info: Failed to load audio analyzer worklet at url: PitchProcessor.js. Further info: The operation was aborted.
That’s because Firefox doesn’t yet support importing modules from AudioWorklets—for us, that’s PitchProcessor.js running in the AudioWorklet thread.
The Completed Application
Once done, we simply reload the page. The app should load without error. Click “Start Listening” and allow your browser to access your microphone. You’ll see a very basic pitch detector written in JavaScript using Wasm:

Programming in WebAssembly with Rust: A Real-time Web Audio Solution
In this tutorial, we have built a web application from scratch that performs computationally expensive audio processing using WebAssembly. WebAssembly allowed us to take advantage of near-native performance of Rust to perform the pitch detection. Further, this work could be performed on another thread, allowing the main JavaScript thread to focus on rendering to support silky-smooth frame rates even on mobile devices.
Wasm/Rust and Web Audio Takeaways
- Modern browsers provide performant audio (and video) capture and processing inside web apps.
- Rust has great tooling for Wasm, which helps recommend it as the language of choice for projects incorporating WebAssembly.
- Compute-intensive work can be performed efficiently in the browser using Wasm.
Despite the many WebAssembly advantages, there are a couple Wasm pitfalls to watch out for:
- Tooling for Wasm within worklets is still evolving. For example, we needed to implement our own versions of TextEncoder and TextDecoder functionality required for passing strings between JavaScript and Wasm because they were missing from the
AudioWorkletcontext. That, and importing Javascript bindings for our Wasm support from anAudioWorkletis not yet available in Firefox. - Although the application we developed was very simple, building the WebAssembly module and loading it from the
AudioWorkletrequired significant setup. Introducing Wasm to projects does introduce an increase in tooling complexity, which is important to keep in mind.
For your convenience, this GitHub repo contains the final, completed project. If you also do back-end development, you may also be interested in using Rust via WebAssembly within Node.js.
Further Reading on the Toptal Blog:
Understanding the basics
WebAssembly is a programming language—but not one that is intended to be directly written by humans. Rather, it is compiled from other, higher-level languages into a compact, binary bytecode form for efficient transport over the web and execution in today’s browsers.
WebAssembly allows software written in languages other than JavaScript to run seamlessly in the browser. This allows web developers to leverage the unique benefits of a particular language or reuse existing libraries by way of the convenience and ubiquity of the web.
WebAssembly programs are faster to transfer to the browser than JavaScript because they use a compact binary representation. High-performance languages like Rust also generally transpile into fast-running Wasm bytecode.
WebAssembly programs use a compact binary bytecode representation that makes it faster to transfer over the web than JavaScript. This bytecode is not intended to be written directly by humans and instead is generated when compiling code written in higher-level language such as C/C++ or Rust.
Rust has a robust memory model, good concurrency support, and a small runtime footprint, making it well-suited to systems-level software such as operating systems, device drivers, and embedded programs. It’s also a powerful WebAssembly option for web apps with demanding graphics or data-processing requirements.
Rust programs are fast because their code compiles to optimized machine-level instructions, and Rust does not use garbage collection, leaving programmers full control of how memory is used. This results in consistent and predictable performance.
Dunedin, Otago, New Zealand
Member since June 12, 2020
About the author
Peter is a full-stack developer with 15 years of experience building apps for the web and desktop.