
All Perks, No Hassle: An Angular 9 Tutorial
“Every year the internet breaks,” goes the saying, and developers usually have to go and fix it. Is this true when it comes to the long-awaited Angular version 9?

“Every year the internet breaks,” goes the saying, and developers usually have to go and fix it. Is this true when it comes to the long-awaited Angular version 9?

Joaquin is a full-stack and hybrid mobile app developer with 13+ years of experience working for companies like WebMD and Getty Images.
Expertise
Previously At

“Every year the internet breaks,” goes the saying, and developers usually have to go and fix it. With the long-awaited Angular version 9, Angular programmers might think this would apply, and that apps developed on earlier versions would need to go through a major migration process.
But that’s not the case! The Angular team completely redesigned its compiler, resulting in faster builds, faster test runs, smaller bundle sizes, and most importantly, backward compatibility with older versions. Angular developers will be happy to discover that with Angular 9 you get all the perks without any of the hassle.
In this Angular 9 tutorial, we’ll build an Angular application from scratch. We’ll use some of the latest Angular 9 features and go over other improvements along the way.
Angular 9 Tutorial: Starting with a New Angular Application
Let’s get started on our Angular project example. First, let’s install the latest version of Angular’s CLI:
npm install -g @angular/cli
We can verify the Angular CLI version by running ng version.
Next, let’s create an Angular application:
ng new ng9-app --create-application=false --strict
We are using two arguments in our ng new command:
-
--create-application=falsewill tell the CLI to only generate workspace files. This will help us better organize our code when we need to have more than one app and multiple libraries. -
--strictwill add stricter rules to enforce more TypeScript typing and code cleanliness.
As a result of this, we have a basic workspace folder and files.

Now, let’s add a new app. To do that, we will run:
ng generate application tv-show-rating
We’ll be prompted:
? Would you like to share anonymous usage data about this project with the Angular Team at
Google under Google's Privacy Policy at https://policies.google.com/privacy? For more
details and how to change this setting, see http://angular.io/analytics. No
? Would you like to add Angular routing? Yes
? Which stylesheet format would you like to use? SCSS
Now, if we run ng serve, we’ll see the app running with its initial scaffolding.

If we run ng build --prod, we can see the list of generated files.

We have two versions of each file. One is compatible with legacy browsers, and the other is compiled targeting ES2015, which uses newer APIs and requires fewer polyfills to run on browsers.
One big improvement of Angular 9 is bundle size. According to the Angular team, you can see a decrease of up to 40% for big apps.
For a newly created app, bundle size is pretty similar to that of Angular 8, but as your app grows, you’ll see the bundle size becoming smaller vs. previous versions.
Another feature introduced in Angular 9 is the ability to warn us if any of the component style CSS files is bigger than a defined threshold.

This will help us catch bad style imports or huge component style files.
Adding a Form to Rate TV Shows
Next, we’ll add a form to rate TV shows. For that, first, we’ll install bootstrap and ng-bootstrap:
npm install bootstrap @ng-bootstrap/ng-bootstrap
Another improvement on Angular 9 is i18n (internationalization). Previously, developers would need to run a full build for every locale in an app. Angular 9 instead lets us build an app once and generate all i18n files in a post-build process, significantly reducing build time. Since ng-bootstrap has a dependency on i18n, we’ll add the new package to our project:
ng add @angular/localize
Next, we’ll add the Bootstrap theme to our app’s styles.scss:
@import "~bootstrap/scss/bootstrap";
And we’ll include NgbModule and ReactiveFormsModule in our AppModule on app.module.ts:
// ...
import { ReactiveFormsModule } from '@angular/forms';
import { NgbModule } from '@ng-bootstrap/ng-bootstrap';

@NgModule({
  imports: [
    // ...
    ReactiveFormsModule,
    NgbModule
  ],
})
Next, we’ll update app.component.html with a basic grid for our form:
<div class="container">
  <div class="row">
    <div class="col-6">

    </div>
  </div>
</div>
And generate the form component:
ng g c TvRatingForm
Let’s update tv-rating-form.component.html and add the form to rate TV shows.
<form [formGroup]="form"
(ngSubmit)="submit()"
class="mt-3">
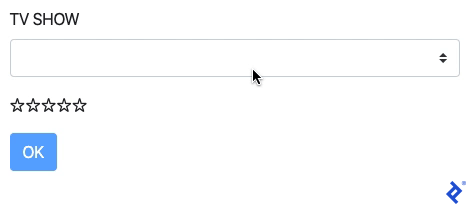
<div class="form-group">
<label>TV SHOW</label>
<select class="custom-select"
formControlName="tvShow">
<option *ngFor="let tvShow of tvShows"
[value]="tvShow.name">{{tvShow.name}}</option>
</select>
</div>
<div class="form-group">
<ngb-rating [max]="5"
formControlName="rating"></ngb-rating>
</div>
<button [disabled]="form.invalid || form.disabled" class="btn btn-primary">OK</button>
</form>
And tv-rating-form.component.ts will look like this:
// ...
export class TvRatingFormComponent implements OnInit {

  tvShows = [
    { name: 'Better call Saul!' },
    { name: 'Breaking Bad' },
    { name: 'Lost' },
    { name: 'Mad men' }
  ];


  form = new FormGroup({
    tvShow: new FormControl('', Validators.required),
    rating: new FormControl('', Validators.required),
  });

  submit() {
    alert(JSON.stringify(this.form.value));
    this.form.reset();
  }

}
Finally, let’s add the form to app.component.html:
<!-- ... -->
<div class="col-6">
  <app-tv-rating-form></app-tv-rating-form>
</div>
At this point, we have some basic UI functionality. Now, if we run ng serve again, we can see it in action.
Before we move on, let’s take a quick look at some interesting new Angular 9 features that were added to help debugging. Since this is a very common task in our daily work, it’s worth knowing what has changed to make our lives a little bit easier.
Debugging with Angular 9 Ivy
Another big improvement introduced in Angular 9 and Angular Ivy is the debugging experience. The compiler now can detect more errors and throw them in a more “readable” fashion.
Let’s see it in action. First, we’ll activate template checking in tsconfig.json:
{
  // ...
  "angularCompilerOptions": {
    "fullTemplateTypeCheck": true,
    "strictInjectionParameters": true,
    "strictTemplates": true
  }
}
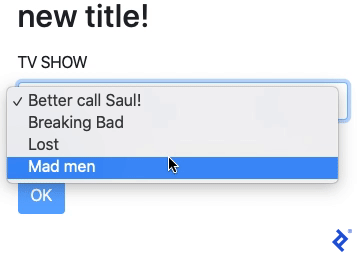
Now, if we update tvShows array and rename name to title:
  tvShows = [
    { title: 'Better call Saul!' },
    { title: 'Breaking Bad' },
    { title: 'Lost' },
    { title: 'Mad men' }
  ];
…we’ll get an error from the compiler.

This type checking will allow us to prevent typos and the incorrect usage of TypeScript types.
Angular Ivy Validation for @Input()
Another good validation we get is with @Input(). For instance, we might add this to tv-rating-form.component.ts:
@Input() title: string;
…and bind it in app.component.html:
<app-tv-rating-form [title]="title"></app-tv-rating-form>
…and then change app.component.ts like so:
// ...
export class AppComponent {
  title = null;
}
If we make these three changes, we’ll get another type of error from the compiler.

In case we want to bypass it, we can use $any() on the template to cast the value to any and fix the error:
<app-tv-rating-form [title]="$any(title)"></app-tv-rating-form>
The right way to fix this, though, would be to make title on the form nullable:
@Input() title: string | null ;
The ExpressionChangedAfterItHasBeenCheckedError in Angular 9 Ivy
One of the most dreaded errors in Angular development is the ExpressionChangedAfterItHasBeenCheckedError. Thankfully, Ivy outputs the error in a clearer way, making it easier to find where the problem comes from.
So, let’s introduce an ExpressionChangedAfterItHasBeenCheckedError error. To do that, first, we’ll generate a service:
ng g s Title
Next, we’ll add a BehaviorSubject, and methods to access the Observable and to emit a new value.
export class TitleService {

  private bs = new BehaviorSubject < string > ('');

  constructor() {}

  get title$() {
    return this.bs.asObservable();
  }

  update(title: string) {
    this.bs.next(title);
  }
}
After that, we’ll add this to app.component.html:
      <!-- ... -->
      <div class="col-6">
        <h2>
          {{title$ | async}}
        </h2>
        <app-tv-rating-form [title]="title"></app-tv-rating-form>
      </div>
And in app.component.ts, we’ll inject the TitleService:
export class AppComponent implements OnInit {

  // ...
  title$: Observable < string > ;

  constructor(
    private titleSvc: TitleService
  ) {}

  ngOnInit() {
    this.title$ = this.titleSvc.title$;
  }
  // ...
}
Finally, in tv-rating-form.component.ts, we’ll inject TitleService and update the title of the AppComponent, which will throw an ExpressionChangedAfterItHasBeenCheckedError error.
  // ...

  constructor(
    private titleSvc: TitleService
  ) {

  }

  ngOnInit() {
    this.titleSvc.update('new title!');
  }
Now we can see the detailed error in the browser’s dev console, and clicking on app.component.html will point us to where the error is.
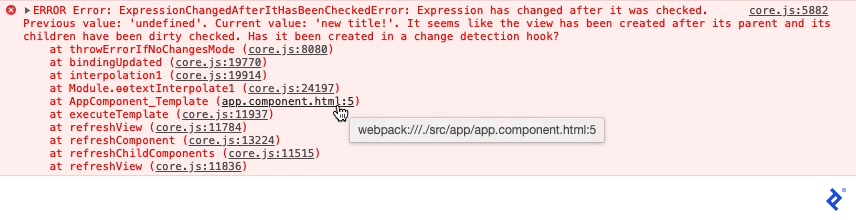
We can fix this error by wrapping the service call with setTimeout:
setTimeout(() => {
  this.titleSvc.update('new title!');
});
Angular Ivy allows us to have errors presented in a clearer way and helps enforce TypeScript typing in our code. In the following section, we’ll cover some common scenarios where we’ll take advantage of Ivy and debugging.
Writing a Test for Our Angular 9 App with Component Harnesses
In Angular 9, a new testing API was introduced called component harnesses. The idea behind it is to remove all the chore required to interact with the DOM, making it much easier to work with and more stable to run.
The component harness API is included in the @angular/cdk library, so let’s first install that on our project:
npm install @angular/cdk
Now we can write out a test and leverage component harnesses. In tv-rating-form.component.spec.ts, let’s set up the test:
import { NgbModule } from '@ng-bootstrap/ng-bootstrap';
import { ReactiveFormsModule } from '@angular/forms';

describe('TvRatingFormComponent', () => {
  let component: TvRatingFormComponent;
  let fixture: ComponentFixture < TvRatingFormComponent > ;

  beforeEach(async (() => {
    TestBed.configureTestingModule({
      imports: [
        NgbModule,
        ReactiveFormsModule
      ],
      declarations: [TvRatingFormComponent]
    }).compileComponents();
  }));

  // ...

});
Next, let’s implement a ComponentHarness for our component. We are going to create two harnesses: one for TvRatingForm, and another for NgbRating. ComponentHarness requires a static field, hostSelector, which should take the value of the component’s selector.
// ...

import { ComponentHarness, HarnessLoader } from '@angular/cdk/testing';
import { TestbedHarnessEnvironment } from '@angular/cdk/testing/testbed';

class TvRatingFormHarness extends ComponentHarness {
  static hostSelector = 'app-tv-rating-form';
}

class NgbRatingHarness extends ComponentHarness {
  static hostSelector = 'ngb-rating';
}

// ...
For our TvRatingFormHarness, we’ll create a selector for the submit button and a function to trigger a click. You can see how much easier implementing this becomes.
class TvRatingFormHarness extends ComponentHarness {
  // ...
  protected getButton = this.locatorFor('button');

  async submit() {
    const button = await this.getButton();
    await button.click();
  }
}
Next, we’ll add methods to set a rating. Here we use locatorForAll to look for all the <span> elements that represent the stars the user can click on. The rate function just gets all the possible ratings’ stars and clicks on the one corresponding to the value sent.
class NgbRatingHarness extends ComponentHarness {
  // ...

  protected getRatings = this.locatorForAll('span:not(.sr-only)');

  async rate(value: number) {
    const ratings = await this.getRatings();
    return ratings[value - 1].click();
  }
}
The last piece missing is to connect TvRatingFormHarness to NgbRatingHarness. To do that, we just add the locator on the TvRatingFormHarness class.
class TvRatingFormHarness extends ComponentHarness {
  // ...

  getRating = this.locatorFor(NgbRatingHarness);

  // ...
}
Now, let’s write our test:
describe('TvRatingFormComponent', () => {
  // ...

  it('should pop an alert on submit', async () => {
    spyOn(window, 'alert');

    const select = fixture.debugElement.query(By.css('select')).nativeElement;
    select.value = 'Lost';
    select.dispatchEvent(new Event('change'));
    fixture.detectChanges();

    const harness = await TestbedHarnessEnvironment.harnessForFixture(fixture, TvRatingFormHarness);
    const rating = await harness.getRating();
    await rating.rate(1);
    await harness.submit();

    expect(window.alert).toHaveBeenCalledWith('{"tvShow":"Lost","rating":1}');
  });

});
Notice that for our select within the form, we didn’t implement setting its value via a harness. That’s because the API still doesn’t support selecting an option. But this gives us a chance to compare here what interacting with elements looked like before component harnesses.
One last thing before we run the tests. We need to fix app.component.spec.ts since we updated title to be null.
describe('AppComponent', () => {
  // ...
  it(`should have as title 'tv-show-rating'`, () => {
    const fixture = TestBed.createComponent(AppComponent);
    const app = fixture.componentInstance;
    expect(app.title).toEqual(null);
  });

});
Now, when we run ng test, our test passes.

Back to Our Angular 9 Example App: Saving Data in a Database
Let’s wrap up our Angular 9 tutorial by adding a connection to Firestore and saving the ratings in the database.
To do that, we need to create a Firebase Project. Then, we’ll install the required dependencies.
npm install @angular/fire firebase
In the Firebase Console’s project settings, we’ll get its configuration and add them to environment.ts and environment.prod.ts:
export const environment = {
  // ...
  firebase: {
    apiKey: '{your-api-key}',
    authDomain: '{your-project-id}.firebaseapp.com',
    databaseURL: 'https://{your-project-id}.firebaseio.com',
    projectId: '{your-project-id}',
    storageBucket: '{your-project-id}.appspot.com',
    messagingSenderId: '{your-messaging-id}',
    appId: '{your-app-id}'
  }
};
After that, we’ll import the necessary modules in app.module.ts:
import { AngularFireModule } from '@angular/fire';
import { AngularFirestoreModule } from '@angular/fire/firestore';
import { environment } from '../environments/environment';

@NgModule({
  // ...
  imports: [
    // ...
    AngularFireModule.initializeApp(environment.firebase),
    AngularFirestoreModule,
  ],
  // ...
})
Next, in tv-rating-form.component.ts, we’ll inject the AngularFirestore service and save a new rating on form submission:
import { AngularFirestore } from '@angular/fire/firestore';

export class TvRatingFormComponent implements OnInit {

  constructor(
    // ...
    private af: AngularFirestore,
  ) { }

  async submit(event: any) {
    this.form.disable();
    await this.af.collection('ratings').add(this.form.value);
    this.form.enable();
    this.form.reset();
  }

}
Now, when we go to the Firebase Console, we’ll see the newly created item.

Finally, let’s list all the ratings into AppComponent. To do that, in app.component.ts, we’ll get the data from the collection:
import { AngularFirestore } from '@angular/fire/firestore';

export class AppComponent implements OnInit {
  // ...
  ratings$: Observable<any>;

  constructor(
    // ...
    private af: AngularFirestore
  ) { }

  ngOnInit() {
    // ...
    this.ratings$ = this.af.collection('ratings').valueChanges();
  }
}
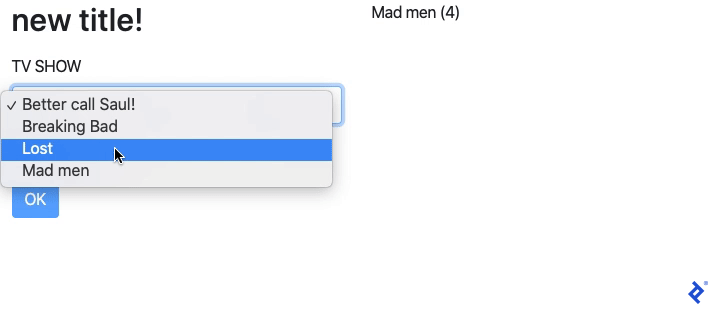
…and in app.component.html, we’ll add a list of ratings:
<div class="container">
  <div class="row">
    // ...
    <div class="col-6">
      <div>
        <p *ngFor="let rating of ratings$ | async">
          {{rating.tvShow}} ({{rating.rating}})
        </p>
      </div>
    </div>
  </div>
</div>
This is what our Angular 9 tutorial app looks like when it’s all put together.
Angular 9 and Angular Ivy: Better Development, Better Apps, and Better Compatibility
In this Angular 9 tutorial, we’ve covered building a basic form, saving data to Firebase, and retrieving items from it.
Along the way, we saw which improvements and new features are included on Angular 9 and Angular Ivy. For a complete list, you can check the official Angular blog’s latest release post.

As a Google Cloud Partner, Toptal’s Google-certified experts are available to companies on demand for their most important projects.
Understanding the basics
Angular is a JavaScript framework that helps developers easily build fast web and mobile applications. It comes with pre-built functionality to help developers get up and running quickly.
Angular’s latest version is Angular 10, which updates the CLI and Angular Material in addition to the framework. (Before that, Angular 9 was the first version to enable the Angular Ivy compiler by default.)
Angular was created in 2013 and gained its popularity as a full-featured framework, shipping with it many of the components most commonly needed by web developers.
Yes. Angular is one of the top three most popular frameworks and has a huge and active community. Being supported by Google makes it likely to be with us for many years to come.
Angular Ivy is the new Angular compiler. It’s the result of a major refactoring the Angular team worked on for two years. It sets the foundation for many improvements, allowing Angular to stay current with the latest innovations in web development.
In Angular 9, Ivy is enabled by default. It’s possible to enable Ivy in Angular 8 as well, but if you are not using Angular 9 yet, the recommendation is to upgrade to version 9 to enable Ivy.
Joaquin Cid
Rosario, Santa Fe Province, Argentina
Member since May 2, 2018
About the author
Joaquin is a full-stack and hybrid mobile app developer with 13+ years of experience working for companies like WebMD and Getty Images.
Expertise
PREVIOUSLY AT