
Ultimate Guide to the Processing Language Part I: The Fundamentals
Rapid prototyping and the ability to produce quick visual results are features of many programming languages and frameworks. However, some take it even further by making these their primary goals. Processing, a programming language based on Java, allows its users to code within the context of visual arts and has been designed from the ground up to provide instant visual feedback. In this article, Toptal engineer Oguz Gelal provides a gentle introduction to Processing and some insights into its inner mechanics.

Rapid prototyping and the ability to produce quick visual results are features of many programming languages and frameworks. However, some take it even further by making these their primary goals. Processing, a programming language based on Java, allows its users to code within the context of visual arts and has been designed from the ground up to provide instant visual feedback. In this article, Toptal engineer Oguz Gelal provides a gentle introduction to Processing and some insights into its inner mechanics.

Oguz is a software engineer and full-stack web developer. He has worked with a number of frameworks and tools, fron- and back-end.
Expertise
Previously At

You are struggling with boredom and itching to use your creativity. You want to build something, something visually impressive, something artsy. Or maybe you want to learn programming and make something impressive as soon as possible. If so, then the Processing language is the way to go.
Among all the programming languages I have worked with so far, Processing is, without a doubt, one of the most entertaining ones. It is a straightforward language—easy to learn, understand, and use—yet very powerful. It is almost like you are painting on an empty canvas with lines of code. There are no rigid rules or guidelines whatsoever to limit your creativity; the only limit is your imagination.
In college, I was a teaching assistant for a program that gathered high school students and taught them Processing. Most of them didn’t have a strong programming background; some hadn’t even written a single line of code before. In only five days, they were expected to learn the language and build simple games of their own. The success rate was almost 100%; we rarely faced failure. In this article, this is exactly what we’ll be doing. I shrank down the entire program into two parts. In the first part, I will be talking about the language. I will give a basic overview, a walkthrough for Processing, and I will give some tips and tricks. Then, in the next part, we will build a simple game step by step, and each step will be explained in detail. I will also convert the game’s code to JavaScript using p5.js so our game can run in a web browser.
What You Should Already Know
To understand and easily follow these articles, you should have a basic knowledge of programming, as I will not be talking about programming fundamentals. I will mostly not be touching any advanced programming concepts, though, so a superficial understanding will do. There are some parts where I talk about some low-level ideas and concepts, such as object-oriented programming (OOP), but they are not crucial. Those are for curious readers who are interested in the structure of the language. If you don’t want to know, you can just skip those parts. Other than that, the only thing you should have is the ambition to learn this awesome language and the enthusiasm to create your own game!
How to Follow
I’m always in favor of learning programming by trying and experimenting. The sooner you dive into your own game, the faster you’ll get comfortable with Processing. So that will be my first suggestion: try each and every step in your own environment. Processing has a simple and easy-to-use IDE (i.e., a code editor); it is the only thing you’ll need to download and install to follow. You can download the latest stable release (currently Processing 4.x) from the official Processing website.
So let’s get started!
What Is the Processing Language?
This section includes a brief technical overview of the language, its structure, and some notes on the compilation and execution process. The details will include some advanced knowledge on programming and the Java environment. If you don’t mind about details for now and can’t wait to learn and code your own game, you can skip to the “Fundamentals of Processing” section.
Processing is a visual programming language that allows you to sketch with code, so to speak. However, it is not exactly a programming language on its own; it is what they call a “Java-esque” programming language, which means the language is built on top of the Java platform, but is not exactly Java per se. It is based on Java, and all your code gets preprocessed and converted directly into Java code when you hit the run button. Java’s PApplet class is the base class for all Processing sketches. To give an example, let’s take a couple of basic processing code blocks:
public void setup() {
  // setup codes goes here
}
public void draw() {
  // draw codes goes here
}
These code blocks will be converted into something like this:
public class ExampleFrame extends Frame {

     public ExampleFrame() {
         super("Embedded PApplet");

         setLayout(new BorderLayout());
         PApplet embed = new Embedded();
         add(embed, BorderLayout.CENTER);

         embed.init();
     }
}

public class Embedded extends PApplet {

    public void setup() {
      // setup codes goes here
    }
    public void draw() {
      // draw codes goes here
    }

}
You can see that the processing code block was wrapped with a class that extends from Java’s PApplet. Therefore, all the classes you define in your processing code, if any, will be treated as inner classes.
The fact that Processing is Java-based gives us a lot of advantages, especially if you are a Java developer. Not only is the syntax familiar, but it also gives you the ability to do things like embedding Java code, libraries, and JAR files in your sketches; using your Processing applets directly in your Java applications; defining classes; and using standard data types such as int, float, char, and so on. You can even write your Processing code directly from Eclipse, if you want to spend some time setting it up. One thing to be aware of is that AWT and Swing components are not commonly used in Processing sketches because they can introduce compatibility issues. But don’t worry, we will not be doing any of that fancy stuff in this article.
Fundamentals of Processing
Processing code consists of two main parts, setup and draw blocks. Setup block runs once when the code gets executed, and the draw blocks run continuously. The main idea behind Processing is that what you write within the draw block will be executed repeatedly, targeting 60 frames per second by default, from top to bottom until your program terminates. We will build everything by taking advantage of this very idea. We will make our objects move, keep our scores, detect collisions, implement gravity, and do pretty much everything else using this feature. This refresh loop is the heartbeat of our project. I will be explaining how to use this heartbeat to bring your code to life in later sections. First, let me introduce you to the Processing IDE.
Processing IDE
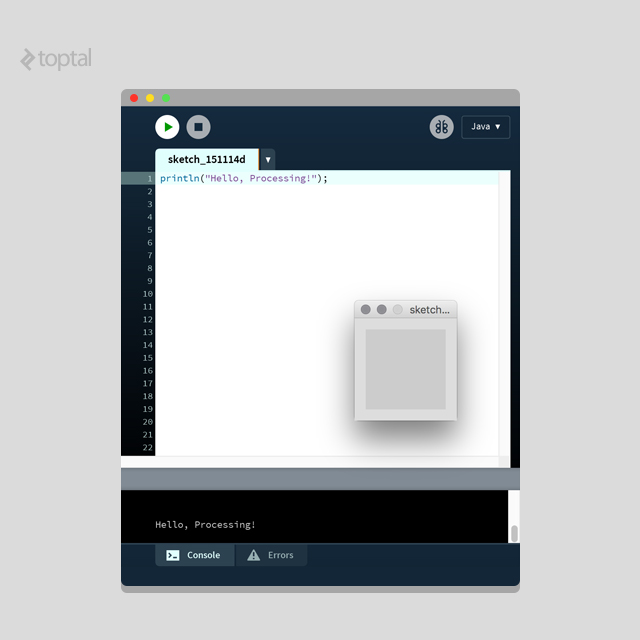
If you have read until this point and still haven’t downloaded the Processing IDE, please go ahead and do it. Throughout the article, I will outline some easy tasks for you to try on your own, and you can only practice if you have the IDE up and running. Here is a brief introduction to the processing IDE. It is very simple and self-explanatory, so I will keep it short.
As you’d expect, run and stop buttons do what they suggest. When you click on the run button, your code will get compiled and executed. By nature, processing programs never get terminated; they run forever and ever until they get disturbed. You can terminate it programmatically, but if you don’t, you can use the stop button.
The button that looks like a butterfly on the right of the run and stop is the debugger. Using the debugger needs a whole other article dedicated to it. It is out of the scope of this article, so you can ignore it for now. The dropdown next to the debugger button is where you add or configure mods. Mods provide you with certain functionality, allow you to write code for Android, allow you to write code in Python, and so on and so forth. Mods are also out of the scope, so you can keep it in the default Java mode and ignore it as well.
The window on the code editor is where your sketches normally run. In the image, it is blank because we haven’t set any property like size or background color, or we haven’t drawn anything.
There is nothing much to talk about the code editor; it is simply where you write your code. There are line numbers, which make navigating larger sketches very easy.
The black box below is the console. We will use it to print out stuff for quick debugging purposes. The errors tab next to the console provides a convenient way to review and troubleshoot errors.
Setup Block
As stated before, setup blocks get executed once when the program starts. You can use it for making configurations and for things that you’d like to run only once, for instance, loading images or sounds. Here is an example setup block. Run this code in your own environment and see the results for yourself.
public void setup() {
  // Size of our sketch will be 800x600,
  // and use the P2D rendering engine.
  size(800, 600, P2D);

  // We could have used this function instead of size()
  // fullScreen(P2D);

  // The background color of our sketch will be black
  // by default, unless specified otherwise
  background(0);

  // We could have used this to set a background image.
  // Note that size of our sketch should be the same as the image.
  // background(loadImage("test.jpg"));

  // Shapes and objects will be filled with red by default,
  // unless specified otherwise.
  fill(255,0,0);

  // Shaped and objects will have a white border by default,
  // unless specified otherwise.
  stroke(255);
}
The methods related to styling (background, fill, stroke) will be explained in the properties and settings sections. For now, what you need to know is how the settings and configurations we set here affect our whole sketch. Code written here is used to establish default settings that apply throughout the sketch. What you should also understand in this section are the methods listed below:
size() - As the name suggests, this function is used to configure the size of our sketch. It has to be in the first line of the setup code block. It could be used in the following forms:
- size(width,height);
- size(width, height, renderer);
The width and height values could be given in pixels. The size function accepts a third parameter, renderer, which is used to set which rendering engine our sketch will use. If no renderer is specified, Processing uses its default renderer. Available renderers include P2D (Processing 2D), P3D (Processing 3D, which should be used if your sketches include 3D graphics), and PDF (2D graphics are drawn directly into an Acrobat PDF file; more information can be found here). P2D and P3D renderers make use of OpenGL-compatible graphics hardware.
fullScreen() - The fullScreen() function can be used instead of the size() function and should be included in the first line of the setup block. The usage is as follows:
- fullScreen();
- fullScreen(display);
- fullScreen(renderer);
- fullScreen(display, renderer);
If you use it without any parameters, your processing sketch will simply run in full screen and will run on your main display. The ‘display’ parameter is used to set on which display your sketch will run. For example, if you connect external monitors to your computer, you can set the display variable to 2 (or 3, 4, etc.) and your sketch will run there. The ‘renderer’ parameter is as explained at the size() part above.
Settings Block
The settings block is useful when you want to define size() or fullScreen() methods with variable parameters. It is also necessary to define size() and other styling properties, such as smooth(), in this code block if you are using any environment other than Processing’s own IDE, such as Eclipse. But you will not be needing it in most cases, definitely not in this article.
Draw Block
There is nothing special to talk about the draw block, yet everything is special about it. The draw block is where all the magic happens. It is the heart of your program, beating 60 times a second by default. This code block houses all your code logic. All your shapes, objects, etc., will be written in here.
Most of the code we will talk about in this article is going to be from the draw block, so it is important that you clearly understand how this code block works. To give you a demonstration, here is something you can try. First, note that we can print anything to the console by using the print() or println() methods. Print methods only print to the console; println, however, prints and appends a newline at the end, so each println() will print in separate rows.
So, take a look at the following code block. First, try to guess what it will print in the console. Then, go ahead and try it out:
void setup(){
}
void draw(){
  int x = 0;
  x += 1;
  print(x+" ");
}
If you guessed “1 2 3 4…”, I got you! This is one of the confusions in Processing. Remember this block repeatedly gets executed? When you define a variable here, it gets defined on each loop over and over again. On each iteration, x is set to 0, gets incremented by 1, and gets printed to the console. Therefore, we get the result “1 1 1 1…”. This example was somewhat obvious, but it may be confusing when things get a little complicated.
We don’t want x to get overwritten, so how can we achieve this and get the result “1 2 3 4…” ? By using global variables. This is nothing fancy; we only define the variable outside of the draw block so it doesn’t get redefined on each iteration. Also, the scope of the variable will be accessible throughout the sketch. See the code below:
int x = 0;

void setup(){
}
void draw(){
  x += 1;
  print(x+" ");
}
You might be asking yourself, how can a variable defined outside of our blocks work? And why didn’t we use the setup() block since it gets executed once at the beginning? The answer is related to object-oriented programming and scopes; if you are not familiar, you may skip this paragraph. Refer to the part where I explained how Processing code gets converted into Java. Remember how they get wrapped with a Java class? The variables we write outside of the setup() and draw() block also get wrapped; therefore, they are treated as fields of the outer class that wraps our code. Using x+=1 is the same as using this.x+=1. It also functions the same in our case, no variable called x is defined in the scope of draw(), and an outer scope is searched, which is the scope of this. And why didn’t we define our variable x in the setup() section? If we did, the scope of which x is defined would be the scope of the setup function, and it wouldn’t be accessible from the draw() block.
Drawing Shapes and Texts
Now we know how to configure our sketch using the setup block, and we know what the draw block does. So it is time to get a little visual and learn about the fun parts of processing: how to draw shapes.
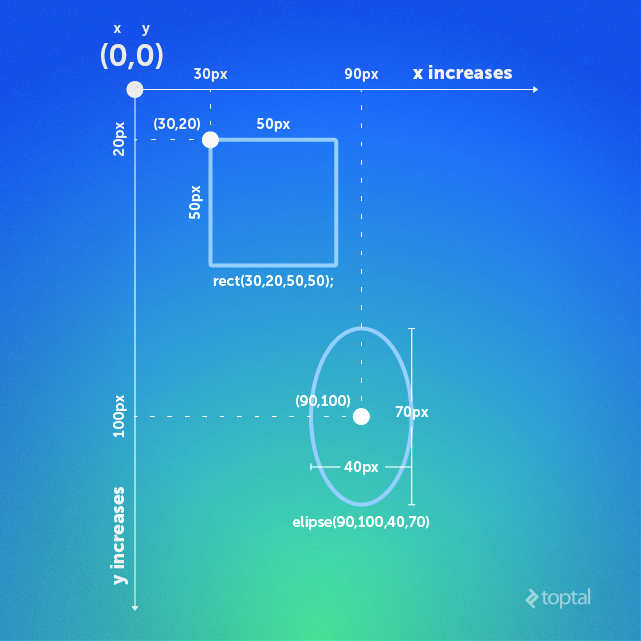
Before we begin, you should understand the coordinate system. In Processing, you determine the coordinates of every object you draw on the screen. The coordinate system is in pixels. The origin (i.e., starting point) is the top left corner; you should give your coordinates relative to that point. Another thing you should know is that each shape has a different reference point. For example, rect() has its top left corner as a reference point. For ellipse(), it is the center. These reference points can be changed with methods like rectMode() and ellipseMode(), which I will be explaining in the properties and settings section. An example figure is provided to help you understand better.
This article is a basic overview of Processing, so we will not be touching any complex shapes like vertices or 3D shapes. Basic 2D shapes will actually be more than enough for us to create our own game. In the figure, you can see examples of how shapes are drawn. Each shape has its own syntax to be created, but the basic idea is to give either its coordinates or its sizes or both. Here are some shapes you should be familiar with (for all values given below, ‘x’ and ‘y’ mean x and y coordinates in pixels, ‘w’ and ‘h’ mean width and height values also in pixels):
point() - Simple point, only needs a single coordinate. Usage:
- point(x, y)
- point(x, y, z) - In case you are using 3 dimensions.
line() - For creating a line. You can create a line with only a starting and an ending point. Usage:
- line(x1, y1, x2, y2)
- line(x1, y1, z1, x2, y2, z2) - In case you are using 3 dimensions.
triangle() - For creating a triangle. Usage: triangle(x1, y1, x2, y2, x3, y3)
quad() - For creating a quadrilateral. Usage: quad(x1, y1, x2, y2, x3, y3, x4, y4)
rect() - For creating a rectangle. The reference point is the top left corner by default (refer to the figure). Here is the usage:
- rect(x, y, w, h)
- rect(x, y, w, h, r) - ‘r’ means the radius in pixels to make the corners rounded.
- rect(x, y, w, h, tl, tr, br, bl) - Radius for top left, top right, bottom right, bottom left corners respectively. This is also in pixels.
ellipse() - For creating an ellipse shape. This is also used to create a circle; the same width and height values should be given. The reference point for this shape is the center by default (refer to the figure). Here is the usage:
- ellipse(x, y, w, h)
arc() - Draw an arc. Usage:
- arc(x, y, w, h, start, stop) - ‘start’ and ‘stop’ are used to determine the angle to start and stop drawing the arc. Values are in radians. Constants such as “PI, HALF_PI, QUARTER_PI and TWO_PI” can be used.
- arc(x, y, w, h, start, stop, mode) - ‘mode’ variable is to determine the rendering style of the arc (string). Available options are “OPEN, CHORD, PIE”. OPEN will leave the non-drawn parts borderless. CHORD will complete the non-drawn parts with a border. PIE will make your arc look like a pie chart.
Displaying texts on the screen is similar to displaying shapes; the basic idea is that you determine a coordinate at which you want your text to be displayed. There is, however, more to handling texts. You will have more control over your texts after the properties and settings section, where you’ll learn how to apply settings and properties to objects. For now, I will show the basics of displaying texts. There are many ways to do it, so I’ll only show the essentials.
text() - Display texts. Usage:
- text(c, x, y) - ‘c’ means character, any alphanumeric character will be displayed.
- text(c, x, y, z) - In case you are working with 3 dimensions.
- text(str, x, y) - ‘str’ is the string to be displayed.
- text(str, x, y, z) - In case you are working with 3 dimensions.
- text(num, x, y) - ‘num’ is the numeric value to be displayed.
- text(num, x, y, z) - In case you are working with 3 dimensions.
Properties and Settings
The first thing that should be explained in this section is the logic behind setting the properties of objects. Fill color, background color, border, border width, border color, alignment of the shapes, border styles, etc., could be some examples of these properties.
When you set a property, you have to remember that the code will be executing from top to bottom. Say, you set the “fill” property to red, all the objects drawn below that line will be filled with red until it gets overwritten by another fill property. The same thing applies to other properties as well, but note that not all properties will overwrite each other. For example, the “stroke” property doesn’t overwrite the “fill” property; instead, they work together. Here is a visual representation for you to comprehend the logic:
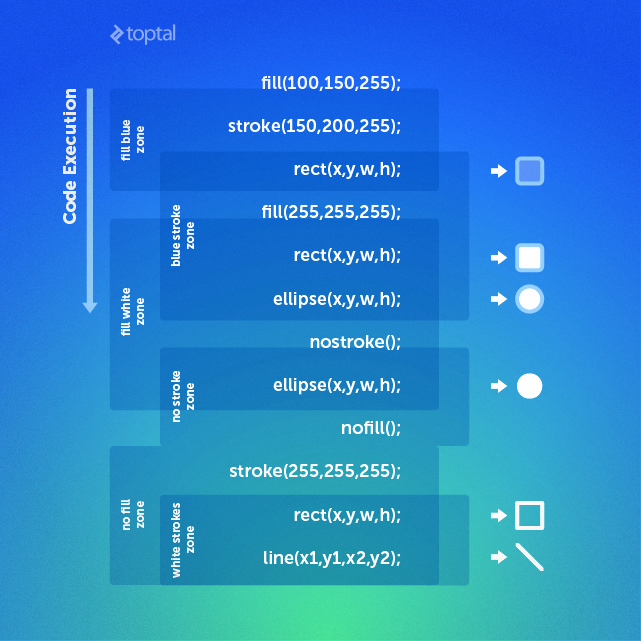
As you can see in the image, the first line sets the fill color to red and the second line sets the stroke color to blue. We now have two active settings: fill red and blue strokes. As you’d expected, whatever our object may be on the next line, it will be filled with red and have blue strokes (if applicable). You can keep examining the image this way, and you will grasp the logic.
Here are some essential properties and settings that are commonly used:
Styling Settings
fill() - Sets the fill color to objects. This setting is also used to color texts. For now, we only need to know the following usage:
- fill(r, g, b) - Red, green, and blue values as integers
- fill(r, g, b, a) - Additional alpha value, max is 255
noFill() - Sets the fill color to transparent.
stroke() - Sets the stroke color to objects. Stroke property is applicable for lines and borders around objects. For now, we only need to know the following usage:
- stroke(r, g, b) - Red, green, and blue values as integers
- stroke(r, g, b, a) - Additional alpha value, max is 255
noStroke() - Removes the stroke.
strokeWeight() - Sets the width of the stroke. Usage:
- strokeWeight(x) - x is an integer and represents the width of the stroke in pixels
background() - Sets the background color. For now, we only need to know the following usage:
- background(r, g, b) - Red, green, and blue values as integers
- background(r, g, b, a) - Additional alpha value, max is 255
Alignment Settings
ellipseMode() - Sets where to take as reference point to align ellipses. Usage:
- ellipseMode(mode) - ‘mode’ is the parameter. Here are the available parameters:
- CENTER (default): Take the center as the reference point.
- RADIUS: This also takes the center as the reference point, but in this mode, the w and h values you specify are treated as half (i.e., radius instead of diameter)
- CORNER: Takes the top left corner as a reference point.
- CORNERS: Sets the first two parameters (x and y) as the location of the top-left corner, and the last two parameters (w and h) as the location of the bottom-left corner of the ellipse. So this mode, “width” and “height” are irrelevant. Thinking of it as ellipse(x_tl,y_tl,x_br,y_br) makes more sense in this case.
rectMode() - Sets where to take as a reference point, aligning rectangles. Usage:
- rectMode(mode) - ‘mode’ is the parameter. Here are the available parameters:
- CENTER: Take the center as the reference point
- RADIUS: This also takes the center as the reference point, but in this mode, the w and h values you specify are treated as half
- CORNER (default): Takes the top left corner as a reference point
- CORNERS: Sets the first two parameters (x and y) as the location of the top-left corner, and the last two parameters (w and h) as the location of the bottom-left corner of the ellipse. So this mode, “width” and “height” are irrelevant. Thinking of it as rect(x_tl,y_tl,x_br,y_br) makes more sense in this case.
Text-related Settings
textSize() - Sets the font size of text. Usage:
- textSize(size) - Integer value of the desired size.
textLeading() - Sets the line height of your texts. Usage:
- textLeading(lineheight) - Pixel value of the space between lines.
textAlign() - Sets where to take as a reference point, aligning texts. Usage.
- textAlign(alignX) - ‘alignX’ is for horizontal alignment. Available: LEFT, CENTER, RIGHT
- textAlign(alignX, alignY) - ‘alignY’ is for vertical alignment. Available: TOP, BOTTOM, CENTER, BASELINE.
Animations
So far, we learned how to draw objects and texts. But the problem with them is that they are static. Now, how do we make them move? Simple, instead of giving coordinates as integers, we use variables so that we can increment or decrement them. Make sense? Take a look at the following code:
// initialize x and y as 0
int x=0;
int y=0;

void setup(){
  size(800,600);
  background(255); // set background color to white
}

void draw(){
  fill(255,0,0); // fill color red
  stroke(0,0,255); // stroke color blue
  ellipseMode(CENTER); // ref. point to ellipse is its center

  ellipse(x, y, 20, 20); // draw the ellipse

  // increment x and y
  x+=5;
  y+=5;
}
Do you see how we managed the animation? We set x and y as global variables and their initial value to 0. In our draw loop, we created our ellipse, set the fill color to red, the stroke color to blue, and the coordinates to x and y. When we increment x and y, the ball simply changes its location. But there is a problem with this code, can you notice it? As an easy challenge for yourself, try to figure out what the problem is, and test it out. Here is the outcome:
My intention for letting this happen was to make you realize how the looping nature of Processing works. Refer to the example at the “Draw Block” section, do you remember why we got “1 1 1…” instead of “1 2 3…”? It’s the same reason the ball is leaving marks behind. Each time the draw block iterates, x and y get incremented by 5, and therefore the ball gets redrawn to 5 pixels down and right. However, the ball drawn from the previous iterations remains in view. How do we make them go away? Any guesses?
To get rid of the marks the ball leaves behind, we simply remove the background(255) from the setup block and paste it to be the very first line of the draw block. When our background code was in the setup block, it ran one time at the beginning, making our background white. But that isn’t enough, we need it to set our background to white on each loop to cover the balls drawn from the previous loops. Background being the first line means it runs first, and it becomes the base layer. On each loop, our canvas is painted white, and new elements get drawn on top of the white background. So we have no marks.
That is the idea behind animating things in Processing, manipulating the objects’ coordinates programmatically to change their location. But how will we do fancy stuff, such as keeping the ball in the screen? Or maybe implementing gravity? I will teach how to do this stuff in the next part of this article. We will learn by trying and building. We will learn how to do it and apply it to our game immediately. At the end, we will have a complete, playable, and hopefully fun game.
Keyboard and Mouse Interactions
Keyboard and mouse interactions in Processing are very easy and straightforward. There are methods you can call for each event, and what you write inside will be executed once when the event occurs. Also, there are global variables such as mousePressed and keyPressed you can use in your draw block to take advantage of the loop. Here are some of the methods with explanations:
void setup() {
  size(500, 500);
}

void draw() {

  if (mousePressed) {
    // Codes here will be executed as long as the mouse
    // button is pressed

    if (mouseButton == LEFT){
      // This line will be executed as long as
      // the clicked mouse button is the left mouse
      // button.
    }
  }

  if (keyPressed) {
    // Codes here will be executed as long as a key
    // on the keyboard is pressed

    if (key == CODED) {
      // This if statement checks if the pressed key
      // is recognized by Processing.

      if (keyCode == ENTER) {
        // This line will be executed if the pressed key
        // is the enter key.
      }
    }
    else{
      // This line will be executed if the pressed key
      // is not recognized by processing.
    }
  }

}

void mousePressed() {
  // These codes will be executed once, when mouse
  // is clicked. Note that mouseButton variable can
  // also be used here.
}

void keyPressed() {
  // These codes will be executed once, when a key
  // is pressed. Note that key and keyCode variables
  // are also usable here.
}
As you can see, it is pretty easy to check whether the mouse is clicked or which key is being pressed. There are, however, more options available for mousePressed and keyCode variables. Available options for mousePressed are LEFT, RIGHT, and CENTER. There are many more available for keyCode; UP, DOWN, LEFT, RIGHT, ALT, CONTROL, SHIFT, BACKSPACE, TAB, ENTER, RETURN, ESC, and DELETE.
One thing to know about the mouse variables, which we will use a lot, is how to get the coordinates of the mouse. To get the exact coordinates of the cursor, we can use the mouseX and mouseY variables directly in the draw() block. Last but not least, there are a lot of other useful methods that you should take a look at. They are all documented in the Processing Reference.
Conclusion
You should be getting familiar with Processing by now. However, if you stop here, all this knowledge will fly away. I strongly recommend you continue practicing, playing around with what you have learned. To help you practice, I will provide you with two exercises. You should try your best to do it on your own. If you get stuck, Google and Processing Reference should be your best friends. I will provide the code for the first one, but looking at them should be the last thing that you do.
Recommended Exercise 1
You should make 4 balls with different colors, starting from the 4 corners of the screen, traveling through the center at different speeds. When you click and hold the mouse button, the balls should freeze. And when you let go of the mouse, the balls could go back to their initial position and keep moving. So, I am looking for something like this.
After you try the exercise yourself, you may check out the code here.
Recommended Exercise 2
Remember the famous DVD screensaver in which the DVD logo bounces around the screen, and we all waited desperately for it to hit the corner? I want you to replicate that screensaver, but only using a rectangle instead of the DVD logo. When you start the app, the screen should be black, and the rectangle should start at a random location. Each time the rectangle hits the corner, it should change its color (and obviously direction). When you move the mouse around, the rectangle should disappear, and the background color should turn white (it is a screensaver, isn’t it?). I will not give the code for this exercise in this article. You should try your best to implement it, and the code will be provided in the second part of this article.
The second part of the ultimate guide to Processing, a step-by-step tutorial to building a simple game, has been published.
Further Reading on the Toptal Blog:
Oguz Gelal
Brussels, Belgium
Member since October 18, 2015
About the author
Oguz is a software engineer and full-stack web developer. He has worked with a number of frameworks and tools, fron- and back-end.
Expertise
PREVIOUSLY AT