
Streamline Event-driven Microservices With Kafka and Python
With the rise of big data, cloud, and streaming platforms, monolithic apps just won’t do. Here’s a blueprint for an adaptable and scalable event-driven microservices project using Kafka and Python.

With the rise of big data, cloud, and streaming platforms, monolithic apps just won’t do. Here’s a blueprint for an adaptable and scalable event-driven microservices project using Kafka and Python.

Dmitry is a software developer and Python expert. He has eight years of experience at companies such as Kaspersky and FABLEfx, and has developed multiple microservices systems across the globe using Kafka and Python.
Previously At

For many critical application functions, including streaming and e-commerce, monolithic architecture is no longer sufficient. With current demands for real-time event data and cloud service usage, many modern applications, such as Netflix and Lyft, have shifted to an event-driven microservices approach. Separated microservices can operate independently of one another and enhance a code base’s adaptability and scalability.
But what is an event-driven microservices architecture, and why should you use it? We’ll examine the foundational aspects and create a complete blueprint for an event-driven microservices project using Python and Apache Kafka.
Using Event-driven Microservices
Event-driven microservices combine two modern architecture patterns: microservices architectures and event-driven architectures. Though microservices can pair with request-driven REST architectures, event-driven architectures are becoming increasingly relevant with the rise of big data and cloud platform environments.
What Is a Microservices Architecture?
A microservices architecture is a software development technique that organizes an application’s processes as loosely coupled services. It is a type of service-oriented architecture (SOA).
In a traditional monolithic structure, all application processes are inherently interconnected; if one part fails, the system goes down. Microservices architectures instead group application processes into separate services interacting with lightweight protocols, providing improved modularity and better app maintainability and resiliency.
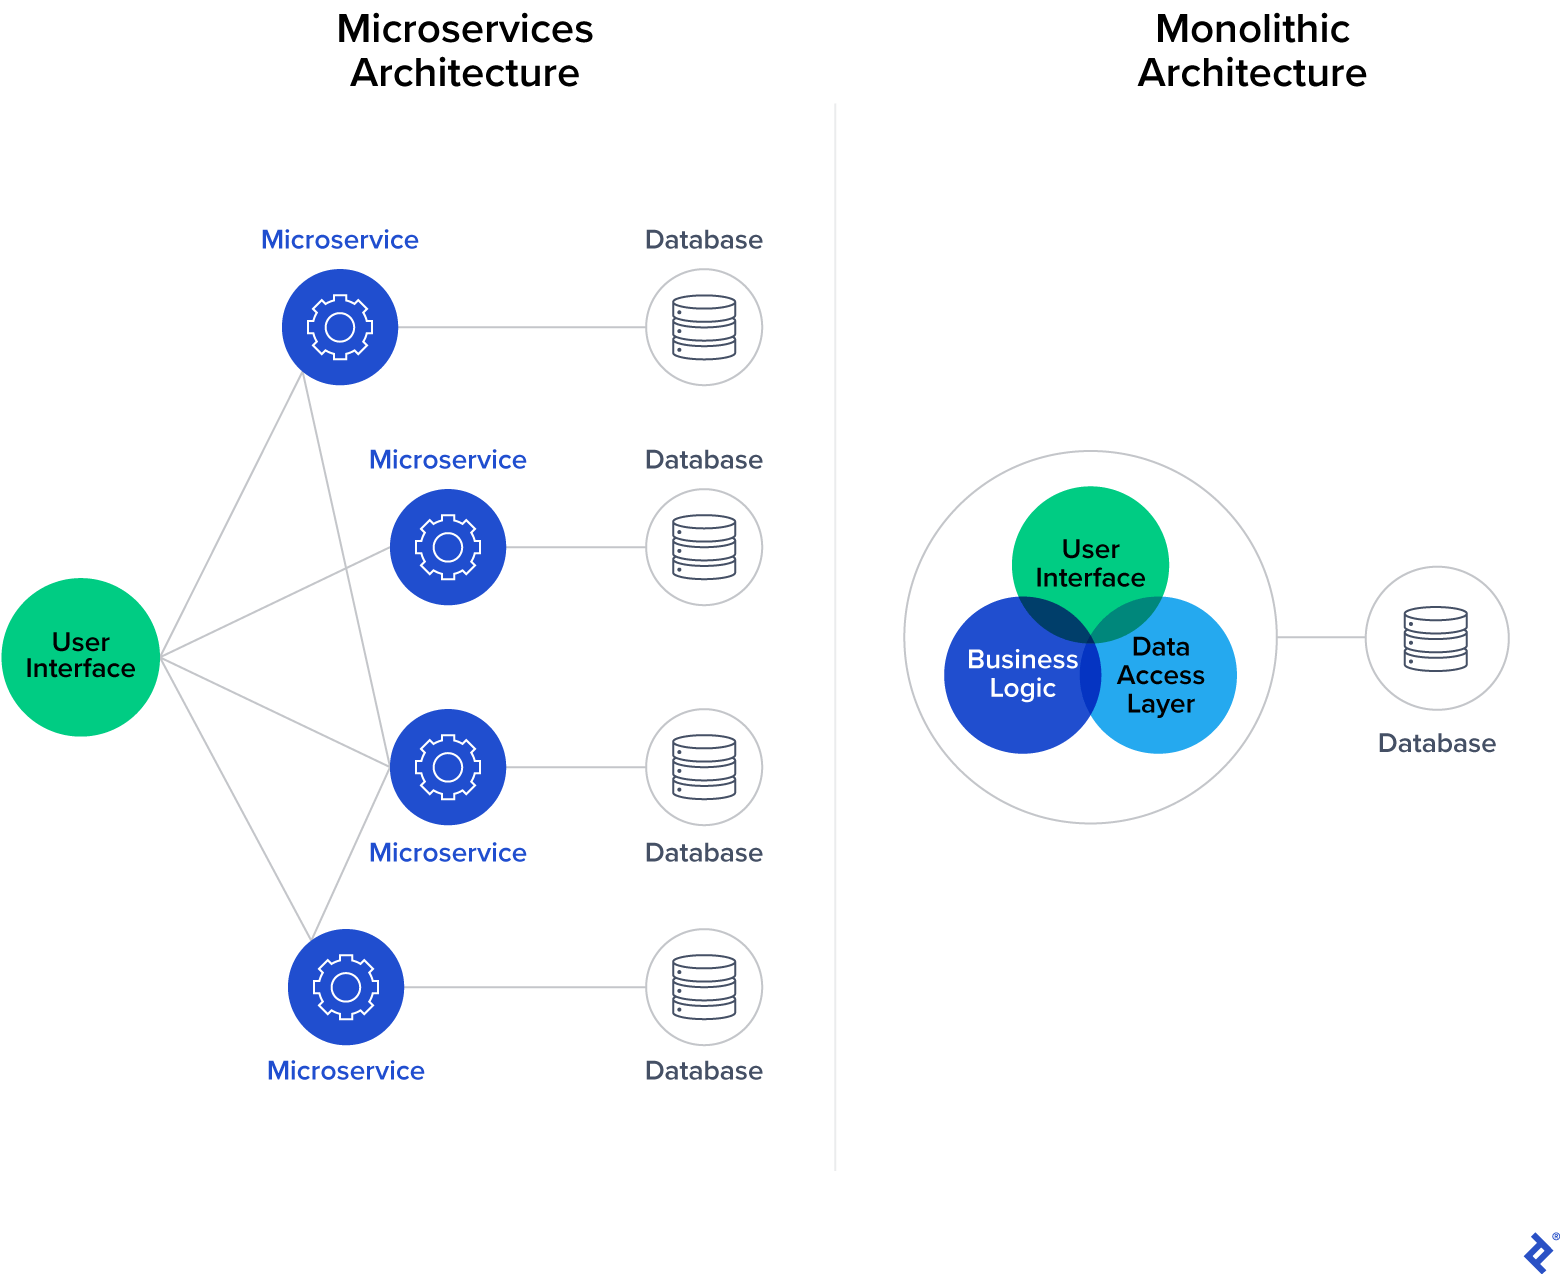
Though monolithic applications may be simpler to develop, debug, test, and deploy, most enterprise-level applications turn to microservices as their standard, which allows developers to own components independently. Successful microservices should be kept as simple as possible and communicate using messages (events) that are produced and sent to an event stream or consumed from an event stream. JSON, Apache Avro, and Google Protocol Buffers are common choices for data serialization. In production environments, Avro and Protocol Buffers are often paired with Schema Registry to support schema evolution and help maintain compatibility as event definitions change.
What Is an Event-driven Architecture?
An event-driven architecture is a design pattern that structures software so that events drive the behavior of an application. Events are meaningful data generated by actors (i.e., human users, external applications, or other services).
Our example project features this architecture; at its core is an event-streaming platform that manages communication in two ways:
- Receiving messages from actors that write them (usually called publishers or producers)
- Sending messages to other actors that read them (usually called subscribers or consumers)
In more technical terms, our event-streaming platform is software that acts as the communication layer between services and allows them to exchange messages. It can implement a variety of messaging patterns, such as publish/subscribe or point-to-point messaging, as well as message queues.
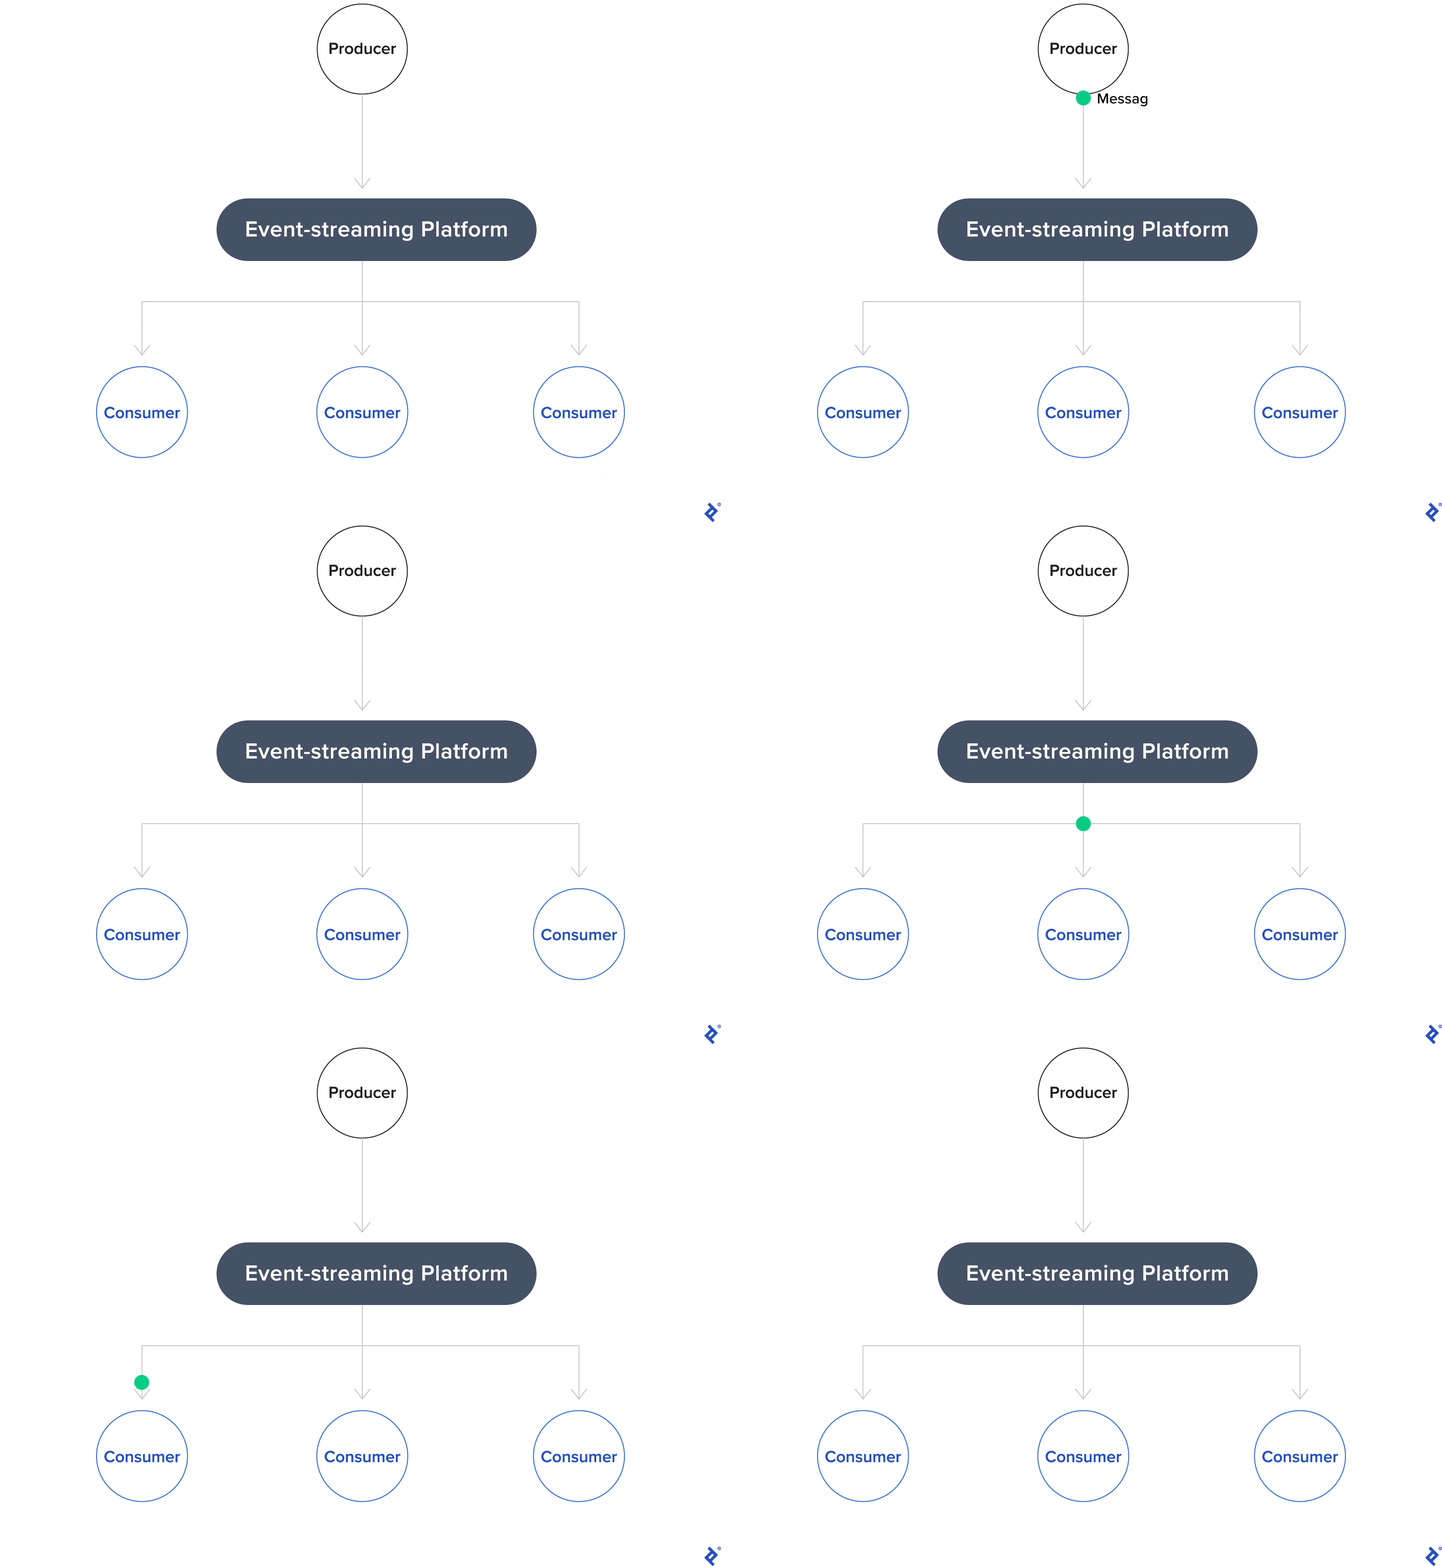
Using an event-driven architecture with an event-streaming platform and microservices offers a wealth of benefits:
- Asynchronous communications: The ability to independently multitask allows services to react to events whenever they are ready instead of waiting on a previous task to finish before starting the next one. Asynchronous communications facilitate real-time data processing and make applications more reactive and maintainable.
- Complete decoupling and flexibility: The separation of producer and consumer components means that services only need to interact with the event-streaming platform and the data format they can produce or consume. Services can follow the single responsibility principle and scale independently. They can even be implemented by separate development teams using unique technology stacks.
- Reliability and scalability: The asynchronous, decoupled nature of event-driven architectures further amplifies app reliability and scalability (which are already advantages of microservices architecture design).
With event-driven architectures, it’s easy to create services that react to any system event. You can also create semi-automatic pipelines that include some manual actions. (For example, a pipeline for automated user payouts might include a manual security check triggered by unusually large payout values before transferring funds.)
Choosing the Project Tech Stack
We will create our project using Python and Apache Kafka paired with Confluent Cloud. Python is a robust, reliable standard for many types of software projects; it boasts a large community and plentiful libraries. It is a good choice for creating microservices because its frameworks are suited to REST and event-driven applications (e.g., FastAPI, Flask, and Django). Microservices written in Python are also commonly used with Apache Kafka.
Apache Kafka is a well-known event-streaming platform that uses a publish/subscribe messaging pattern. It is a common choice for event-driven architectures due to its extensive ecosystem, scalability (the result of its fault-tolerance abilities), storage system, and stream processing abilities.
Lastly, we will use Confluent as our cloud platform to efficiently manage Kafka and provide out-of-the-box infrastructure. AWS MSK is another excellent option if you’re using AWS infrastructure, but Confluent is easier to set up as Kafka is the core part of its system and it offers a free tier.
Implementing the Project Blueprint
We’ll set up our Kafka microservices example in Confluent Cloud, create a simple message producer, then organize and improve it to optimize scalability. By the end of this tutorial, we will have a functioning message producer that successfully sends data to our cloud cluster.
Kafka Setup
We’ll first create a Kafka cluster. Kafka clusters host Kafka servers that facilitate communication. Producers and consumers interface with the servers using Kafka topics (categories storing records).
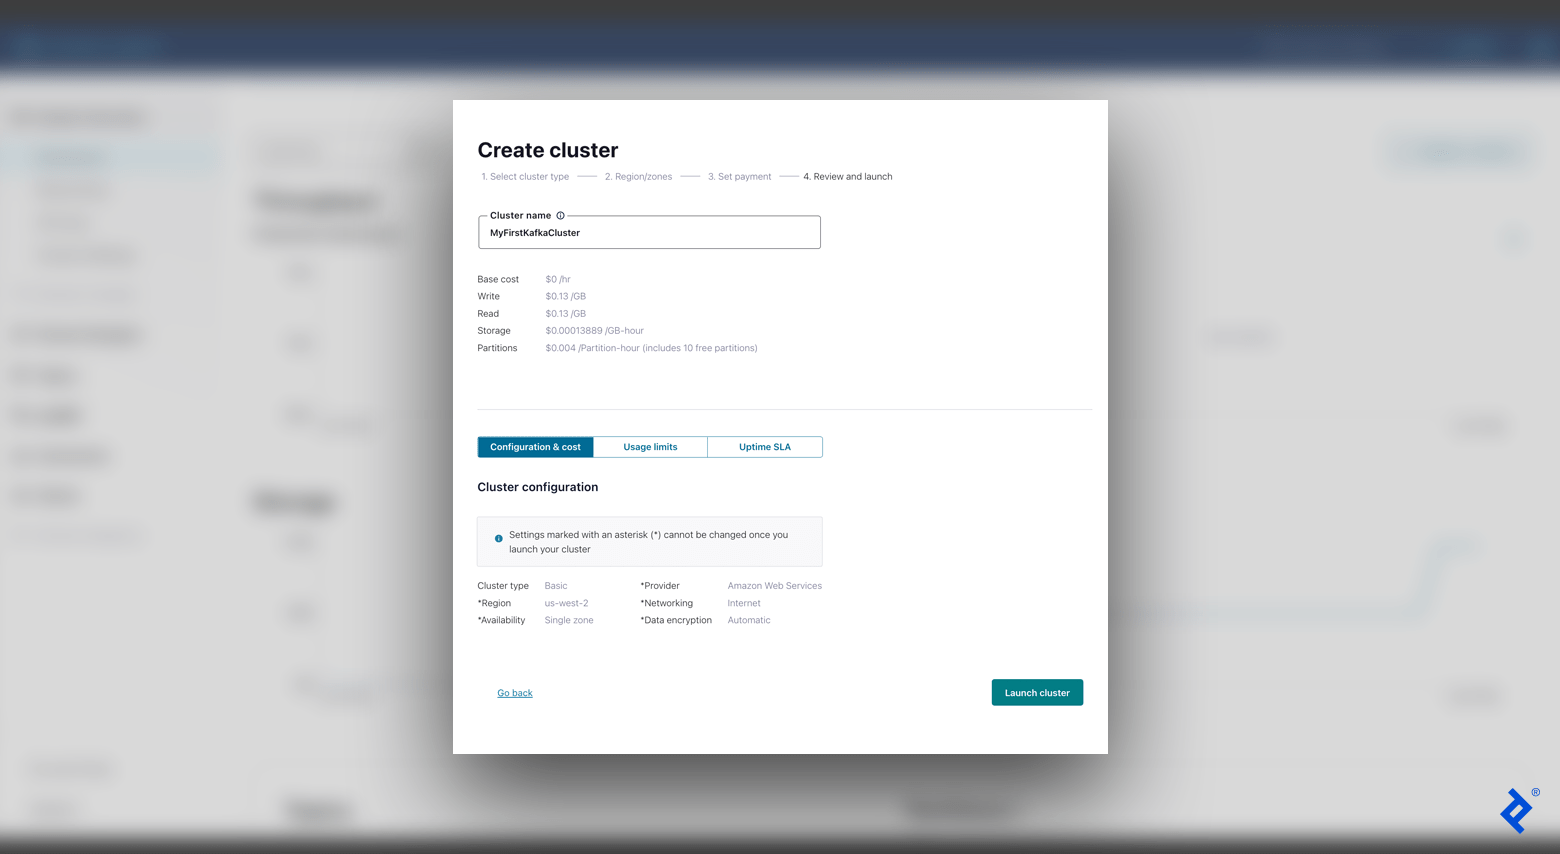
- Sign up for Confluent Cloud. Once you create an account, create a new Kafka cluster and select the Basic configuration.
- Choose a cloud provider and region. You should optimize your choices for the best network latency from your location. For the purposes of this tutorial, we’ll use the default availability settings.
- Next, enter a cluster name (e.g., “MyFirstKafkaCluster”), review your settings, and create the cluster. If you’re using Confluent Cloud’s free tier, you may be able to skip payment configuration.
With a working cluster, we are ready to create our first topic. From your cluster overview, open Topics, create a new topic (e.g., “MyFirstKafkaTopic”), and accept the default settings unless your workload requires a different partitioning strategy.
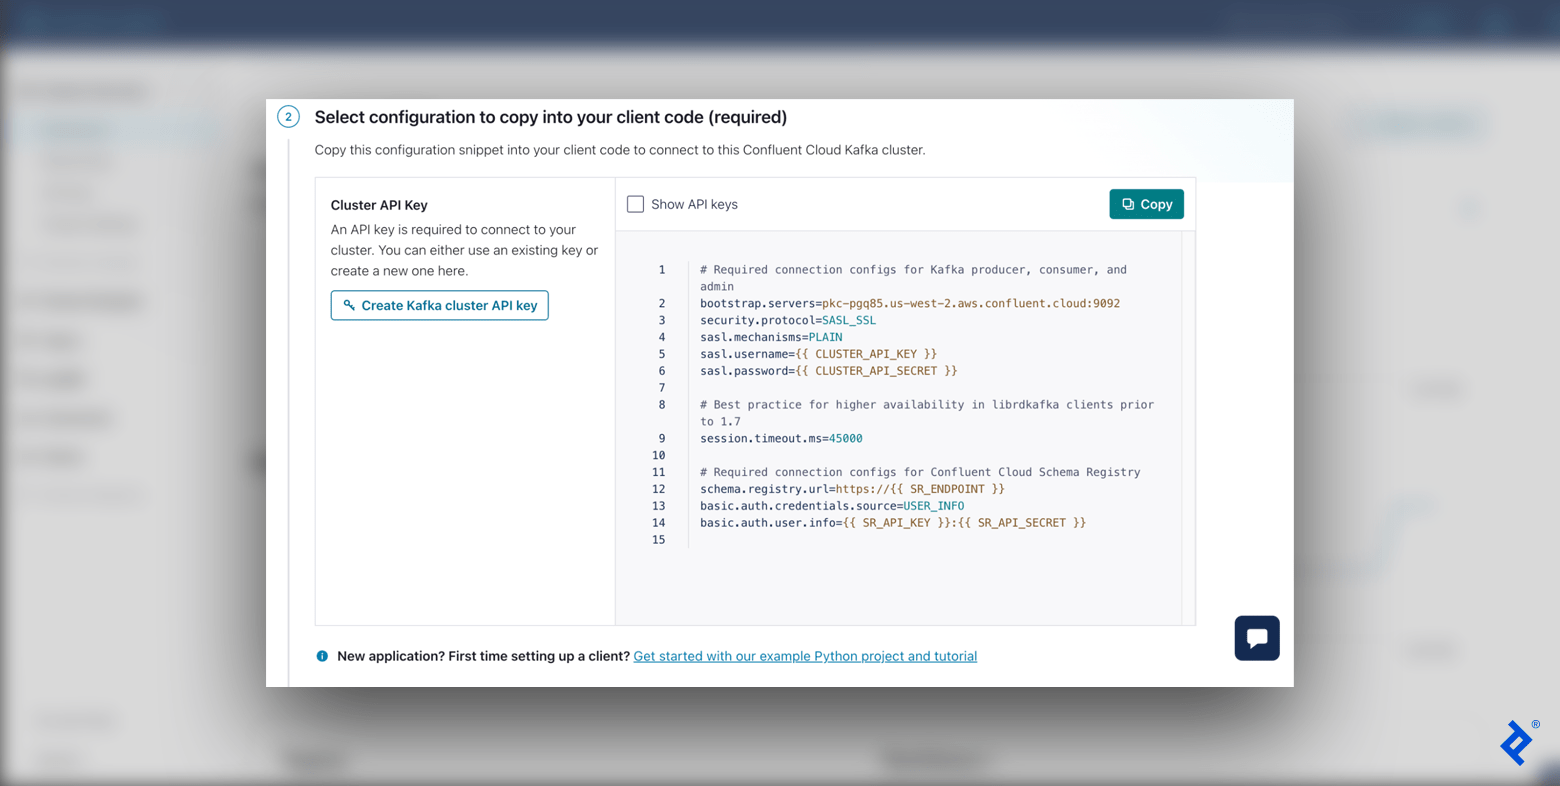
Before creating our first message, we need to configure our client. Open the Clients page (or use the Connect clients action from your cluster), choose Python, generate a Kafka cluster API key, and download the client configuration.
At this point, our event-streaming platform is finally ready to receive messages from our producer.
Simple Message Producer
Our producer generates events and sends them to Kafka. Let’s write some code to create a simple message producer. I recommend setting up a virtual environment for our project since we will be installing multiple packages in our environment.
First, we will add the connection settings from the client configuration that we downloaded from Confluent Cloud. To do this in our virtual environment, we’ll add export SETTING=value for each setting below to the end of our activate file (alternatively, you can add SETTING=value to your .env file):
export KAFKA_BOOTSTRAP_SERVERS=<bootstrap.servers>
export KAFKA_SECURITY_PROTOCOL=<security.protocol>
export KAFKA_SASL_MECHANISMS=<sasl.mechanisms>
export KAFKA_SASL_USERNAME=<sasl.username>
export KAFKA_SASL_PASSWORD=<sasl.password>
Make sure to replace each entry with your Confluent Cloud values (for example, <sasl.mechanisms> should be PLAIN), with your API key and secret as the username and password. Run source env/bin/activate, then printenv. Our new settings should appear, confirming that our variables have been correctly updated.
We will be using two Python packages:
-
python-dotenvpackage: Loads and sets environment variables. -
confluent-kafkapackage: Provides producer and consumer functionality; our Python client for Kafka.
We’ll run the command pip install confluent-kafka python-dotenv to install these. There are many other packages for Kafka in Python that may be useful as you expand your project.
Finally, we’ll create our basic producer using our Kafka settings. Add a simple_producer.py file:
# simple_producer.py
import os

from confluent_kafka import Producer
from dotenv import load_dotenv

def main():
    settings = {
        'bootstrap.servers': os.getenv('KAFKA_BOOTSTRAP_SERVERS'),
        'security.protocol': os.getenv('KAFKA_SECURITY_PROTOCOL'),
        'sasl.mechanisms': os.getenv('KAFKA_SASL_MECHANISMS'),
        'sasl.username': os.getenv('KAFKA_SASL_USERNAME'),
        'sasl.password': os.getenv('KAFKA_SASL_PASSWORD'),
    }

    producer = Producer(settings)
    producer.produce(
        topic='MyFirstKafkaTopic',
        key=None,
        value='MyFirstValue-111',
    )
    producer.flush()  # Wait for the confirmation that the message was received

if __name__ == '__main__':
    load_dotenv()
    main()
With this straightforward code, we create our producer and send a simple test message. Because this standalone example sends only a single message before exiting, we call flush() immediately to ensure that the message has been delivered. To test the result, run python3 simple_producer.py:
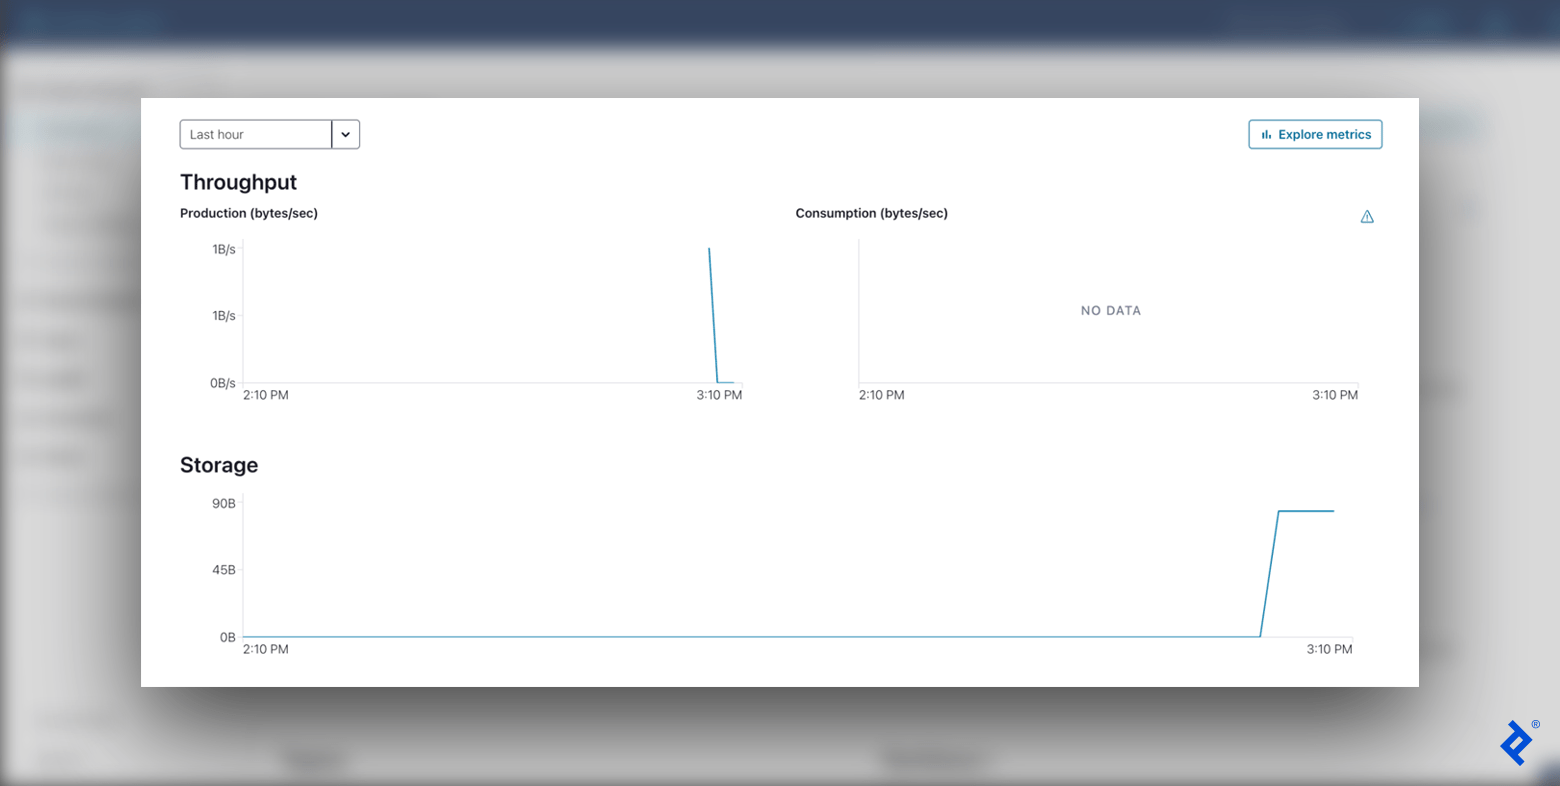
Checking the cluster dashboard, we will see a new data point on our Production graph for the message sent.
Custom Message Producer
Our producer is up and running. Let’s reorganize our code to make our project more modular and OOP-friendly. This will make it easier to add services and scale our project in the future. We’ll split our code into four files:
-
kafka_settings.py: Holds our Kafka configurations. -
kafka_producer.py: Contains a customproduce()method and error handling. -
kafka_producer_message.py: Handles different input data types. -
advanced_producer.py: Runs our final app using our custom classes.
First, our KafkaSettings class will encapsulate our Apache Kafka settings, so we can easily access these from our other files without repeating code:
# kafka_settings.py
import os

class KafkaSettings:
    def __init__(self):
        self.conf = {
            'bootstrap.servers': os.getenv('KAFKA_BOOTSTRAP_SERVERS'),
            'security.protocol': os.getenv('KAFKA_SECURITY_PROTOCOL'),
            'sasl.mechanisms': os.getenv('KAFKA_SASL_MECHANISMS'),
            'sasl.username': os.getenv('KAFKA_SASL_USERNAME'),
            'sasl.password': os.getenv('KAFKA_SASL_PASSWORD'),
        }
Next, our KafkaProducer class adds delivery reporting and error handling while allowing Kafka to batch messages efficiently:
# kafka_producer.py
from confluent_kafka import KafkaError, Producer

from kafka_producer_message import ProducerMessage
from kafka_settings import KafkaSettings


def delivery_report(error, message):
    '''Report whether a message was successfully delivered.'''
    if error is None:
        print(
            f'Message delivered to {message.topic()} '
            f'[partition {message.partition()}] '
            f'at offset {message.offset()}'
        )
        return

    if error.code() == KafkaError.MSG_SIZE_TOO_LARGE:
        # Replace this placeholder with application-specific handling.
        print(f'Message is too large to deliver: {error}')
        return

    print(f'Message delivery failed: {error}')


class KafkaProducer:
    def __init__(self, settings: KafkaSettings):
        self._producer = Producer(settings.conf)

    def produce(self, message: ProducerMessage):
        '''Queue a message for asynchronous delivery.'''
        try:
            self._producer.produce(
                topic=message.topic,
                key=message.key,
                value=message.value,
                on_delivery=delivery_report,
            )

            # Serve any delivery callbacks that are ready without blocking.
            self._producer.poll(0)

        except BufferError:
            # Give queued messages time to be delivered before reporting
            # that the local producer queue is full.
            self._producer.poll(1)
            raise

    def flush(self, timeout=10.0):
        '''Wait for outstanding messages before shutting down.'''
        messages_remaining = self._producer.flush(timeout)

        if messages_remaining:
            raise TimeoutError(
                f'{messages_remaining} message(s) were still queued '
                f'after {timeout} seconds.'
            )
In our delivery callback, we report when a message is too large for the Kafka cluster to accept. However, you should update your production code to handle this error appropriately. For example, you might log the failed event, send it to a dead-letter queue, or alert the service responsible for producing it.
Rather than calling flush() after every message, which prevents Kafka from batching records efficiently and reduces throughput, we’ll call poll(0) to process any delivery callbacks that are ready without blocking. We then call flush() once when the application shuts down to ensure that any remaining messages have been delivered.
Now, our ProducerMessage class handles different types of input data and correctly serializes them. We’ll add functionality for dictionaries, Unicode strings, and byte strings:
# kafka_producer_message.py
import json

class ProducerMessage:
    def __init__(self, topic: str, value, key=None, serializer=None) -> None:
        self.topic = f'{topic}'
        self.key = key
        self.value = serializer(value) if serializer else self.convert_value_to_bytes(value)

    @classmethod
    def convert_value_to_bytes(cls, value):
        if isinstance(value, dict):
            return cls.from_json(value)

        if isinstance(value, str):
            return cls.from_string(value)

        if isinstance(value, bytes):
            return cls.from_bytes(value)

        raise ValueError(f'Wrong message value type: {type(value)}')

    @classmethod
    def from_json(cls, value):
        return json.dumps(value, indent=None, sort_keys=True, default=str, ensure_ascii=False)

    @classmethod
    def from_string(cls, value):
        return value.encode('utf-8')

    @classmethod
    def from_bytes(cls, value):
        return value
We’ve also given ProducerMessage an optional serializer parameter. It’s unused for now, but it’ll let us plug in alternative encodings, like Avro, later without changing how messages are constructed.
Finally, we can build our app using our newly created classes in advanced_producer.py:
# advanced_producer.py
from dotenv import load_dotenv

from kafka_producer import KafkaProducer
from kafka_producer_message import ProducerMessage
from kafka_settings import KafkaSettings


def main():
    settings = KafkaSettings()
    producer = KafkaProducer(settings)

    try:
        messages = [
            ProducerMessage(
                topic='MyFirstKafkaTopic',
                key='event-1',
                value={'value': 'MyFirstKafkaValue'},
            ),
            ProducerMessage(
                topic='MyFirstKafkaTopic',
                key='event-2',
                value={'value': 'MySecondKafkaValue'},
            ),
            ProducerMessage(
                topic='MyFirstKafkaTopic',
                key='event-3',
                value={'value': 'MyThirdKafkaValue'},
            ),
        ]

        for message in messages:
            producer.produce(message)

    finally:
        # Wait for any queued messages before shutting down.
        producer.flush()


if __name__ == '__main__':
    load_dotenv()
    main()
We now have a neat abstraction above the confluent-kafka library. Our custom producer adds delivery reporting and error handling while allowing Kafka to batch messages efficiently. Separating the producer logic, settings, and message serialization also makes it easier to extend and maintain the application as its requirements evolve.
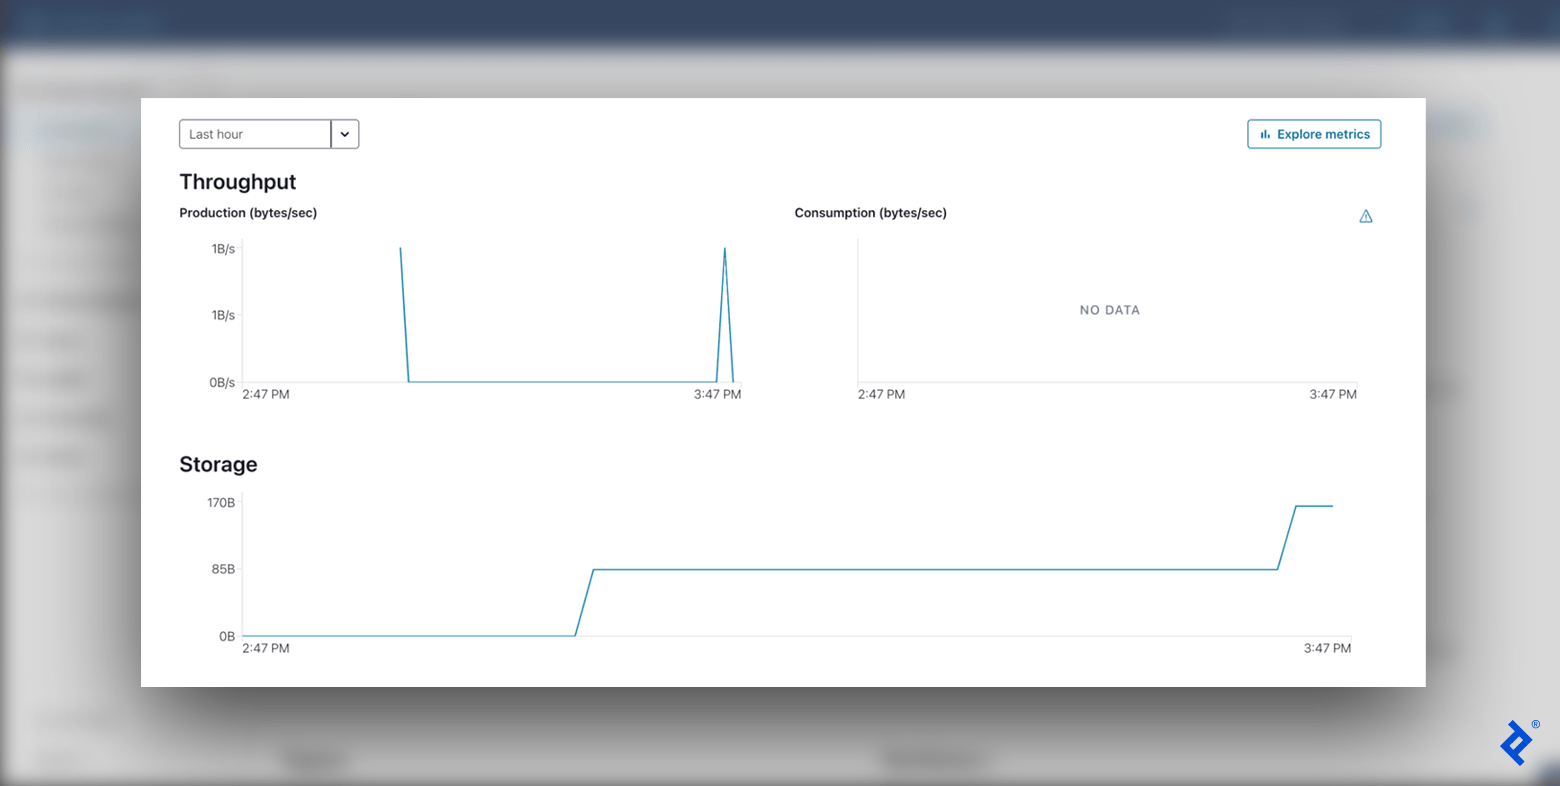
After running python3 advanced_producer.py, we can confirm from the Confluent Cloud cluster dashboard that additional data has been sent to our cluster. Having sent one message with the simple producer and three with our custom producer, we should see additional production activity and an increase in overall storage. The exact shape and number of spikes may vary because Kafka can batch messages together.
Asynchronous Message Producers
Many modern Python microservices are built with asynchronous frameworks such as FastAPI and asyncio. In these environments, we want message production to integrate naturally with our application’s event loop instead of blocking while we wait for network operations to complete.
The confluent-kafka library provides native AsyncIO support through its AIOProducer and AIOConsumer classes. These clients manage polling internally and allow Kafka operations to run without blocking the application’s event loop. Let’s rewrite our simple producer using AIOProducer. Because it has its own async interface, we’ll use it directly here rather than through our KafkaProducer wrapper. The delivery-reporting and error-handling ideas from that section still apply. We’re just expressing them as await-able calls instead of callbacks:
# async_producer.py
import asyncio
import os

from confluent_kafka.aio import AIOProducer
from dotenv import load_dotenv


async def send_event():
    settings = {
        'bootstrap.servers': os.getenv('KAFKA_BOOTSTRAP_SERVERS'),
        'security.protocol': os.getenv('KAFKA_SECURITY_PROTOCOL'),
        'sasl.mechanisms': os.getenv('KAFKA_SASL_MECHANISMS'),
        'sasl.username': os.getenv('KAFKA_SASL_USERNAME'),
        'sasl.password': os.getenv('KAFKA_SASL_PASSWORD'),
    }

    producer = AIOProducer(settings)

    try:
        # produce() returns a Future; awaiting it gives us the delivered Message
        delivery_future = await producer.produce(
            'MyFirstKafkaTopic',
            value='MyFirstKafkaValue',
        )
        await delivery_future
    finally:
        await producer.flush()
        await producer.close()


if __name__ == '__main__':
    load_dotenv()
    asyncio.run(send_event())
The first await queues the message and returns a future representing its delivery. Awaiting that future then confirms that Kafka has delivered the message. Both operations allow other asynchronous work to continue while the producer communicates with the broker.
Because this example waits for the delivery future, its message is already delivered by the time we shut down. We still call flush() before close() to preserve the shutdown pattern needed by larger applications that may have queued messages awaiting delivery.
Confluent introduced these AsyncIO clients as stable, first-class APIs in confluent-kafka 2.13.0. Older projects may still use aiokafka, but using confluent-kafka for both synchronous and asynchronous production lets our example retain the same client configuration and avoid adding another dependency.
Using Schema Registry for Strongly Typed Events
So far, we’ve serialized our messages as JSON for simplicity. While JSON remains an excellent choice for learning Kafka concepts and many lightweight integrations, production systems often standardize on Apache Avro or Protocol Buffers together with Confluent Schema Registry. Schema Registry centrally manages event schemas, allowing producers and consumers to validate message formats and maintain compatibility as schemas evolve. This helps reduce the risk of breaking downstream services.
Before using Schema Registry, add your Confluent Cloud Schema Registry credentials to your environment variables. You can generate them from the Schema Registry section of the Confluent Cloud console. These credentials are separate from your Kafka cluster API key and secret:
export SCHEMA_REGISTRY_URL=<schema.registry.url>
export SCHEMA_REGISTRY_API_KEY=<schema.registry.api.key>
export SCHEMA_REGISTRY_API_SECRET=<schema.registry.api.secret>
With our Schema Registry credentials in place, we can extend ProducerMessage with an optional serializer, so Avro-encoded messages flow through the same KafkaProducer wrapper as everything else we’ve built so far:
# schema_registry_producer.py
import os

from confluent_kafka.schema_registry import SchemaRegistryClient
from confluent_kafka.schema_registry.avro import AvroSerializer
from confluent_kafka.serialization import MessageField, SerializationContext
from dotenv import load_dotenv

from kafka_producer import KafkaProducer
from kafka_producer_message import ProducerMessage
from kafka_settings import KafkaSettings


schema_str = '''
{
  "type": "record",
  "name": "Message",
  "fields": [
    {"name": "value", "type": "string"}
  ]
}
'''


def main():
    settings = KafkaSettings()
    producer = KafkaProducer(settings)

    schema_registry = SchemaRegistryClient(
        {
            'url': os.getenv('SCHEMA_REGISTRY_URL'),
            'basic.auth.user.info': (
                f"{os.getenv('SCHEMA_REGISTRY_API_KEY')}:"
                f"{os.getenv('SCHEMA_REGISTRY_API_SECRET')}"
            ),
        }
    )

    topic = 'MyFirstKafkaTopic'
    avro_serializer = AvroSerializer(schema_registry, schema_str)

    message = ProducerMessage(
        topic=topic,
        key=None,
        value={'value': 'MyFirstKafkaValue'},
        serializer=lambda value: avro_serializer(
            value, SerializationContext(topic, MessageField.VALUE)
        ),
    )

    try:
        producer.produce(message)
    finally:
        producer.flush()


if __name__ == '__main__':
    load_dotenv()
    main()
With Schema Registry, producers register event schemas centrally instead of relying on each service to interpret JSON independently. This makes it easier for producers and consumers to evolve together as applications grow, while compatibility rules help prevent schema changes from unintentionally breaking downstream services. Although JSON remains appropriate for many simple applications and examples, Schema Registry paired with Avro or Protocol Buffers is a common choice for production event-driven systems.
Looking Ahead: From Producers to Consumers
An event-driven microservices architecture will enhance your project and improve its scalability, flexibility, reliability, and asynchronous communications. This tutorial has given you a glimpse of these benefits in action. With our enterprise-scale producer up and running, the next steps would be to create a consumer to read these messages from other services, containerize the application with Docker, deploy it with Kubernetes, and explore production-ready capabilities such as Schema Registry and observability.
The editorial team of the Toptal Engineering Blog extends its gratitude to E. Deniz Toktay for reviewing the code samples and other technical content presented in this article.
Further Reading on the Toptal Blog:
Understanding the basics
A microservices architecture is a type of service-oriented architecture that organizes an application’s processes as loosely coupled services, as opposed to a monolithic structure that supports inherently connected processes.
Kafka is a strong choice for microservices architectures due to its extensive ecosystem, scalability (fault-tolerance abilities), storage system, and stream processing features. It is one of the most popular event-streaming platforms available.
Yes, you can use Python with Kafka. It is common to pair Apache Kafka with microservices written in Python.
Event-driven microservices combine event-driven architectures and microservices architectures. An event-driven architecture is a design pattern that structures software so that events, or meaningful data, drive an app’s behavior. Event-driven microservices use this pattern with modularized application services.

Dmitry Shurov
Vancouver, Canada
Member since February 15, 2022
About the author
Dmitry is a software developer and Python expert. He has eight years of experience at companies such as Kaspersky and FABLEfx, and has developed multiple microservices systems across the globe using Kafka and Python.
PREVIOUSLY AT