
MySQL Master-Slave Replication on the Same Machine
Developers often work on only one machine, and have their whole development environment on that machine. Testing database replication before deploying changes in this kind of a development environment can be a challenging task.
In this article, Toptal engineer Ivan Bojovic guides us through a step-by-step tutorial on how to implement MySQL master-slave replication on one machine.

Ivan has over 11 years of experience with MySQL, Oracle, PostgreSQL and other database systems, and is a certified MySQL DBA.
Previously At

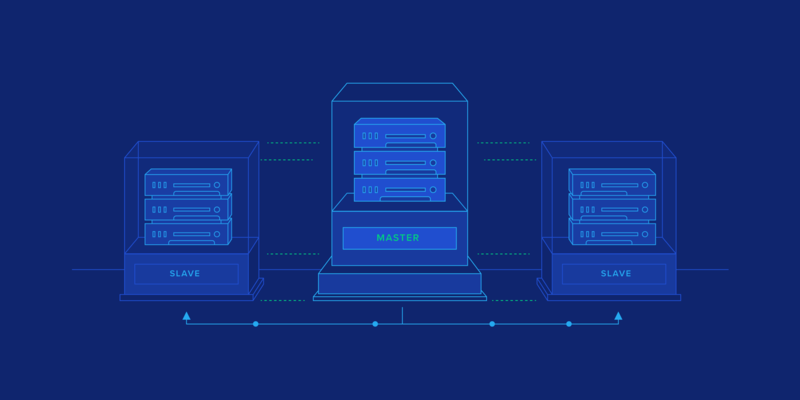
MySQL replication is a process that enables data from one MySQL database server (the master) to be copied automatically to one or more MySQL database servers (the slaves). It is usually used to spread read access on multiple servers for scalability, although it can also be used for other purposes such as for failover, or analyzing data on the slave in order not to overload the master.
As the master-slave replication is a one-way replication (from master to slave), only the master database is used for the write operations, while read operations may be spread on multiple slave databases. What this means is that if master-slave replication is used as the scale-out solution, you need to have at least two data sources defined, one for write operations and the second for read operations.

MySQL developers usually work on only one machine and tend to have their whole development environment on that one machine, with the logic that they are not dependent on a network or internet connection. If a master-slave replication is needed because, for example, they need to test replication in a development environment before deploying changes elsewhere, they have to create it on the same machine. While the setup of a single MySQL instance is fairly simple, we need to make some extra effort to setup a second, and then a master-slave replication.
For this step-by-step tutorial, I’ve chosen Ubuntu Linux as the host operating system, and the provided commands are for that operating system. If you want to setup your MySQL master-slave replication on some other operating system, you will need to make modifications for its specific commands. However, general principles of setting up the MySQL master-slave replication on the same machine are the same for all operating systems.

Installation of the First MySQL Instance
If you already have one instance of MySQL database installed on your machine, you can skip this step.
The easiest way to install MySQL on the Ubuntu is to run the following command from a terminal prompt:
sudo apt-get install mysql-server
During the installation process, you will be prompted to set a password for the MySQL root user.
Setting Up mysqld_multi
In order to manage two MySQL instances on the same machine efficiently, we need to use mysqld_multi.
First step in setting up mysqld_multi is the creation of two separate [mysqld] groups in the existing my.cnf file. Default location of my.cnf file on the Ubuntu is /etc/mysql/. So, open my.cnf file with your favorite text editor, and rename existing [mysqld] group to [mysqld1]. This renamed group will be used for the configuration of the first MySQL instance and will be also configured as a master instance. As in MySQL master-slave replication each instance must have its own unique server-id, add the following line in [mysqld1] group:
server-id = 1
Since we need a separate [mysqld] group for the second MySQL instance, copy the [mysqld1] group with all current configurations, and paste it below in the same my.cnf file. Now, rename the copied group to [mysqld2], and make the following changes in the configuration for the slave:
server-id           = 2
port                = 3307
socket              = /var/run/mysqld/mysqld_slave.sock
pid-file            = /var/run/mysqld/mysqld_slave.pid
datadir             = /var/lib/mysql_slave
log_error           = /var/log/mysql_slave/error_slave.log
relay-log           = /var/log/mysql_slave/relay-bin
relay-log-index     = /var/log/mysql_slave/relay-bin.index
master-info-file    = /var/log/mysql_slave/master.info
relay-log-info-file = /var/log/mysql_slave/relay-log.info
read_only           = 1
To setup the second MySQL instance as a slave, set server-id to 2, as it must be different to the master’s server-id.
Since both instances will run on the same machine, set port for the second instance to 3307since it has to be different from the port used for the first instance, which is 3306 by default.
In order to enable this second instance to use the same MySQL binaries, we need to set different values for socket, pid-file, datadir and log_error.
We also need to enable relay-log in order to use the second instance as a slave (parameters relay-log, relay-log-index and relay-log-info-file), as well as to set master-info-file.
Finally, in order to make the slave instance read-only, parameter read_only is set to 1. You should be careful with this option since it doesn’t completely prevent changes on the slave. Even when the read_only is set to 1, updates will be permitted only from users who have the SUPER privilege. MySQL has recently introduced the new parameter super_read_only to prevent SUPER users making changes. This option is available with version 5.7.8.
Apart from the [mysqld1] and [mysqld2] groups, we also need to add a new group [mysqld_multi] to the my.cnf file:
[mysqld_multi]
mysqld     = /usr/bin/mysqld_safe
mysqladmin = /usr/bin/mysqladmin
user       = multi_admin
password   = multipass
Once we install the second MySQL instance, and we start up both, we will give appropriate privileges to the multi_admin user in order to be able to shut down MySQL instances.
Create New Folders for the Second MySQL Instance
In the previous step we prepared the configuration file for the second MySQL instance. In that configuration file two new folders are used. The following Linux commands should be used in order to create those folders with appropriate privileges:
mkdir -p /var/lib/mysql_slave
chmod --reference /var/lib/mysql /var/lib/mysql_slave
chown --reference /var/lib/mysql /var/lib/mysql_slave

mkdir -p /var/log/mysql_slave
chmod --reference /var/log/mysql /var/log/mysql_slave
chown --reference /var/log/mysql /var/log/mysql_slave
Additional Security Settings in AppArmor
In some Linux environments, AppArmor security settings are needed in order to run the second MySQL instance. At least, they are required on Ubuntu.
To properly set-up AppArmor, edit /etc/apparmor.d/usr.sbin.mysqld file with your favorite text editor, add the following lines:
/var/lib/mysql_slave/ r,
/var/lib/mysql_slave/** rwk,
/var/log/mysql_slave/ r,
/var/log/mysql_slave/* rw,
/var/run/mysqld/mysqld_slave.pid rw,
/var/run/mysqld/mysqld_slave.sock w,
/run/mysqld/mysqld_slave.pid rw,
/run/mysqld/mysqld_slave.sock w,
After you save the file, reboot the machine in order for these changes to take effect.
Installation of the Second MySQL Instance
Several different approaches may be followed for the installation of the second MySQL instance. The approach presented in this tutorial uses the same MySQL binaries as the first, with separate data files necessary for the second installation.
Since we have already prepared the configuration file and the necessary folders and security changes in the previous steps, the final installation step of the second MySQL instance is the initialization of the MySQL data directory.
Execute the following command in order to initialize new MySQL data directory:
mysql_install_db --user=mysql --datadir=/var/lib/mysql_slave
Once MySQL data directory is initialized, you can start both MySQL instances using the mysqld_multi service:
mysqld_multi start
Set the root password for the second MySQL instance by using the mysqladmin with the appropriate host and port. Keep in mind, if host and port are not specified, mysqladmin will connect to the first MySQL instance by the default:
mysqladmin --host=127.0.0.1 --port=3307 -u root password rootpwd
In the example above I set the password to “rootpwd”, but using a more secure password is recommended.
Additional Configuration of mysqld_multi
At the end of the “Setting up mysqld_multi” section, I wrote that we will give appropriate privileges to the multi_admin user later on, so now is the time for that. We need to give this user appropriate privileges in both instances, so let’s first connect to the first instance:
mysql --host=127.0.0.1 --port=3306 -uroot -p
Once logged in, execute the following two commands:
mysql> GRANT SHUTDOWN ON *.* TO 'multi_admin'@'localhost' IDENTIFIED BY 'multipass';
mysql> FLUSH PRIVILEGES;
Exit from the MySQL client, and connect to the second instance:
mysql --host=127.0.0.1 --port=3307 -uroot -p
Once logged in, execute the same two commands as above:
mysql> GRANT SHUTDOWN ON *.* TO 'multi_admin'@'localhost' IDENTIFIED BY 'multipass';
mysql> FLUSH PRIVILEGES;
Exit from the MySQL client.
Start Both MySQL Instances Automatically on Boot
The final step of setting up mysqld_multi is the installation of the automatic boot script in the init.d.
To do that, create new file named mysqld_multi in /etc/init.d, and give it appropriate privileges:
cd /etc/init.d
touch mysqld_multi
chmod +x /etc/init.d/mysqld_multi
Open this new file with your favorite text editor, and copy the following script:
#!/bin/sh

### BEGIN INIT INFO
# Provides:       scriptname
# Required-Start: $remote_fs $syslog
# Required-Stop:  $remote_fs $syslog
# Default-Start:  2 3 4 5
# Default-Stop:   0 1 6
# Short-Description: Start daemon at boot time
# Description:    Enable service provided by daemon.
### END INIT INFO

bindir=/usr/bin

if test -x $bindir/mysqld_multi
then
    mysqld_multi="$bindir/mysqld_multi";
else
    echo "Can't execute $bindir/mysqld_multi";
    exit;
fi

case "$1" in
    'start' )
     "$mysqld_multi" start $2
     ;;
    'stop' )
     "$mysqld_multi" stop $2
     ;;
    'report' )
     "$mysqld_multi" report $2
     ;;
    'restart' )
     "$mysqld_multi" stop $2
     "$mysqld_multi" start $2
     ;;
    *)
     echo "Usage: $0 {start|stop|report|restart}" >&2
     ;;
esac
Add mysqld_multi service to the default runlevels with the following command:
update-rc.d mysqld_multi defaults
Reboot your machine, and check that both MySQL instances are running by using the following command:
mysqld_multi report
Setup Master-slave Replication
Now, when we have two MySQL instances running on the same machine, we will setup the first instance as a master, and the second as a slave.
One part of the configuration was already performed in the chapter “Setting up mysqld_multi”. The only remaining change in the my.cnf file is to set binary logging on the master. To do this, edit my.cnf file with the following changes and additions in the [mysqld1] group:
log_bin                     = /var/log/mysql/mysql-bin.log
innodb_flush_log_at_trx_commit  = 1
sync_binlog                 = 1
binlog-format               = ROW
Restart the master MySQL instance in order for these changes to take effect:
mysqld_multi stop 1
mysqld_multi start 1
In order for the slave to connect to the master with the correct replication privileges, a new user should be created on the master. Connect to the master instance using the MySQL client with the appropriate host and port:
mysql -uroot -p --host=127.0.0.1 --port=3306
Create a new user for replication:
mysql> CREATE USER 'replication'@'%' IDENTIFIED BY 'replication';
mysql> GRANT REPLICATION SLAVE ON *.* TO 'replication'@'%';
Exit from the MySQL client.
Execute the following command in order to create a dump of the master data:
mysqldump -uroot -p --host=127.0.0.1 --port=3306 --all-databases --master-data=2 > replicationdump.sql
Here we use the option --master-data=2 in order to have a comment containing a CHANGE MASTER statement inside the backup file. That comment indicates the replication coordinates at the time of the backup, and we will need those coordinates later for the update of master information in the slave instance. Here is the example of that comment:
--
-- Position to start replication or point-in-time recovery from
--

-- CHANGE MASTER TO MASTER_LOG_FILE='mysql-bin.000001', MASTER_LOG_POS=349;
Import the dump you created in the previous step into the slave instance:
mysql -uroot -p --host=127.0.0.1 --port=3307 < replicationdump.sql
Finally, in order for slave instance to connect to the master instance, the master information on the slave needs to be updated with the appropriate connection parameters.
Connect to the slave instance using the MySQL client with the appropriate host and port:
mysql -uroot -p --host=127.0.0.1 --port=3307
Execute the following command in order to update the master information (take the replication coordinates from the dump file replicationdump.sql, as explained above):
mysql> CHANGE MASTER TO
  -> MASTER_HOST='127.0.0.1',
  -> MASTER_USER='replication',
  -> MASTER_PASSWORD='replication',
  -> MASTER_LOG_FILE='mysql-bin.000001',
  -> MASTER_LOG_POS=349;
Execute the following command in order to start the slave:
mysql> START SLAVE;
Execute the following command in order to verify the replication is up and running:
mysql> SHOW SLAVE STATUS \G
Congratulations. Your MySQL master-slave replication on the same machine is now successfully set up.

Wrap Up
Having a master-slave replication configured in your development environment is useful if you need it for a scale-out solution in the production environment. This way, you will also have separate data sources configured for write and read operations so you can test locally that everything works as expected before further deployment.
Additionally, you may want to have several slave instances configured on the same machine to test the load balancer that distributes the read operations to several slaves. In that case, you may use this same manual to setup other slave instances by repeating all the same steps.
Further Reading on the Toptal Blog:
- The Definitive Guide to NoSQL Databases
- A Deep Dive Into Entity Framework Performance When Using “Contains”
- Magento Performance Optimization: A Complete Guide to Faster Load Speeds
- Case Study: Why I Use AWS Cloud Infrastructure for My Products
- PageSpeed Insights Best Practices: Acing Google’s Assessment
Ivan Bojovic
Belgrade, Serbia
Member since November 26, 2015
About the author
Ivan has over 11 years of experience with MySQL, Oracle, PostgreSQL and other database systems, and is a certified MySQL DBA.
PREVIOUSLY AT