Integrating Stripe and PayPal Payment Methods in Ruby on Rails
Secure payment processing is a key prerequisite for any eCommerce operation. If it fails, the consequences can be catastrophic for any company, big or small.
In this article, Toptal Ruby on Rails Developer Henrique Reinaldo Sarmento outlines how you can create a Ruby on Rails eCommerce app, leveraging PayPal and Stripe for reliable and secure payments.
Henrique is a passionate full-stack developer and cloud computing enthusiast with experience in Ruby on Rails, Flask, Javascript and React.
Expertise
PREVIOUSLY AT

A key feature for huge eCommerce companies such as AliExpress, Ebay, and Amazon is a secure way of handling payments, which is essential for their business. If this feature fails, the consequences would be devastating. This applies to industry leaders and Ruby on Rails developers working on eCommerce apps.
Cybersecurity is essential to preventing attacks, and a way to make the transaction process more secure is asking a third-party service to handle it. Including payment gateways in your application is a way to achieve this goal, as they provide user authorization, data encryption, and a dashboard so you can follow transaction status on the fly.
There are a variety of payment gateway services on the web, but in this article, I will be focusing on integrating Stripe and PayPal to a Rails application. To mention a few others: Amazon Payments, Square, SecurePay, WorldPay, Authorize.Net, 2Checkout.com, Braintree, Amazon, or BlueSnap.
How Payment Gateway Integration Works
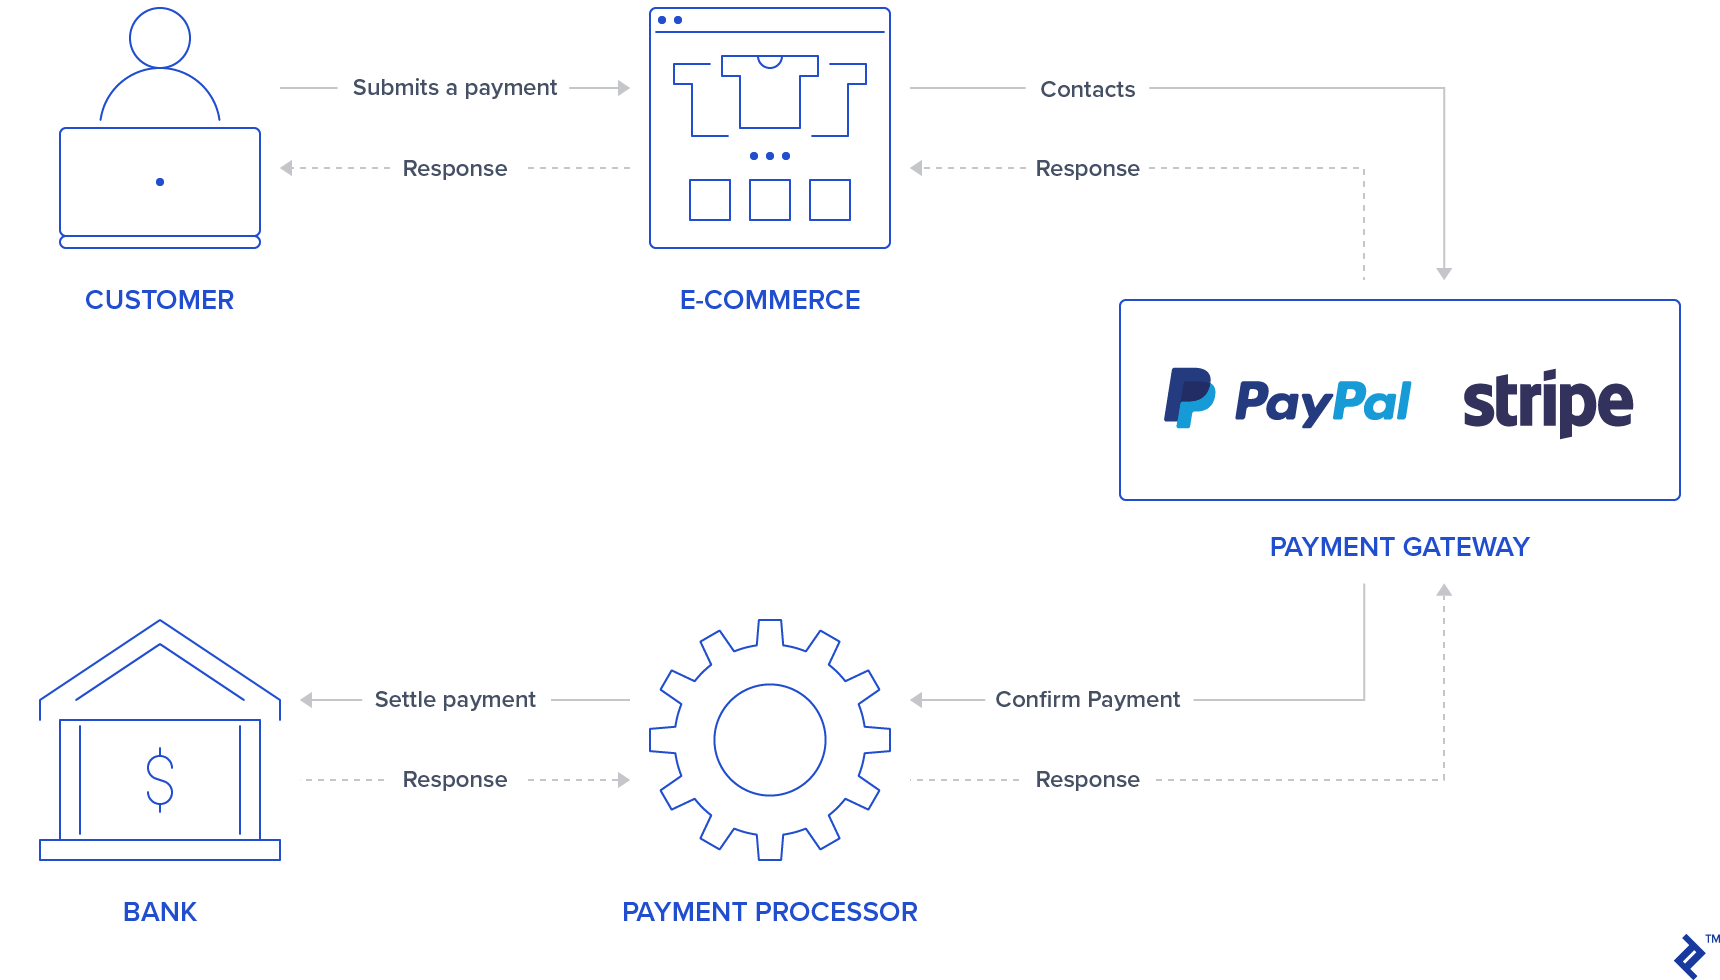
In general, there will be a form/button in your application where the user can log in/insert credit card data. PayPal and Stripe already make this first step more secure by using iframe forms or popups which prevent your application from storing sensitive user credit card info as they will return a token representing this transaction. Some users also might already feel more confident to process payments by knowing that a third-party service is handling the transaction process, so this can also be an attraction for your application.
After authenticating the user info, a payment gateway will confirm the payment by contacting a payment processor which communicates with banks in order to settle payments. This ensures that the transaction is debited/credited properly.
Stripe uses a credit card form asking credit card number, cvv, and expiration date. So the user has to fill out credit card information in the secured Stripe inputs. After providing this information, your application back end processes this payment through a token.
Unlike Stripe, PayPal redirects the user to the PayPal login page. The user authorizes and selects the payment method through PayPal, and again, your back end will handle tokens instead of user sensitive data.
It’s important to mention that, for these two payment gateways, your back end should ask for proceeding transaction execution through Stripe or PayPal APIs which will give a OK/NOK response, so your application should redirect the user to a successful or error page accordingly.
The intent of this article is to provide a quick guide for integrating these two payment gateways in a single application. For all tests, we will be using sandboxes and test accounts provided by Stripe and PayPal in order to simulate payments.
Setup
Before integrating payment gateways, we will do a setup for initializing the application by adding gems, database tables, and an index page. This project was created using Rails version 5.2.3 and Ruby 2.6.3.
Note: You can check out new Rails 6 features in our recent article.
Step 1: Initialize a Rails application.
Initialize the project by running the project initialization with the rails command with your app name:
rails new YOUR_APP_NAME
And cd in your application folder.
Step 2: Install gems.
Besides Stripe and PayPal gems, a few other gems were added:
-
devise: used for user authentication and authorization -
haml: templating tool for rendering user pages -
jquery-rails: forjqueryin the front-end scripts -
money-rails: for displaying formatted money values
Add to your Gemfile:
gem "devise", ">= 4.7.1"
gem "haml"
gem "jquery-rails"
gem "money-rails"
After adding it run in your CLI:
bundle install
Step 3: Initialize gems.
Some of these gems will require initialization besides installing them through bundle.
Installing devise:
rails g devise:install
Initializing money-rails:
rails g money_rails:initializer
Initialize jquery-rails by appending to the bottom of app/assets/javascripts/application.js the following:
//= require jquery
//= require jquery_ujs
Step 4: Tables and migrations
Three tables will be used in this project Users, Products, and Orders.
-
Users: Will be generated through devise -
Productscolumns:nameprice_cents-
Stripe_plan_name: An ID representing a subscription plan created in Stripe, so users can subscribe to it. This field is only required for products associated to a Stripe plan. -
paypal_plan_name: The same asstripe_plan_namebut for PayPal
-
Orderscolumns:product_iduser_id-
status: This will inform if the order is pending, failed, or paid. -
token: This is a token generated from the APIs (either Stripe or PayPal) in order to initialize a transaction. -
price_cents: Similar as the product, but used in order to make this value persistent in the order record -
payment_gateway: Stores which payment gateway is being used for the order PayPal or Stripe -
customer_id: This will be used for Stripe in order to store the Stripe customer for a subscription, and it will be explained with more detail in a later section.
For generating these tables, a few migrations have to be generated:
For creating the Users table. Run:
rails g devise User
For creating the Products table. Generate a migration by running:
rails generate migration CreateProducts name:string stripe_plan_name:string paypal_plan_name:string
Open your created migration file, which should be located at db/migrate/, and make changes to make your migration look similar to this:
class CreateProducts < ActiveRecord::Migration[5.2]
  def change
    create_table :products do |t|
      t.string :name
      t.string :stripe_plan_name
      t.string :paypal_plan_name
    end
    add_money :products, :price, currency: { present: true }
  end
end
For creating the Orders table. Generate a migration by running:
rails generate migration CreateOrders product_id:integer user_id:integer status:integer token:string charge_id:string error_message:string customer_id:string payment_gateway:integer
Again, open your created migration file which should be located at db/migrate/ and make changes to that file in order to make it look similar to this:
class CreateOrders < ActiveRecord::Migration[5.2]
  def change
    create_table :orders do |t|
      t.integer :product_id
      t.integer :user_id
      t.integer :status, default: 0
      t.string :token
      t.string :charge_id
      t.string :error_message
      t.string :customer_id
      t.integer :payment_gateway
      t.timestamps
    end
    add_money :orders, :price, currency: { present: false }
  end
end
Run database migrations by executing:
rails db:migrate
Step 5: Create models.
The user model is already created from devise installation, and no changes will be required on it. Besides that, two models will be created for Product and Order.
Product. Add a new file, app/models/product.rb, with:
class Product < ActiveRecord::Base
  monetize :price_cents
  has_many :orders
end
Order. Add a new file, app/models/order.rb, with:
class Order < ApplicationRecord
  enum status: { pending: 0, failed: 1, paid: 2, paypal_executed: 3}
  enum payment_gateway: { stripe: 0, paypal: 1 }
  belongs_to :product
  belongs_to :user

  scope :recently_created, ->  { where(created_at: 1.minutes.ago..DateTime.now) }

  def set_paid
    self.status = Order.statuses[:paid]
  end
  def set_failed
    self.status = Order.statuses[:failed]
  end
  def set_paypal_executed
    self.status = Order.statuses[:paypal_executed]
  end
end
Step 6: Populate the database.
A user and two products will be created in the console. Order records will be created according to payment tests.
- Run
rails s - In your browser, visit
http://localhost:3000 - You will be redirected to a sign-up page.
- Sign up a user by filling in their email address and password.
- In your terminal, the following logs will be prompted showing that a user was created in your database:
User Create (0.1ms) INSERT INTO "users" ("email", "encrypted_password", "created_at", "updated_at") VALUES (?, ?, ?, ?) …
- Create two products without subscriptions by running
rails cand adding:Product.create(name: "Awesome T-Shirt", price_cents: 3000)Product.create(name: "Awesome Sneakers", price_cents: 5000)
Step 7: Create an index page
The main page for the project includes product selection for purchases or subscriptions. Additionally, it also has a section for payment method selection (Stripe or PayPal). A submit button is also used for each payment gateway type as for PayPal we will add its own button design through its JavaScript library.
First, create the routes for index and submit in config/routes.rb.
Rails.application.routes.draw do
  devise_for :users
  get '/', to: 'orders#index'
  post '/orders/submit', to: 'orders#submit'
end
Create and add actions index and submit in the orders controller app/controllers/orders_controller.rb. The orders#index action stores two variables to be consumed in the front-end: @products_purchase which has a list of products without plans and @products_subscription which has products with both PayPal and Stripe plans.
class OrdersController < ApplicationController
  before_action :authenticate_user!
  def index
    products = Product.all
    @products_purchase = products.where(stripe_plan_name:nil, paypal_plan_name:nil)
    @products_subscription = products - @products_purchase
  end

  def submit
  end
end
Create a file in app/views/orders/index.html.haml. This file contains all inputs we are going to send to our back end through the submit method, and the interaction for payment gateways and product selection. Here are a few input name attributes:
-
Orders[product_id]stores the product id. -
Orders[payment_gateway]contains the payment gateway with either Stripe or PayPal values for the other.
%div
  %h1 List of products
  = form_tag({:controller => "orders", :action => "submit" }, {:id => 'order-details'}) do
    %input{id:'order-type', :type=>"hidden", :value=>"stripe", :name=>'orders[payment_gateway]'}
    .form_row
      %h4 Charges/Payments
      - @products_purchase.each do |product|
        %div{'data-charges-and-payments-section': true}
          = radio_button_tag 'orders[product_id]', product.id, @products_purchase.first == product
          %span{id: "radioButtonName#{product.id}"} #{product.name}
          %span{id: "radioButtonPrice#{product.id}", :'data-price' => "#{product.price_cents}"} #{humanized_money_with_symbol product.price}
        %br
      %h4 Subscriptions
      - @products_subscription.each do |product|
        %div
          = radio_button_tag 'orders[product_id]', product.id, false
          %span{id: "radioButtonName#{product.id}"} #{product.name}
          %span{id: "radioButtonPrice#{product.id}", :'data-price' => "#{product.price_cents}"} #{humanized_money_with_symbol product.price}
        %br
    %hr
    %h1 Payment Method
    .form_row
      %div
        = radio_button_tag 'payment-selection', 'stripe', true, onclick: "changeTab();"
        %span Stripe
      %br
      %div
        = radio_button_tag 'payment-selection', 'paypal', false, onclick: "changeTab();"
        %span Paypal
    %br
    %br
    %div{id:'tab-stripe', class:'paymentSelectionTab active'}
      %div{id:'card-element'}
      %div{id:'card-errors', role:"alert"}
      %br
      %br
      = submit_tag "Buy it!", id: "submit-stripe"
    %div{id:'tab-paypal', class:'paymentSelectionTab'}
      %div{id: "submit-paypal"}
    %br
    %br
    %hr
:javascript
  function changeTab() {
    var newActiveTabID = $('input[name="payment-selection"]:checked').val();
    $('.paymentSelectionTab').removeClass('active');
    $('#tab-' + newActiveTabID).addClass('active');
  }

:css
  #card-element {
    width:500px;
  }
  .paymentSelectionTab {
    display: none;
  }
  .paymentSelectionTab.active {
    display: block !important;
  }
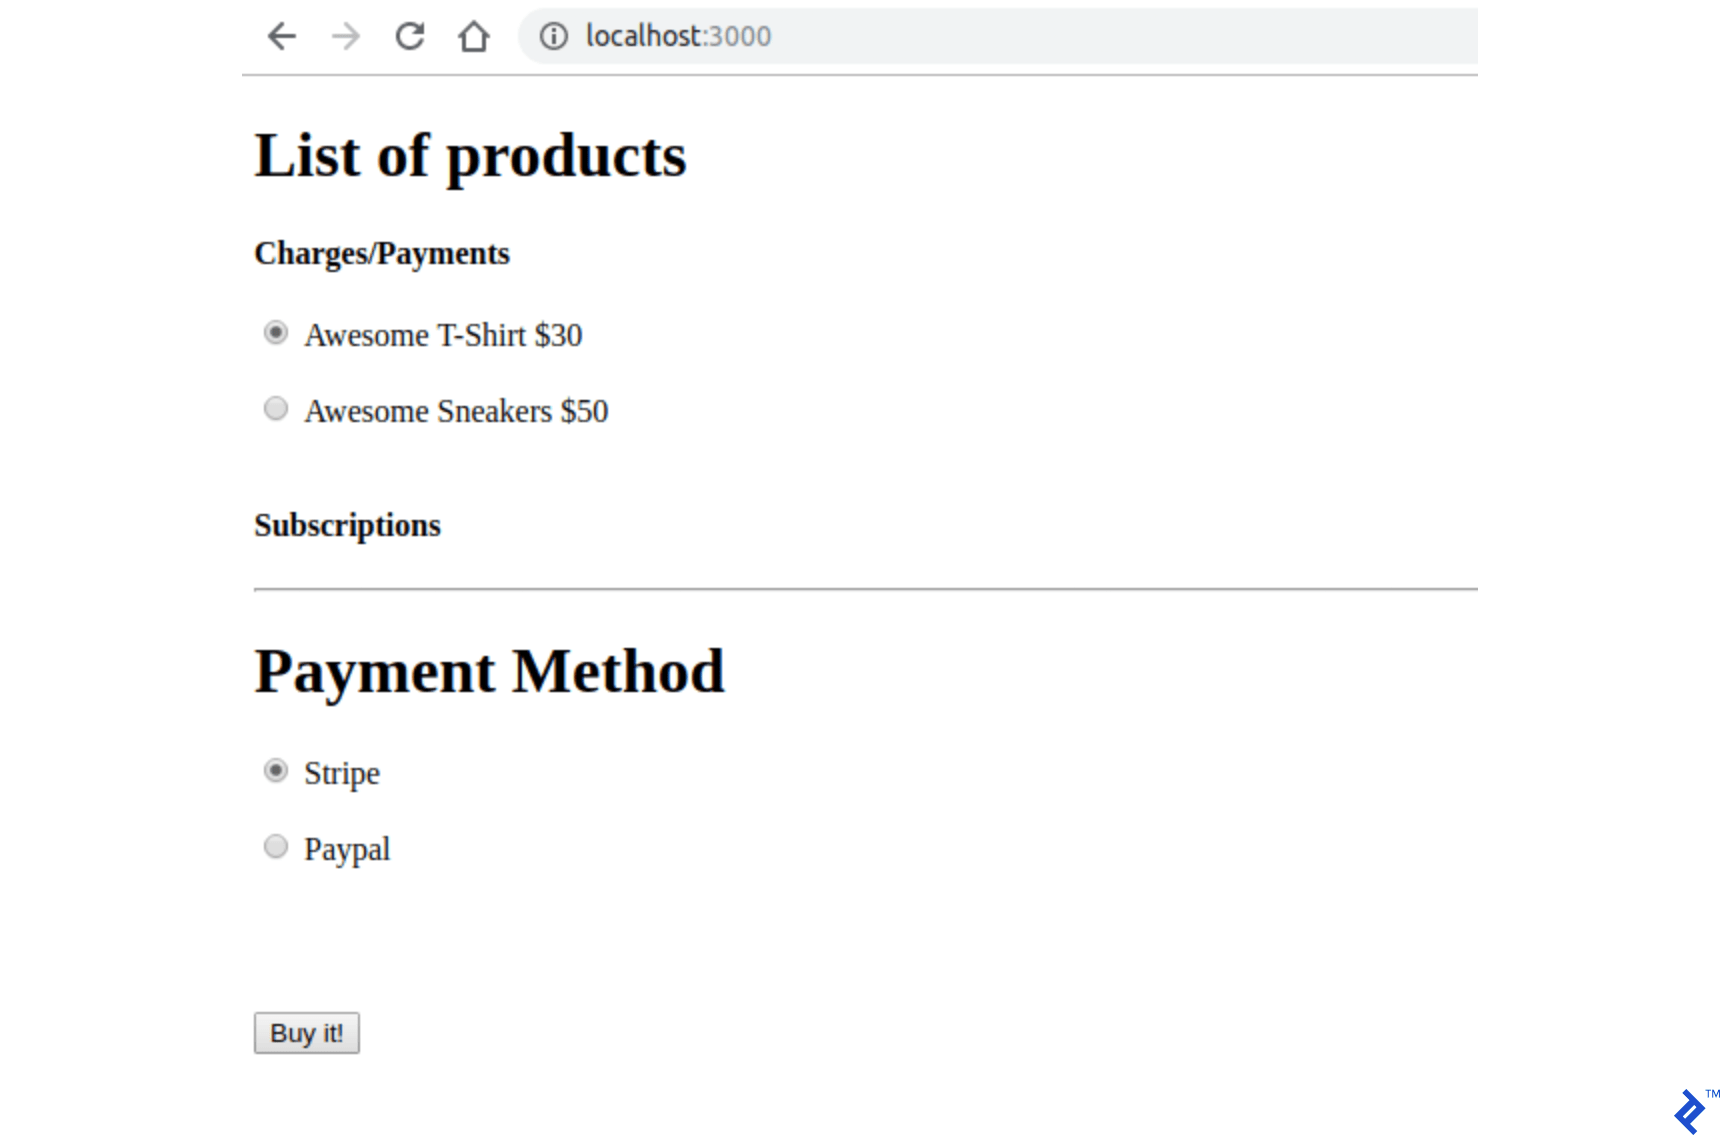
If you run your application with rails s and visit your page in http://localhost:3000. You should be able to see the page as the following:
Payment Gateway Credentials Storage
PayPal and Stripe keys will be stored in a file not tracked by Git. There are two types of keys stored in this file for each payment gateway, and for now, we will be using a dummy value for them. Additional directions for creating these keys are presented in further sections.
Step 1: Add this in .gitignore.
/config/application.yml
Step 2: Create a file with your credentials in config/application.yml. It should contain all your PayPal and Stripe sandbox/test keys for accessing these APIs.
test: &default
  PAYPAL_ENV: sandbox
  PAYPAL_CLIENT_ID: 	 	YOUR_CREDENTIAL_HERE
  PAYPAL_CLIENT_SECRET: 	YOUR_CREDENTIAL_HERE
  STRIPE_PUBLISHABLE_KEY:	YOUR_CREDENTIAL_HERE
  STRIPE_SECRET_KEY: 	YOUR_CREDENTIAL_HERE
development:
  <<: *default
Step 3: In order to store the variables from the file config/application.yml when the application starts, add these lines in config/application.rb inside the Application class so they will be available in ENV.
config_file = Rails.application.config_for(:application)
config_file.each do |key,value|
  ENV[key] = value
end unless config_file.nil?
Stripe Configuration
We will be adding a gem for using the Stripe API: stripe-rails. Creating a Stripe account is also required so that charges and subscriptions can be processed. If you have to, you can consulting the API methods for Stripe API in the official documentation.
Step 1: Add the stripe-rails gem to your project.
The stripe-rails gem will provide an interface for all API requests used in this project.
Add this in the Gemfile:
gem 'stripe-rails'
Run:
bundle install
Step 2: Generate your API keys.
In order to have the API keys for communicating with Stripe, you will need to create an account in Stripe. To test the application, it is possible to use testing mode, so no real business info has to be filled in the process of Stripe account creation.
- Create an account in Stripe if you don’t have one (https://dashboard.stripe.com/).
- While still in the Stripe dashboard, after logging in, toggle View Test Data on.
- At https://dashboard.stripe.com/test/apikeys, replace
YOUR_CREDENTIAL_HEREfor the valuesSTRIPE_PUBLISHABLE_KEYandSTRIPE_SECRET_KEYin/config/application.ymlwith the content fromPublishable KeyandSecret key.
Step 3: Initialize Stripe module
In addition to replacing the keys, we still need to initialize the Stripe module, so that it uses the keys already set in our ENV.
Create a file in config/initializers/stripe.rb with:
Rails.application.configure do
  config.stripe.secret_key = ENV["STRIPE_SECRET_KEY"]
  config.stripe.publishable_key = ENV["STRIPE_PUBLISHABLE_KEY"]
end
Step 4: Integrate Stripe in the front end.
We will be adding the Stripe JavaScript library and the logic for sending a token which represents the user credit card information and will be processed in our back end.
In the index.html.haml file, add this to the top of your file. This will use the Stripe module (provided by the gem) to add the Stripe javascript library to the user’s page.
= stripe_javascript_tag
Stripe uses secure input fields which are created through their API. As they are created in an iframe created through this API, you won’t have to worry about possible vulnerabilities handling user credit card information. Additionally, your back end won’t be able to process/store any user sensitive data, and it will only receive a token representing this information.
These input fields are created by calling stripe.elements().create('card'). After that it is just required to call the returned object with mount() by passing as the argument the HTML element id/class where these inputs should be mounted to. More information can be found at Stripe.
When the user hits the submit button with the Stripe payment method, another API call returning a promise is performed on the created Stripe card element:
stripe.createToken(card).then(function(result)
The result variable of this function, if not having a property error assigned, will have a token which can be retrieved by accessing the attribute result.token.id. This token will be sent to the back end.
In order to make these changes, replace the commented code // YOUR STRIPE AND PAYPAL CODE WILL BE HERE in index.html.haml with:
  (function setupStripe() {
    //Initialize stripe with publishable key
    var stripe = Stripe("#{ENV['STRIPE_PUBLISHABLE_KEY']}");

    //Create Stripe credit card elements.
    var elements = stripe.elements();
    var card = elements.create('card');

    //Add a listener in order to check if
    card.addEventListener('change', function(event) {
      //the div card-errors contains error details if any
      var displayError = document.getElementById('card-errors');
      document.getElementById('submit-stripe').disabled = false;
      if (event.error) {
        // Display error
        displayError.textContent = event.error.message;
      } else {
        // Clear error
        displayError.textContent = '';
      }
    });

    // Mount Stripe card element in the #card-element div.
    card.mount('#card-element');
    var form = document.getElementById('order-details');
    // This will be called when the #submit-stripe button is clicked by the user.
    form.addEventListener('submit', function(event) {
      $('#submit-stripe').prop('disabled', true);
      event.preventDefault();
      stripe.createToken(card).then(function(result) {
        if (result.error) {
          // Inform that there was an error.
          var errorElement = document.getElementById('card-errors');
          errorElement.textContent = result.error.message;
        } else {
        // Now we submit the form. We also add a hidden input storing
    // the token. So our back-end can consume it.
          var $form = $("#order-details");
          // Add a hidden input orders[token]
          $form.append($('<input type="hidden" name="orders[token]"/>').val(result.token.id));
          // Set order type
          $('#order-type').val('stripe');
          $form.submit();
        }
      });
      return false;
    });
  }());
  //YOUR PAYPAL CODE WILL BE HERE
If you visit your page, it should look like the following with the new Stripe secure input fields:

Step 5: Test your application.
Fill the credit card form with a testing card (https://stripe.com/docs/testing) and submit the page. Check if the submit action is called with all parameters (product_id, payment_gateway, and token) in your server output.
Stripe Charges
Stripe charges represent one-time transactions. Therefore, after a Stripe charge transaction, you would receive money from the client directly. This is ideal for selling products which are not associated with plans. In a later section, I will show how to do the same transaction type with PayPal, but PayPal’s name for this type of transaction is Payment.
In this section I will also provide all the skeleton for handling and submitting an order. We create an order in the submit action when the Stripe form is submitted. This order will initially have the pending status, so if anything goes wrong while processing this order, the order will still be pending.
If any error arises from Stripe API calls, we set the order in a failed state, and if the charge is completed successfully, it will be in the paid state. The user is also redirected according to the Stripe API response as shown in the following graph:

Additionally, when a Stripe charge is performed, an ID is returned. We will be storing this ID so that you can later look for it in your Stripe dashboard if required. This ID can also be used if the order has to be refunded. Such a thing won’t be explored in this article.
Step 1: Create the Stripe service.
We will be using a singleton class to represent Stripe operations using the Stripe API. In order to create a charge, the method Stripe::Charge.create is called, and the returned object ID attribute will be stored in the order record charge_id. This create function is called by passing the token originated in the front end, the order price, and a description.
So, create a new folder app/services/orders, and add a Stripe service: app/services/orders/stripe.rb containing the Orders::Stripe singleton class, which has an entry in the method execute.
class Orders::Stripe
  INVALID_STRIPE_OPERATION = 'Invalid Stripe Operation'
  def self.execute(order:, user:)
    product = order.product
    # Check if the order is a plan
    if product.stripe_plan_name.blank?
      charge = self.execute_charge(price_cents: product.price_cents,
                                   description: product.name,
                                   card_token:  order.token)
    else
  	 #SUBSCRIPTIONS WILL BE HANDLED HERE
    end

    unless charge&.id.blank?
      # If there is a charge with id, set order paid.
      order.charge_id = charge.id
      order.set_paid
    end
  rescue Stripe::StripeError => e
    # If a Stripe error is raised from the API,
    # set status failed and an error message
    order.error_message = INVALID_STRIPE_OPERATION
    order.set_failed
  end
  private
  def self.execute_charge(price_cents:, description:, card_token:)
    Stripe::Charge.create({
      amount: price_cents.to_s,
      currency: "usd",
      description: description,
      source: card_token
    })
  end
end
Step 2: Implement the submit action and call the Stripe service.
In orders_controller.rb, add the following in the submit action, which basically will call the service Orders::Stripe.execute. Note that two new private functions were also added: prepare_new_order and order_params.
  def submit
    @order = nil
    #Check which type of order it is
    if order_params[:payment_gateway] == "stripe"
      prepare_new_order
      Orders::Stripe.execute(order: @order, user: current_user)
    elsif order_params[:payment_gateway] == "paypal"
      #PAYPAL WILL BE HANDLED HERE
    end
  ensure
    if @order&.save
      if @order.paid?
        # Success is rendered when order is paid and saved
        return render html: SUCCESS_MESSAGE
      elsif @order.failed? && !@order.error_message.blank?
        # Render error only if order failed and there is an error_message
        return render html: @order.error_message
      end
    end
    render html: FAILURE_MESSAGE
  end

  private
  # Initialize a new order and and set its user, product and price.
  def prepare_new_order
    @order = Order.new(order_params)
    @order.user_id = current_user.id
    @product = Product.find(@order.product_id)
    @order.price_cents = @product.price_cents
  end

  def order_params
    params.require(:orders).permit(:product_id, :token, :payment_gateway, :charge_id)
  end
Step 3: Test your application.
Check if the submit action, when called with a valid testing card, performs a redirection to a successful message. Additionally, check in your Stripe dashboard if the order is shown as well.
Stripe Subscriptions
Subscriptions or plans can be created for recurring payments. With this type of product, the user is charged daily, weekly, monthly or yearly automatically according to the plan configuration. In this section, we will use the field for product stripe_plan_name in order to store the plan ID—actually, it is possible for us to choose the ID, and we will call it premium-plan—which will be used in order to create the relation customer <-> subscription.
We will also create a new column for users table called stripe_customer_id which will be filled with the id property of a Stripe customer object. A Stripe customer is created when the function Stripe::Customer.create is called, and you can also check the customers created and linked to your account in (https://dashboard.stripe.com/test/customers). Customers are created by passing a source parameter which, in our case, is the token generated in the front end which is sent when the form is submitted.
The customer object obtained from the last mentioned Stripe API call, is also used for creating a subscription which is done by calling customer.subscriptions.create and passing the plan ID as a parameter.
Additionally, the stripe-rails gem provides the interface to retrieve and update a customer from Stripe, which is done by calling Stripe::Customer.retrieve and Stripe::Customer.update, respectively.
So, when a user record already has a stripe_customer_id, instead of creating a new customer using Stripe::Customer.create, we will call Stripe::Customer.retrieve passing the stripe_customer_id as the parameter, followed by a Stripe::Customer.update, and in this case, passing the token a parameter.
Firstly we will be creating a plan using Stripe API so that we can create a new subscription product using the field stripe_plan_name. Afterwards, we will do modifications in the orders_controller and Stripe service so that creation and execution of Stripe subscriptions is handled.
Step 1: Create a plan using the Stripe API.
Open your console using the command rails c . Create subscription for your Stripe account with:
Stripe::Plan.create({
  amount: 10000,
  interval: 'month',
  product: {
    name: 'Premium plan',
  },
  currency: 'usd',
  id: 'premium-plan',
})
If the returned result in this step is true, it means that the plan was created successfully, and you can access it in your Stripe dasboard.
Step 2: Create a product in the database with stripe_plan_name field set.
Now, create a product with the stripe_plan_name set as premium-plan in the database:
Product.create(price_cents: 10000, name: 'Premium Plan', stripe_plan_name: 'premium-plan')
Step 3: Generate a migration for adding a column stripe_customer_id in the users table.
Run the following in the terminal:
rails generate migration AddStripeCustomerIdToUser stripe_customer_id:string

rails db:migrate
Step 4: Implement the subscription logic in the Stripe service class.
Add two more functions in the private methods of app/services/orders/stripe.rb: execute_subscription is responsible for creating the subscriptions in the customer’s object. The function find_or_create_customer is responsible to return the already created customer or by returning a newly created customer.
def self.execute_subscription(plan:, token:, customer:)
  customer.subscriptions.create({
    plan: plan
  })
end

def self.find_or_create_customer(card_token:, customer_id:, email:)
  if customer_id
    stripe_customer = Stripe::Customer.retrieve({ id: customer_id })
    if stripe_customer
      stripe_customer = Stripe::Customer.update(stripe_customer.id, { source: card_token})
    end
  else
    stripe_customer = Stripe::Customer.create({
      email: email,
      source: card_token
    })
  end
  stripe_customer
end
Finally, in the execute function in the same file (app/services/orders/stripe.rb), we will first call find_or_create_customer and then execute the subscription by calling execute_subscription by passing the previous retrieved/created customer. So, replace the comment #SUBSCRIPTIONS WILL BE HANDLED HERE in the execute method with the following code:
customer =  self.find_or_create_customer(card_token: order.token,
                               customer_id: user.stripe_customer_id,
                               email: user.email)
if customer
  user.update(stripe_customer_id: customer.id)
  order.customer_id = customer.id
  charge = self.execute_subscription(plan: product.stripe_plan_name,
                                     customer: customer)
Step 5: Test your application.
Visit your website, select the subscription product Premium Plan, and fill a valid test card. After submitting, it should redirect you to a successful page. Additionally, check in your Stripe dashboard if the subscription was created successfully.
PayPal Configuration
As we did in Stripe, we will also be adding a gem for using PayPal API: paypal-sdk-rest, and creating a PayPal account is also required. A descriptive workflow for PayPal using this gem can be consulted in the official PayPal API documentation.
Step 1: Add the paypal-sdk-rest gem to your project.
Add this in the Gemfile:
gem 'paypal-sdk-rest'
Run:
bundle install
Step 2: Generate your API keys.
In order to have the API keys for communicating with PayPal, you will need to create a PayPal account. So:
- Create an account (or use your PayPal account) at https://developer.paypal.com/.
- Still logged into your account, create two sandbox accounts at https://developer.paypal.com/developer/accounts/:
- Personal (Buyer Account) – This will be used in your tests for making payments and subscriptions.
- Business (Merchant Account) – This will be linked to the application, which will have the API keys we are looking for. Besides that, all transactions can be followed in this account.
- Create an app at https://developer.paypal.com/developer/applications using the previous business sandbox account.
- After this step, you will receive two keys for PayPal:
Client IDandSecret. - In
config/application.yml, replaceYOUR_CREDENTIAL_HEREfromPAYPAL_CLIENT_IDandPAYPAL_CLIENT_SECRETwith the keys you’ve just received.
Step 3: Initialize the PayPal module.
Similar to Stripe, besides replacing the keys in application.yml, we still need to initialize the PayPal module so it can use the keys already set in our ENV variable. For this purpose, create a file in config/initializers/paypal.rb with:
PayPal::SDK.configure(
  mode: ENV['PAYPAL_ENV'],
  client_id: ENV['PAYPAL_CLIENT_ID'],
  client_secret: ENV['PAYPAL_CLIENT_SECRET'],
)
PayPal::SDK.logger.level = Logger::INFO
Step 4: Integrate PayPal in the front end.
In index.html.haml add this to the top of the file:
%script(src="https://www.paypal.com/sdk/js?client-id=#{ENV['PAYPAL_CLIENT_ID']}")
Unlike Stripe, PayPal uses only a button which, when clicked, opens a secure popup where the user can login and proceed to payment/subscription. This button can be rendered by calling the method paypal.Button(PARAM1).render(PARAM2).
-
PARAM1is an object with the environment configuration and two callback functions as properties:createOrderandonApprove. -
PARAM2indicates the HTML element identifier to which the PayPal button should be attached.
So, still in the same file, replace the commented code YOUR PAYPAL CODE WILL BE HERE with:
  (function setupPaypal() {
    function isPayment() {
      return $('[data-charges-and-payments-section] input[name="orders[product_id]"]:checked').length
    }

    function submitOrderPaypal(chargeID) {
      var $form = $("#order-details");
      // Add a hidden input orders[charge_id]
      $form.append($('<input type="hidden" name="orders[charge_id]"/>').val(chargeID));
      // Set order type
      $('#order-type').val('paypal');
      $form.submit();
    }

    paypal.Buttons({
      env: "#{ENV['PAYPAL_ENV']}",
      createOrder: function() {
      },
      onApprove: function(data) {
      }
    }).render('#submit-paypal');
  }());
Step 5: Test your application.
Visit your page and check if the PayPal button is rendered when you select PayPal as the payment method.
PayPal Transactions
The logic for PayPal transactions, unlike Stripe, is a bit more complex by involving more requests originated from the front end to the back end. That’s why this section exists. I will be explaining more or less (without any code) how the functions described in the createOrder and onApprove methods are going to be implemented and what is expected in the back-end processes as well.
Step 1: When the user clicks the PayPal submit button, a PayPal popup asking for user credentials is open but in a loading state. The function callback createOrder is called.
Step 2: In this function, we will be performing a request to our back-end which will create a payment/subscription. This is the very beginning of a transaction, and no charges will be applied yet, so the transaction is actually in a pending state. Our back end should return us a token, which will be generated using PayPal module (provided through the paypal-rest-sdk gem).
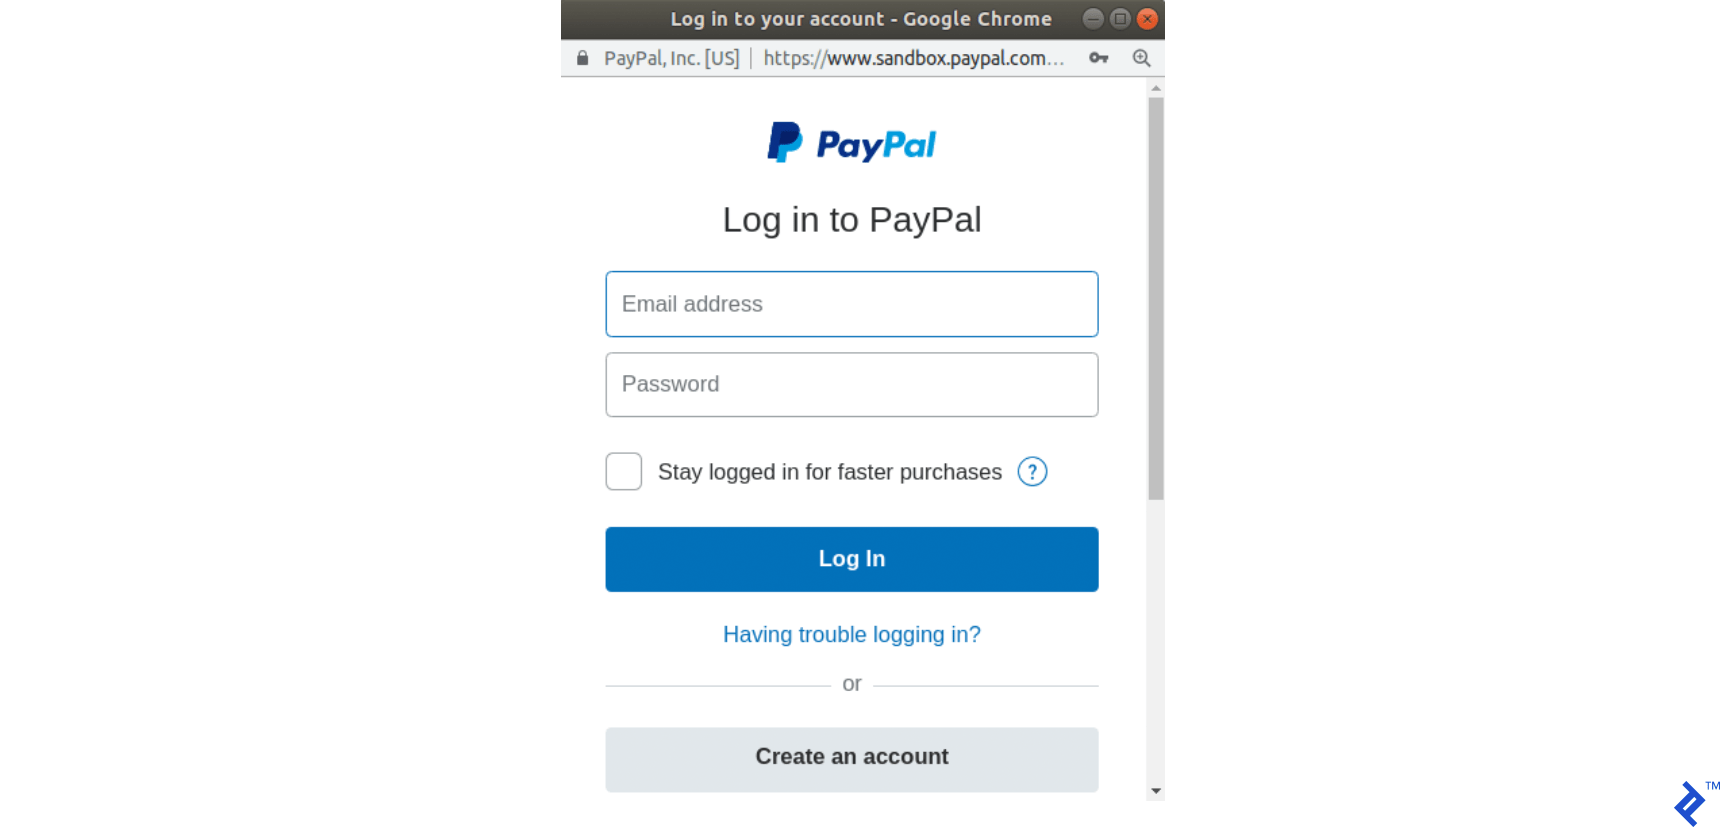
Step 3: Still in createOrder callback, we return this token generated in our back-end, and If everything is ok, the PayPal pop-up will render the following, asking for user credentials:
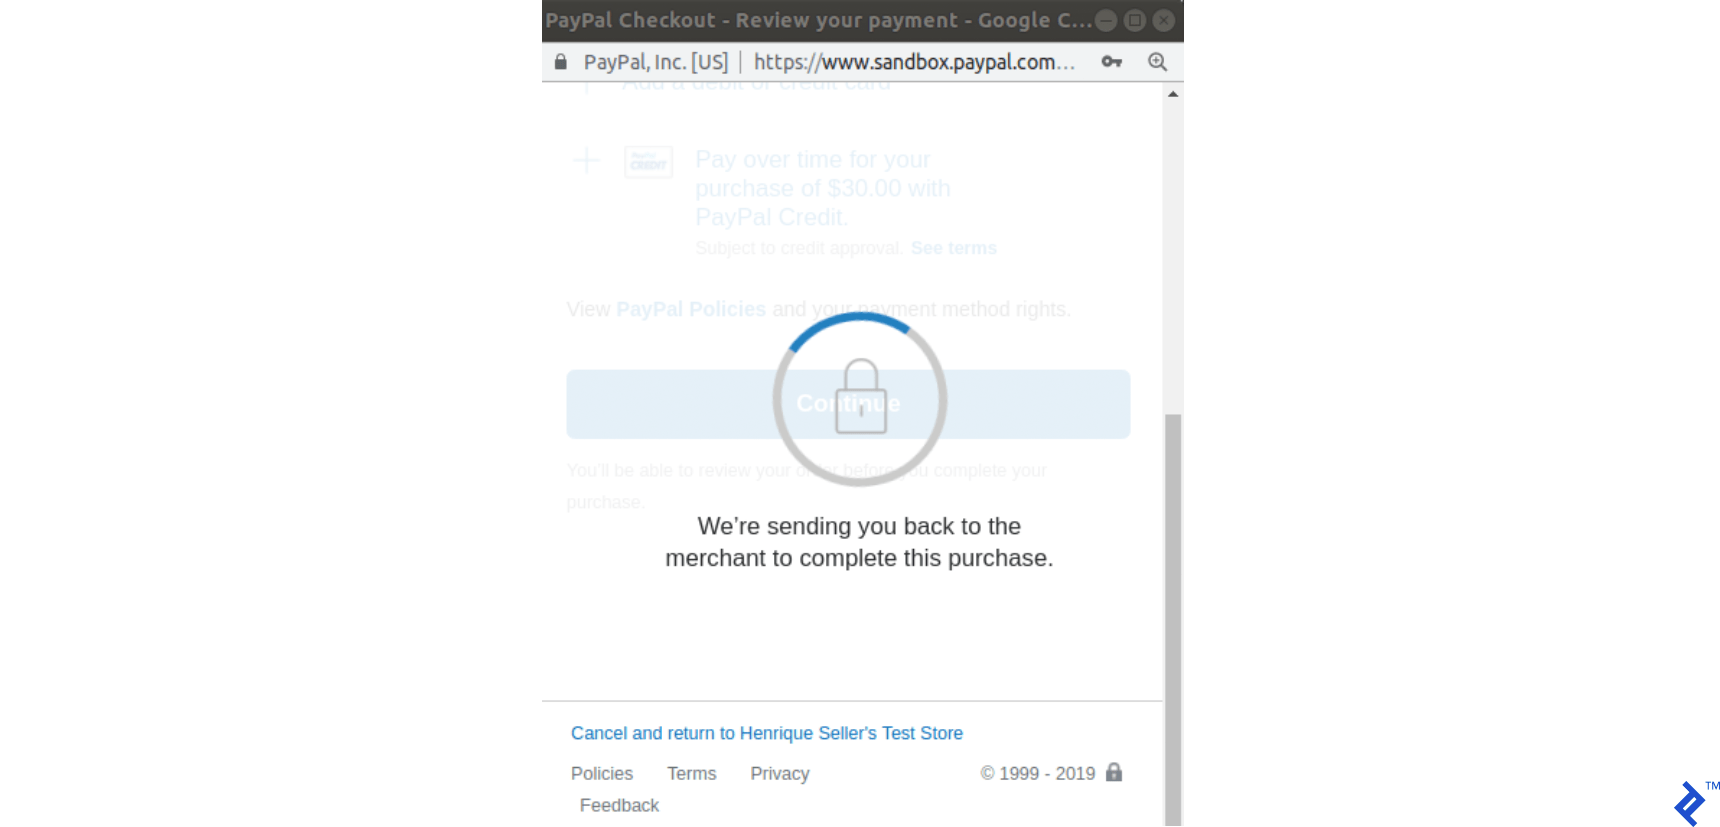
Step 4: After the user has logged in and selected the payment method, the popup will change its state to the following:
Step 5: The onApprove function callback is now called. We’ve defined it as the following: onApprove: function(data). The data object will have the payment information in order to execute it. In this callback, another request to our back-end function will be performed this time passing the data object in order to execute the PayPal order.
Step 6: Our back end executes this transaction and returns 200 (if successful).
Step 7: When our back end returns we submit the form. This is the third request we make to our back end.
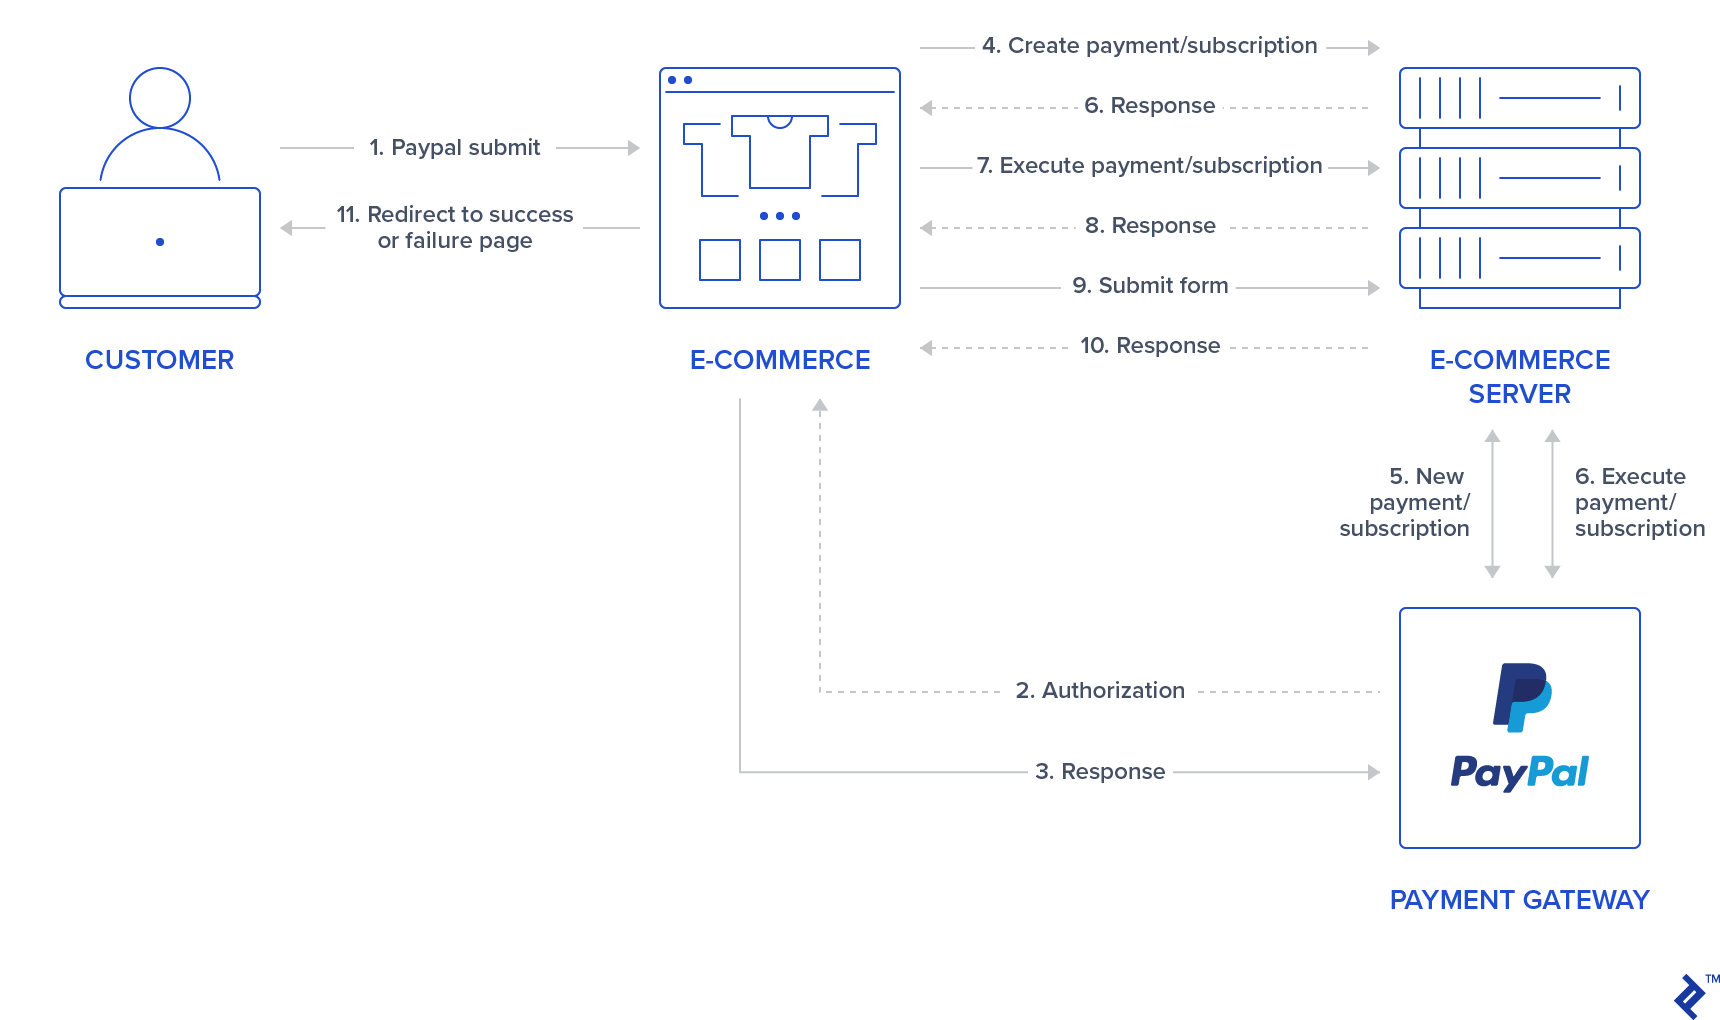
Note that, unlike Stripe, there are three requests made to our back-end in this process. And we will keep our order record status synchronized accordingly:
-
createOrdercallback: A transaction is created, and an order record is also created; therefore, it is in a pending state as default. -
onApprovecallback: The transaction is executed and our order will be set as paypal_executed. - The order page is submitted: The transaction was already executed, so nothing changes. The order record will change its state to paid.
This whole process is described in the following graph:
PayPal Payments
PayPal payments follow the same logic as Stripe Charges, so they represent one-time transactions, but as mentioned in the previous section, they have a different flow logic. These are the changes that will need to be performed for handling PayPal payments:
Step 1: Create new routes for PayPal and execute payments.
Add the following routes in config/routes.rb:
  post 'orders/paypal/create_payment'  => 'orders#paypal_create_payment', as: :paypal_create_payment
  post 'orders/paypal/execute_payment'  => 'orders#paypal_execute_payment', as: :paypal_execute_payment
This will create two new routes for creating and executing payments which will be handled in the paypal_create_payment and paypal_execute_payment orders controller methods.
Step 2: Create the PayPal service.
Add the singleton class Orders::Paypal at: app/services/orders/paypal.rb.
This service will initially have three responsibilities:
- The
create_paymentmethod creates a payment by callingPayPal::SDK::REST::Payment.new. A token is generated and returned to the front-end. - The
execute_paymentmethod executes the payment by first finding the previous created payment object throughPayPal::SDK::REST::Payment.find(payment_id)which uses the payment_id as an argument which has the same value as the charge_id stored in the previous step in the order object. After that, we callexecutein the payment object with a given payer as the parameter. This payer is given by the front end after the user has provided credentials and selected a payment method in the popup. - The
finishmethod finds an order by a specific charge_id querying for recently created orders in the paypal_executed state. If a record is found, it is marked as paid.
class Orders::Paypal
  def self.finish(charge_id)
    order = Order.paypal_executed.recently_created.find_by(charge_id: charge_id)
    return nil if order.nil?
    order.set_paid
    order
  end

  def self.create_payment(order:, product:)
    payment_price = (product.price_cents/100.0).to_s
    currency = "USD"
    payment = PayPal::SDK::REST::Payment.new({
      intent:  "sale",
      payer:  {
        payment_method: "paypal" },
      redirect_urls: {
        return_url: "/",
        cancel_url: "/" },
      transactions:  [{
        item_list: {
          items: [{
            name: product.name,
            sku: product.name,
            price: payment_price,
            currency: currency,
            quantity: 1 }
            ]
          },
        amount:  {
          total: payment_price,
          currency: currency
        },
        description:  "Payment for: #{product.name}"
      }]
    })
    if payment.create
      order.token = payment.token
      order.charge_id = payment.id
      return payment.token if order.save
    end
  end

  def self.execute_payment(payment_id:, payer_id:)
    order = Order.recently_created.find_by(charge_id: payment_id)
    return false unless order
    payment = PayPal::SDK::REST::Payment.find(payment_id)
    if payment.execute( payer_id: payer_id )
      order.set_paypal_executed
      return order.save
    end
  end
Step 3: Call the PayPal service in the controller in the submit action.
Add a callback for prepare_new_order before the action paypal_create_payment (which will be added in the next step) is requested by adding the following in the file app/controllers/orders_controller.rb:
class OrdersController < ApplicationController
  before_action :authenticate_user!
  before_action :prepare_new_order, only: [:paypal_create_payment]
	...
Again, in the same file, call PayPal service in the submit action by replacing the commented code #PAYPAL WILL BE HANDLED HERE. with the following:
...
elsif order_params[:payment_gateway] == "paypal"
  @order = Orders::Paypal.finish(order_params[:token])
end
...
Step 4: Create the actions for handling requests.
Still, in the app/controllers/orders_controller.rb file, create two new actions (which should be public) for handling requests to paypal_create_payment and paypal_execute_payment routes:
- The
paypal_create_paymentmethod: Will call our service methodcreate_payment. If that returns successfully, it will return the order token created byOrders::Paypal.create_payment. - The
paypal_execute_paymentmethod: Will call our service methodexecute_payment(which executes our payments). If the payment is performed successfully, it returns 200.
...
  def paypal_create_payment
    result = Orders::Paypal.create_payment(order: @order, product: @product)
    if result
      render json: { token: result }, status: :ok
    else
      render json: {error: FAILURE_MESSAGE}, status: :unprocessable_entity
    end
  end

  def paypal_execute_payment
    if Orders::Paypal.execute_payment(payment_id: params[:paymentID], payer_id: params[:payerID])
      render json: {}, status: :ok
    else
      render json: {error: FAILURE_MESSAGE}, status: :unprocessable_entity
    end
  end
...
Step 5: Implement the front-end callback functions for createOrder and onApprove.
Make your paypal.Button.render call look like this:
paypal.Buttons({
      env: "#{ENV['PAYPAL_ENV']}",
      createOrder: function() {
        $('#order-type').val("paypal");
        if (isPayment()) {
          return $.post("#{paypal_create_payment_url}", $('#order-details').serialize()).then(function(data) {
            return data.token;
          });
        } else {
        }
      },
      onApprove: function(data) {
        if (isPayment()) {
          return $.post("#{paypal_execute_payment_url}", {
            paymentID: data.paymentID,
            payerID:   data.payerID
          }).then(function() {
            submitOrderPaypal(data.paymentID)
          });
        } else {
        }
      }
    }).render('#submit-paypal');
As mentioned in the previous section, we call paypal_create_payment_url for the createOrder callback and paypal_execute_payment_url for the onApprove callback. Notice that if the last request returns success, we submit the order, which is the third request made to the server.
In the createOrder function handler, we return a token (obtained from the back end). In the onApprove callback, we have two properties passed down to our back-end paymentID and payerID. These will be used in order to execute the payment.
Finally, notice that we have two empty else clauses as I’m leaving room for the next section where we will be adding PayPal subscriptions.
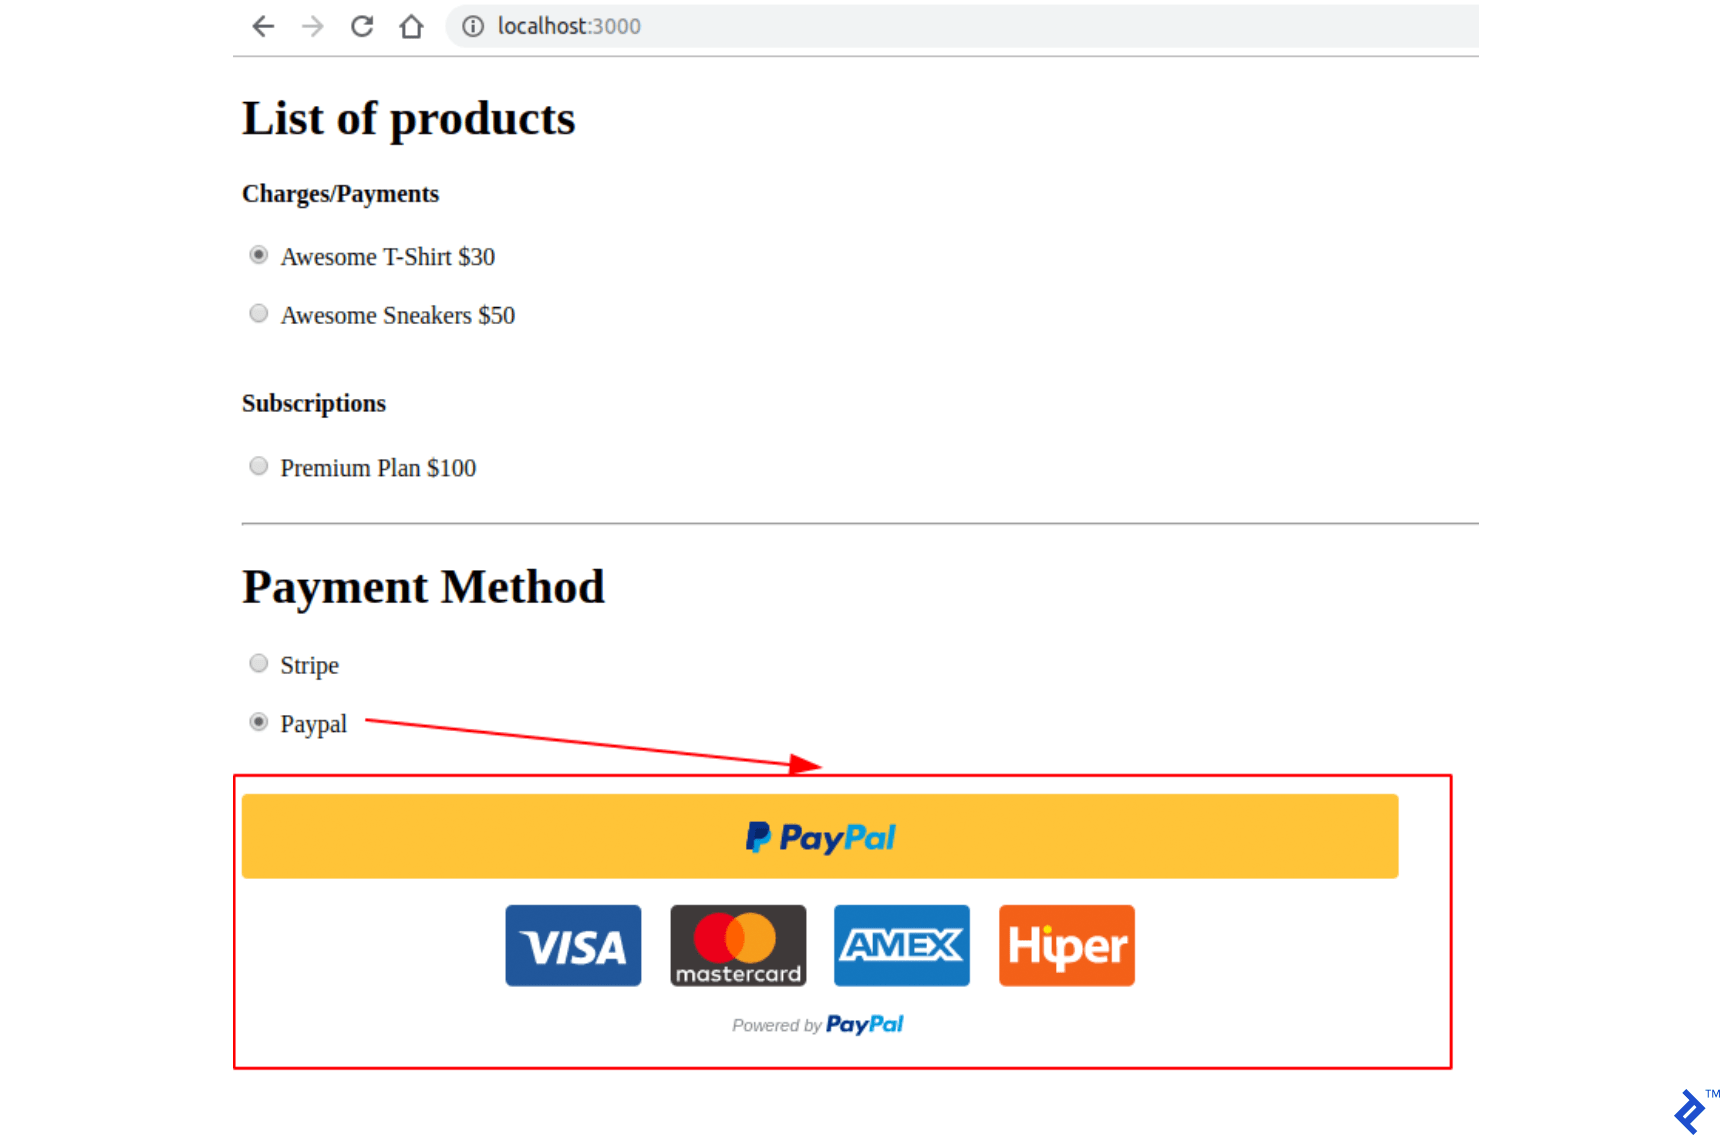
If you visit your page after integrating the front-end JavaScript section and select PayPal as the payment method, it should look like the following:
Step 6: Test your application.
- Visit the index page.
- Select a payment/charge product and PayPal as the payment method.
- Click on the submit PayPal button.
- In the PayPal popup:
- Use the credentials for the buyer account you created.
- Log in and confirm your order.
- The popup should close.
- Check if you are redirected to a success page.
- Finally, check if the order was performed in the PayPal account by signing in with your business account at https://www.sandbox.paypal.com/signin and checking the dashboard https://www.sandbox.paypal.com/listing/transactions.
PayPal Subscriptions
PayPal plans/agreements/subscriptions follow the same logic as Stripe subscriptions, and are created for recurring payments. With this type of product the user is charged daily, weekly, monthly or yearly automatically according to its configuration.
We will be using the field for product paypal_plan_name, in order to store the plan ID provided by PayPal. In this case, differently from Stripe, we don’t choose the ID, and PayPal returns this value to which will be used to update the last product created in our database.
For creating a subscription, no customer information is required in any step, as the method onApprove probably handles this linkage in its underlying implementation. So our tables will remain the same.
Step 1: Create a plan using the PayPal API.
Open your console using the command rails c . Create a subscription for your PayPal account with:
plan = PayPal::SDK::REST::Plan.new({
  name: 'Premium Plan',
  description: 'Premium Plan',
  type: 'fixed',
  payment_definitions: [{
    name: 'Premium Plan',
    type: 'REGULAR',
    frequency_interval: '1',
    frequency: 'MONTH',
    cycles: '12',
    amount: {
      currency: 'USD',
      value: '100.00'
    }
  }],
  merchant_preferences: {
    cancel_url: 'http://localhost:3000/',
    return_url: 'http://localhost:3000/',
    max_fail_attempts: '0',
    auto_bill_amount: 'YES',
    initial_fail_amount_action: 'CONTINUE'
  }
})
plan.create
plan_update = {
  op: 'replace',
  path: '/',
  value: {
    state: 'ACTIVE'
  }
}
plan.update(plan_update)
Step 2: Update the last product in the database paypal_plan_name with the returned plan.id.
Run:
Product.last.update(paypal_plan_name: plan.id)
Step 3: Add routes for PayPal subscription.
Add two new routes in config/routes.rb:
  post 'orders/paypal/create_subscription'  => 'orders#paypal_create_subscription', as: :paypal_create_subscription
  post 'orders/paypal/execute_subscription'  => 'orders#paypal_execute_subscription', as: :paypal_execute_subscription
Step 4: Handle create and execution in the PayPal service.
Add two more functions for creating and executing subscriptions in Orders::Paypal of app/services/orders/paypal.rb:
  def self.create_subscription(order:, product:)
    agreement =  PayPal::SDK::REST::Agreement.new({
      name: product.name,
      description: "Subscription for: #{product.name}",
      start_date: (Time.now.utc + 1.minute).iso8601,
      payer: {
        payment_method: "paypal"
      },
      plan: {
        id: product.paypal_plan_name
      }
    })
    if agreement.create
      order.token = agreement.token
      return agreement.token if order.save
    end
  end

  def self.execute_subscription(token:)
    order = Order.recently_created.find_by(token: token)
    return false unless order
    agreement = PayPal::SDK::REST::Agreement.new
    agreement.token = token
    if agreement.execute
      order.charge_id = agreement.id
      order.set_paypal_executed
      return order.charge_id if order.save
    end
  end
In create_subscription, we initialize an agreement by calling the method PayPal::SDK::REST::Agreement.new and passing the the product.paypal_plan_name as one of its attributes. Afterwards, we create it, and now a token will be set for this last object. We also return the token to the front end.
In execute_subscription, we find the order record created in the previous call. After that, we initialize a new agreement, we set the token of this previous object and execute it. If this last step is successfully performed, the order status is set to paypal_executed. And now we return to the front end the agreement ID which is also stored in order.chager_id.
Step 5: Add actions for create and execute subscriptions in orders_controller.
Change the app/controllers/orders_controller.rb. In the top of the Class, firstly, and then update the callback prepare_new_order to also be executed before paypal_create_subscription is called:
class OrdersController < ApplicationController
  before_action :authenticate_user!
  before_action :prepare_new_order, only: [:paypal_create_payment, :paypal_create_subscription]
Also, in the same file add the two public functions so that they call the Orders::Paypal service with a similar flow as we already have in PayPal payments:
...
  def paypal_create_subscription
    result = Orders::Paypal.create_subscription(order: @order, product: @product)
    if result
      render json: { token: result }, status: :ok
    else
      render json: {error: FAILURE_MESSAGE}, status: :unprocessable_entity
    end
  end

  def paypal_execute_subscription
    result = Orders::Paypal.execute_subscription(token: params[:subscriptionToken])
    if result
      render json: { id: result}, status: :ok
    else
      render json: {error: FAILURE_MESSAGE}, status: :unprocessable_entity
    end
  end
 ...
Step 6: Adding subscription handlers for createOrder and onApprove callbacks in the front end.
Finally, in index.html.haml, replace the paypal.Buttons function with the following, which will fill the two empty else we had before:
paypal.Buttons({
  env: "#{ENV['PAYPAL_ENV']}",
  createOrder: function() {
    $('#order-type').val("paypal");
    if (isPayment()) {
      return $.post("#{paypal_create_payment_url}", $('#order-details').serialize()).then(function(data) {
        return data.token;
      });
    } else {
      return $.post("#{paypal_create_subscription_url}", $('#order-details').serialize()).then(function(data) {
        return data.token;
      });
    }
  },
  onApprove: function(data) {
    if (isPayment()) {
      return $.post("#{paypal_execute_payment_url}", {
        paymentID: data.paymentID,
        payerID:   data.payerID
      }).then(function() {
        submitOrderPaypal(data.paymentID)
      });
    } else {
      return $.post("#{paypal_execute_subscription_url}", {
        subscriptionToken: data.orderID
      }).then(function(executeData) {
        submitOrderPaypal(executeData.id)
      });
    }
  }
}).render('#submit-paypal');
Creation and execution for subscriptions has a similar logic as used for payments. One difference is that when executing payments, the data from the callback function onApprove already has a paymentID representing the charge_id to submit the form through submitOrderPaypal(data.paymentID). For subscriptions, we obtain the charge_id only after executing it by requesting a POST on paypal_execute_subscription_url, so we can call submitOrderPaypal(executeData.id).
Step 7: Test your application.
- Visit the index page.
- Select a subscription product and PayPal as the payment method.
- Click on the submit PayPal button.
- In the PayPal popup:
- Use the credentials for the buyer account you created.
- Log in and confirm your order.
- The popup should close.
- Check if you are redirected to a success page.
- Finally check if the order was performed in the PayPal account by signing in with your business account at https://www.sandbox.paypal.com/signin and checking the dashboard https://www.sandbox.paypal.com/listing/transactions.
Conclusion
After reading this article, you should be able to integrate payments/charges as well as subscriptions transactions for PayPal and Stripe in your Rails application. There are a lot of points that could be improved which I didn’t add in this article for the sake of brevity. I organized everything based on an assumption of difficulty:
- Easier:
- Use Transport Layer Security (TLS) so that your requests use HTTPS.
- Implement production environment configurations for both PayPal and Stripe.
- Add a new page so that users can access a history of previous orders.
- Medium:
- Refund or cancel subscriptions.
- Provide a solution for non-registered user payments.
- Harder:
- Provide a way to remove accounts and retain their token and customer_id if the user wishes to come back. But after a certain amount of days, remove this data so that your application is more PCI compliant.
- Move to PayPal version 2 API in the server side (https://developer.paypal.com/docs/api/payments/v2/) The gem we used in this tutorial paypal-sdk-rest, only has a beta version for version 2. 2023 update: This is now deprecated and does not appear to have been replaced, so the HTTP REST API will likely need to be used directly instead.
- Include idempotent requests.
I also recommend reading about Stripe Checkout element, which is another way to integrate Stripe in the front end. Unlike Stripe Elements, which we used in this tutorial, Stripe Checkout opens a popup after clicking on a button (similar to PayPal) where the user fills credit card info OR choose to pay with Google Pay/Apple Pay https://stripe.com/docs/web.
A second reading recommendation is the security pages for both Payment Gateways.
Finally, thanks for reading this article! You can also check my GitHub project used for this project sample. There, I added rspec tests as well while developing.
Understanding the basics
What is Stripe and how does it work?
Stripe is a company which develops software for individual or business to perform secured payments over the internet.
What is the difference between PayPal and Stripe?
They offer different applications involving payments, and they have different fees for using their services.
What is a payment method token?
Payment tokenization is a process for handling sensitive data from users and transforming them to tokens, so there is no sensitive data leakage.
Is PayPal a payment gateway or processor?
PayPal is not a gateway, but a complete merchant solution. However, it uses a payment gateway called Payflow.
Is Stripe a payment gateway or processor?
Stripe is a payment gateway which handles customers’ cards.
Henrique Reinaldo Sarmento
Curitiba - State of Paraná, Brazil
Member since March 16, 2019
About the author
Henrique is a passionate full-stack developer and cloud computing enthusiast with experience in Ruby on Rails, Flask, Javascript and React.
Expertise
PREVIOUSLY AT

