The Ultimate Guide to Building a WordPress Plugin
WordPress plugins can be both a blessing and a curse. With more than 45,000 plugins available in its official repository, WordPress users can customize their website to their heart’s content. However, not all plugins follow the standards necessary to keep the platform performant and secure while also delivering a solid user experience.
In this tutorial, Toptal Software Engineer Ratko Solaja shows us how to build a robust WordPress plugin, following all the necessary best practices.
Ratko enjoys creating compelling websites that excite users. He is a regular WordCamp and WordPress Metup speaker.
PREVIOUSLY AT

Plugins are a vital part of WordPress websites that need specific functionalities.
While the official WordPress repository has more than 45,000 plugins from you to choose from, many of these plugins miss the mark.
Just because a plugin is in the repository doesn’t mean it won’t hinder its performance or compromise its security.
So what can you do? Well, you can build your own.

Building a great WordPress plugin begins with careful planning.
Whether you’re building one from scratch, or based off a boilerplate, following well-documented best practices is absolutely essential.
In this tutorial, you’ll learn how to build a simple WordPress plugin the right way.
If you want to review the final source code as you read along, you can find it here.
Start with a plan.
First, let’s list the features our plugin will have and outline exactly what it needs to do.
The plugin we’re building will allow site visitors to save content to read later.
For registered users, we’ll store the list in the database, and for anonymous users, we’ll save the list using cookies.
Below is an outline of the features and functionalities that our plugin will provide.
Settings Screen
- The ability for admins to add the “Save Item” button to the end of the content.
- The ability to choose the type of posts where we want this button added.
- Offer users the option to decide whether they want to use our predefined styling or not
- Provide an option to enable the functionality only for logged in users.
- Provide an option to change the messages that appear on the visitor facing part of the plugin.
Saving the Content
- If user is logged in, save content to a custom user field
- If user is not logged in, save content to cookies
Messages
The messages below will appear on-screen in response to a visitor’s interaction with the plugin or as labels on actionable items:
- “Save item.”
- “Unsave item.”
- “Saved. See saved items.”
- “You don’t have any saved items.”
Saved Screen
This is where visitors view the list of posts they’ve saved.
- Show a list of saved items
- Create a Saved page on activation of the plugin
- Delete Saved page on deactivation of the plugin
Shortcode
With a shortcode, the Saved page can be rendered wherever it is added.
Use a boilerplate.
This is the best boilerplate I’ve found. It’s well-structured, object-oriented, and efficient. It follows every best practice. And it’s fast and light.
You can use this page to generate a plugin codebase based on this WordPress Plugin Boilerplate:
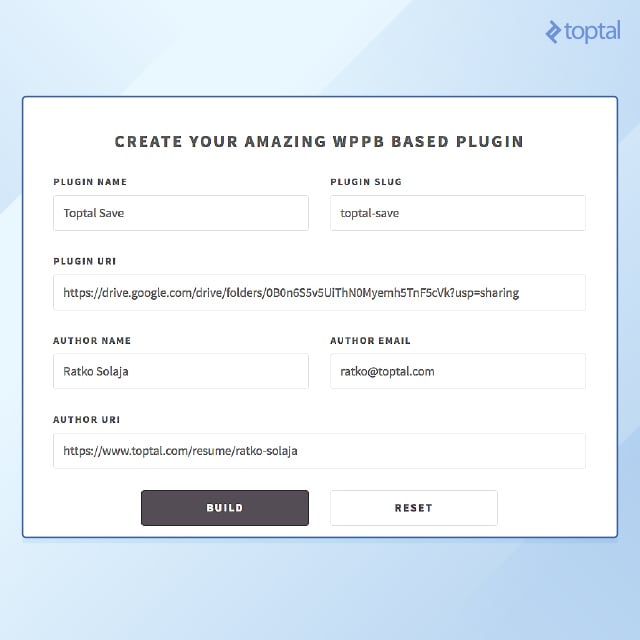
You should get a .zip file.
Extract it, and put it in your WordPress installation folder: wp-content/plugins/.
If you open up your WordPress Dashboard, and go to plugins, you’ll see that your plugin is listed there. Don’t activate it just yet.
Handle activation and deactivation.
It’s important for our plugin to properly handle activation and deactivation.
When our plugin is activated, we’ll create a page named “Saved,” which will hold the user’s saved items in it.
While creating that page, we will add a shortcode for our saved items into the content of that page.
At the end, we’ll save the page; get its ID; and store it in the database, so we can access it later on deactivation of the plugin.
When our plugin is deactivated, we will get the “Saved” page ID from the database, and then delete the “Saved” page, removing any trace of the plugin itself.
We can do all of this in includes/class-toptal-save-activator.php and includes/class-toptal-save-deactivator.php.
Let’s start with the activation process:
<?php
// includes/class-toptal-save-activator.php
// ...
class Toptal_Save_Activator {
	/**
	 * On activation create a page and remember it.
	 *
	 * Create a page named "Saved", add a shortcode that will show the saved items
	 * and remember page id in our database.
	 *
	 * @since    1.0.0
	 */
	public static function activate() {
		// Saved Page Arguments
		$saved_page_args = array(
			'post_title'   => __( 'Saved', 'toptal-save' ),
			'post_content' => '[toptal-saved]',
			'post_status'  => 'publish',
			'post_type'    => 'page'
		);
		// Insert the page and get its id.
		$saved_page_id = wp_insert_post( $saved_page_args );
		// Save page id to the database.
		add_option( 'toptal_save_saved_page_id', $saved_page_id );
	}
}
The activate() function is called when the plugin is activated.
It creates a new page using the wp_insert_post() function and saves the page ID to the database using add_option().
Now, let’s proceed with the plugin deactivation.
<?php
// includes/class-toptal-save-activator.php
// ...
class Toptal_Save_Deactivator {

	/**
	 * On deactivation delete the "Saved" page.
	 *
	 * Get the "Saved" page id, check if it exists and delete the page that has that id.
	 *
	 * @since    1.0.0
	 */
	public static function deactivate() {

		// Get Saved page id.
		$saved_page_id = get_option( 'toptal_save_saved_page_id' );

		// Check if the saved page id exists.
		if ( $saved_page_id ) {

			// Delete saved page.
			wp_delete_post( $saved_page_id, true );

			// Delete saved page id record in the database.
			delete_option( 'toptal_save_saved_page_id' );

		}

	}

}
The deactivate() function, which is called when the plugin is deactivated, retrieves the page using the get_option() function, removes the corresponding page from the database using wp_delete_post(), and removes the saved ID from the options table using delete_option().
If we activate our plugin, and go to pages, we should see a page called “Saved” with a shortcode in it.
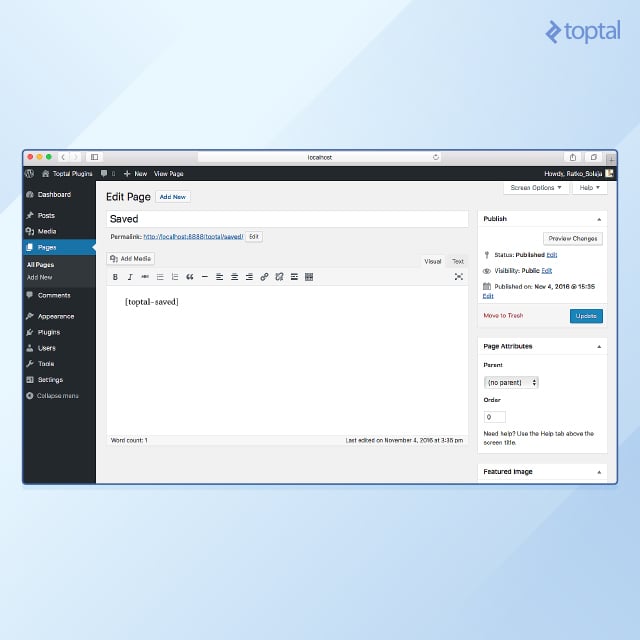
If we were to deactivate the plugin, that page would be removed.
Since we used true as an argument in our wp_delete_post() method, this page won’t go in the trash, but rather, it will be deleted completely.
Create a plugin settings page.
We can create our settings page inside the admin/class-toptal-save-admin.php file, and the first thing we need to do in that file is remove or comment out the call to wp_enqueue_style() inside the enqueue_styles() function and call to wp_enqueue_script() inside the enqueue_scripts() function if we won’t be adding any CSS/JS to the admin screen.
However, if we are going to add some styling, then, I recommend we load those files only in the settings page of our plugin, rather than on all WordPress admin pages. We can do that by placing the following code directly above the lines we would have commented:
if ( 'tools_page_toptal-save' != $hook ) {
	return;
}
wp_enqueue_style( $this->plugin_name, plugin_dir_url( __FILE__ ) . 'css/toptal-save-admin.css', array(), $this->version, 'all' );
if ( 'tools_page_toptal-save' != $hook ) {
	return;
}
wp_enqueue_script( $this->plugin_name, plugin_dir_url( __FILE__ ) . 'js/toptal-save-admin.js', array( 'jquery' ), $this->version, false );
If you’re wondering where did I get that ‘tools_page_toptal-save’ part from.
Well, here’s the thing, I know that I’m going to create a settings page with a slug toptal-save, and I also know I’m going to add it to the Tools (tools.php) screen. So, putting those two together, we can tell that the value of the variable $hook is going to be ‘tools_page_toptal-save’ - a concatenation of the two values.
If we’re not in our plugin settings page, we use return to immediately terminate the execution of the function we are in.
Since I won’t be adding any custom styling to my admin screen – because I want my plugin screen to look like native WordPress screen – I won’t add that code.
Now, we can proceed with creating our settings page.
We’re going to start by adding a simple method to Toptal_Save_Admin class that will call the add_submenu_page() function.
/**
 * Register the settings page for the admin area.
 *
 * @since    1.0.0
 */
public function register_settings_page() {
	// Create our settings page as a submenu page.
	add_submenu_page(
		'tools.php',                             // parent slug
		__( 'Toptal Save', 'toptal-save' ),      // page title
		__( 'Toptal Save', 'toptal-save' ),      // menu title
		'manage_options',                        // capability
		'toptal-save',                           // menu_slug
		array( $this, 'display_settings_page' )  // callable function
	);
}
That’s quite a handful of arguments we are passing to the add_submenu_page() function. Here is what each of them means.
-
Parent slug: The slug name for the parent menu (or the filename of a standard WordPress admin page). You can see the full list of parent slugs here.
-
Page title: The text to be displayed in the title tags of the page when the menu is selected.
-
Menu title: The text to be used for the menu title.
-
Capability: The capability required by the user for this menu to be displayed to them. We have used “manage_options” which allows access to Administration Panel options. You can read more about Roles and Capabilities over here.
-
Menu slug: The slug name to refer to this menu.
-
Callable function: The function to be called to output the content for this page. Since we have defined the name of our callable function, we need to create it, but before we do, we used
$thisto reference an instance of a class from within itself. Here’s what PHP documentation has to say about it:
The pseudo-variable $this is available when a method is called from within an object context. $this is a reference to the calling object (usually the object to which the method belongs, but possibly another object, if the method is called statically from the context of a secondary object).
Next, we will add another method to the class:
/**
 * Display the settings page content for the page we have created.
 *
 * @since    1.0.0
 */
public function display_settings_page() {

	require_once plugin_dir_path( dirname( __FILE__ ) ) . 'admin/partials/toptal-save-admin-display.php';

}
This callable function is including our template that is going to show our settings page. You can see that we are referencing a file located in the admin/partials called toptal-save-admin-display.php.
Now, if you go to Tools, you won’t see that screen. Why? Because we haven’t hooked our register_admin_page() method to the admin_menu hook.
We can do that by opening up our includes/class-toptal-save.php file and adding this chunk of code inside the define_admin_hooks() method, right below where the $plugin_admin = new Toptal_Save_Admin( $this->get_plugin_name(), $this->get_version() ); part is.
/**
 * Register all of the hooks related to the admin area functionality
 * of the plugin.
 *
 * @since    1.0.0
 * @access   private
 */
private function define_admin_hooks() {

	$plugin_admin = new Toptal_Save_Admin( $this->get_plugin_name(), $this->get_version() );

	$this->loader->add_action( 'admin_menu', $plugin_admin, 'register_settings_page' );

	$this->loader->add_action( 'admin_enqueue_scripts', $plugin_admin, 'enqueue_styles' );
	$this->loader->add_action( 'admin_enqueue_scripts', $plugin_admin, 'enqueue_scripts' );

}
Don’t worry about the calls to add_action() since that’s something that we’re going to cover later on.
For now, simply open up the Tools page, and you’ll be able to see the Toptal Save page. If we open it, it works, but we see a blank screen since there’s nothing on it.
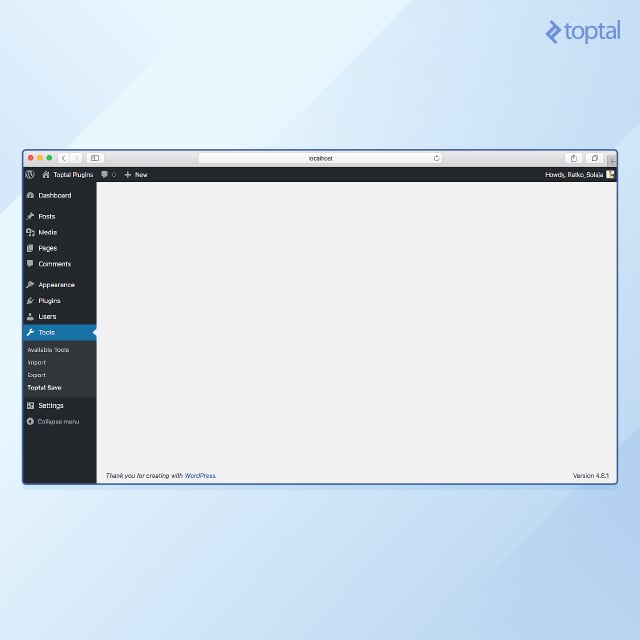
We’re making some progress, but hey, we need to display some settings here, so let’s do that.
We’re going to start creating the fields, and that’s something that we are going to do with the help of WordPress Settings API.
If you’re not familiar with it, it allows us to create form fields that we can use to save our data.
/**
 * Register the settings for our settings page.
 *
 * @since    1.0.0
 */
public function register_settings() {

	// Here we are going to register our setting.
	register_setting(
		$this->plugin_name . '-settings',
		$this->plugin_name . '-settings',
		array( $this, 'sandbox_register_setting' )
	);

	// Here we are going to add a section for our setting.
	add_settings_section(
		$this->plugin_name . '-settings-section',
		__( 'Settings', 'toptal-save' ),
		array( $this, 'sandbox_add_settings_section' ),
		$this->plugin_name . '-settings'
	);

	// Here we are going to add fields to our section.
	add_settings_field(
		'post-types',
		__( 'Post Types', 'toptal-save' ),
		array( $this, 'sandbox_add_settings_field_multiple_checkbox' ),
		$this->plugin_name . '-settings',
		$this->plugin_name . '-settings-section',
		array(
			'label_for' => 'post-types',
			'description' => __( 'Save button will be added only to the checked post types.', 'toptal-save' )
		)
	);

	// ...

}
Inside the register_settings() function we can add and configure all the fields. You can find the complete implementation of the function here. We have used the following in the function shown above:
-
register_setting(): Registers a setting and its sanitization callback. -
add_settings_section(): Adds a new section to a settings page. -
add_settings_field(): Adds a new field to a section of a settings page.
Whenever we used one of those three functions, a sanitization callback was provided. This allows the data to be sanitized and, if it is a field, to show the appropriate HTML element (checkbox, radio, input, etc).
Also, we have passed an array of data to those callbacks, such as label_for, description or default as necessary.
Now, we can create those sanitization callbacks. You can find the code for those callbacks here.
This is all fine, however, we need to hook the fields into admin_init hook and then show them.
We will use add_action which is a hook that the WordPress core starts at specific points during execution, or when a specific event occurs. admin_init is triggered before any other hook when a user accesses the admin area.
First, we need add an action in includes/class-toptal-save.php file.
/**
 * Register all of the hooks related to the admin area functionality
 * of the plugin.
 *
 * @since    1.0.0
 * @access   private
 */
private function define_admin_hooks() {

	$plugin_admin = new Toptal_Save_Admin( $this->get_plugin_name(), $this->get_version() );

	// Hook our settings page
	$this->loader->add_action( 'admin_menu', $plugin_admin, 'register_settings_page' );

	// Hook our settings
	$this->loader->add_action( 'admin_init', $plugin_admin, 'register_settings' );

	$this->loader->add_action( 'admin_enqueue_scripts', $plugin_admin, 'enqueue_styles' );
	$this->loader->add_action( 'admin_enqueue_scripts', $plugin_admin, 'enqueue_scripts' );

}
Next, in admin/partials/topal-save-admin-display.php, we need to provide a view for the admin area of our plugin:
<?php
/**
 * Provide a admin area view for the plugin
 *
 * This file is used to markup the admin-facing aspects of the plugin.
 *
 * @link       https://www.toptal.com/resume/ratko-solaja
 * @since      1.0.0
 *
 * @package    Toptal_Save
 * @subpackage Toptal_Save/admin/partials
 */
?>

<!-- This file should primarily consist of HTML with a little bit of PHP. -->

<div id="wrap">
	<form method="post" action="options.php">
		<?php
			settings_fields( 'toptal-save-settings' );
			do_settings_sections( 'toptal-save-settings' );
			submit_button();
		?>
	</form>
</div>
The settings_fields() function is used to output nonce, action, and option_page fields for a settings page.
It’s followed by the do_settings_sections() which prints out all settings sections added to a particular settings page.
Finally, a submit button is added using the provided text and appropriate class(es) using the submit_button() function.
Now, if we take a look at our page, it will look like this:
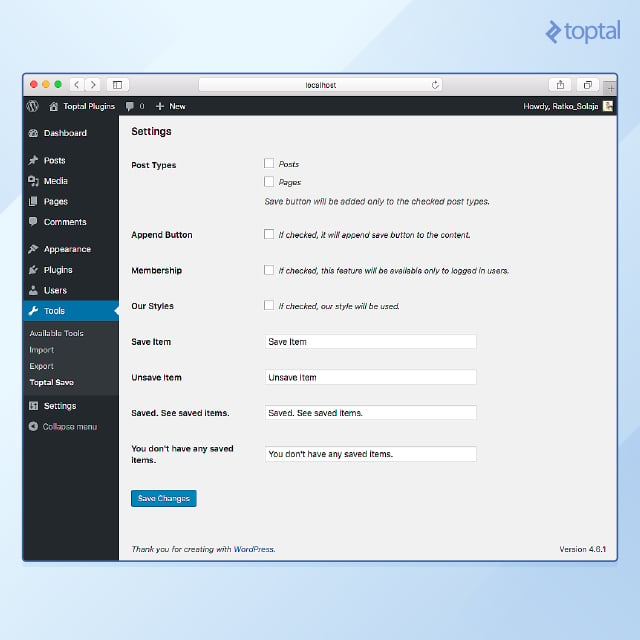
This is all we have to do in our admin area. Let’s begin working on the public part of our plugin.
Create the plugin functionality.
Here comes the interesting part. We need to create multiple functions to separate our functionality:
- A function that will show the “Save Item” button. This needs to check if the current user has already saved that item or not, depending on that, we’ll show different text as well as color.
- A function that will save/unsave an item (AJAX).
- A function that will show all saved items.
- A function that will generate our shortcodes.
So let’s get started with showing the button. We’ll be doing all of this in public/class-toptal-save-public.php.
While doing this, we’ll need to create some additional helper functions to take care of certain things like:
- Creating a unique cookie name for the website
- Creating a cookie
- Getting the cookie value
- Getting the membership status from the settings
The code for these helper functions can be found here.
The get_unique_cookie_name() function will help us generate a unique cookie name from the website URL, website name, and our custom defined suffix. This is so that the generated cookie name will not conflict when used in multiple WordPress sites under the same domain.
The toptal_set_cookie() and toptal_get_cookie() functions will create and get the value of our cookies respectively.
The get_user_status() function will get the status of our membership checkbox in the settings (returning 1 when checked, 0 otherwise).
Now, the juicy part, creating the function that will be responsible for showing the save button. The implementation for our show_save_button() function can be found here. And we have used some new functions from the WordPress API here:
-
get_queried_object_id(): Retrieves the ID of the current queried object. -
is_user_logged_in(): Checks if the current visitor is a logged in user. -
get_user_meta(): Retrieves user metadata field for a user. -
wp_create_nonce(): Creates a cryptographic token tied to a specific action, user, user session, and window of time.
Now, let’s create a function that will append our button to the end of the content. Here, we have two key requirements.
- Make sure that the button is shown only on the post type(s) that is/are selected in the settings.
- Make sure that the checkbox for appending the button is checked.
/**
 * Append the button to the end of the content.
 *
 * @since    1.0.0
 */
public function append_the_button( $content ) {

	// Get our item ID
	$item_id = get_queried_object_id();

	// Get current item post type
	$current_post_type = get_post_type( $item_id );

	// Get our saved page ID, so we can make sure that this button isn't being shown there
	$saved_page_id = get_option( 'toptal_save_saved_page_id' );

	// Set default values for options that we are going to call below
	$post_types = array();
	$override = 0;

	// Get our options
	$options = get_option( $this->plugin_name . '-settings' );
	if ( ! empty( $options['post-types'] ) ) {
		$post_types = $options['post-types'];
	}
	if ( ! empty( $options['toggle-content-override'] ) ) {
		$override = $options['toggle-content-override'];
	}

	// Let's check if all conditions are ok
	if ( $override == 1 && ! empty( $post_types ) && ! is_page( $saved_page_id ) && in_array( $current_post_type, $post_types ) ) {

		// Append the button
		$custom_content = '';
		ob_start();
		echo $this->show_save_button();
		$custom_content .= ob_get_contents();
		ob_end_clean();
		$content = $content . $custom_content;

	}

	return $content;

}
Now, we need to hook this function to the the_content hook.
Why? Because the_content is used to filter the content of the post after it is retrieved from the database and before it is printed to the screen.
With this, we can add our save button anywhere in the content. We can do that in includes/class-toptal-save.php in define_public_hooks() method, like this:
/**
 * Register all of the hooks related to the public-facing functionality
 * of the plugin.
 *
 * @since    1.0.0
 * @access   private
 */
private function define_public_hooks() {

	$plugin_public = new Toptal_Save_Public( $this->get_plugin_name(), $this->get_version() );

	// Append our button
	$this->loader->add_action( 'the_content', $plugin_public, 'append_the_button', 45 );

	$this->loader->add_action( 'wp_enqueue_scripts', $plugin_public, 'enqueue_styles' );
	$this->loader->add_action( 'wp_enqueue_scripts', $plugin_public, 'enqueue_scripts' );

}
Now, if go to plugin settings, and check posts and pages, as well as append the button, we’ll see on any blog post that the button is shown.
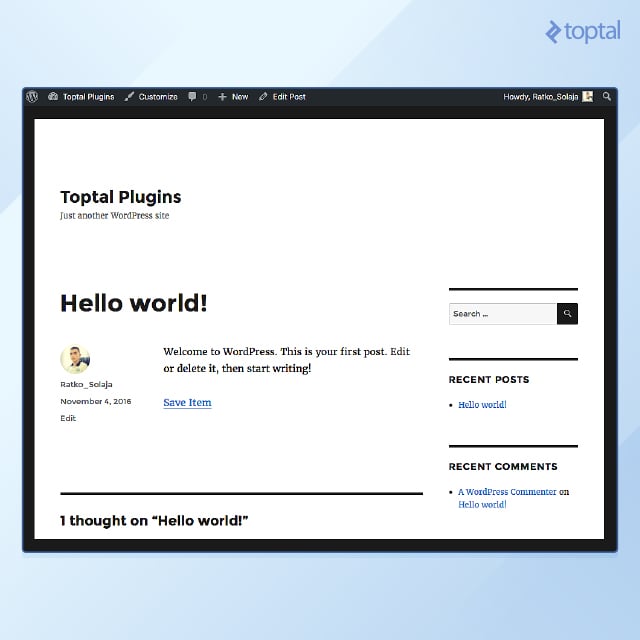
From here, we should go ahead and style that button.
We can do that in public/css/toptal-save-public.css. Find the updated CSS file here.
Now, let’s create a function that will actually save the item.
We’re going to do this in our public class, and, we’re going to do it with AJAX. The code is here.
Let’s hook this function into WordPress AJAX.
/**
 * Register all of the hooks related to the public-facing functionality
 * of the plugin.
 *
 * @since    1.0.0
 * @access   private
 */
private function define_public_hooks() {

	$plugin_public = new Toptal_Save_Public( $this->get_plugin_name(), $this->get_version() );

	// Append our button
	$this->loader->add_action( 'the_content', $plugin_public, 'append_the_button', 45 );

	// Save/unsave AJAX
	$this->loader->add_action( 'wp_ajax_save_unsave_item', $plugin_public, 'save_unsave_item' );
	$this->loader->add_action( 'wp_ajax_nopriv_save_unsave_item', $plugin_public, 'save_unsave_item' );

	$this->loader->add_action( 'wp_enqueue_scripts', $plugin_public, 'enqueue_styles' );
	$this->loader->add_action( 'wp_enqueue_scripts', $plugin_public, 'enqueue_scripts' );

}
You can read more about AJAX in plugins here.
Before we finish this part, we need to do two more things.
- Localize a script.
- Create our AJAX call in public/js/toptal-save-public.js
Localizing a script will be done via the wp_localize_script() function inside our public/class-toptal-save-public.php file.
Also, while we’re at it, we’ll also make sure to implement showing CSS and JS files depending on the state of our “use our style” checkbox.
/**
 * Register the stylesheets for the public-facing side of the site.
 *
 * @since    1.0.0
 */
public function enqueue_styles() {

	/**
	 * This function is provided for demonstration purposes only.
	 *
	 * An instance of this class should be passed to the run() function
	 * defined in Toptal_Save_Loader as all of the hooks are defined
	 * in that particular class.
	 *
	 * The Toptal_Save_Loader will then create the relationship
	 * between the defined hooks and the functions defined in this
	 * class.
	 */

	$options = get_option( $this->plugin_name . '-settings' );

	if ( ! empty( $options['toggle-css-override'] ) && $options['toggle-css-override'] == 1 ) {
		wp_enqueue_style( $this->plugin_name, plugin_dir_url( __FILE__ ) . 'css/toptal-save-public.css', array(), $this->version, 'all' );
	}

}

/**
 * Register the JavaScript for the public-facing side of the site.
 *
 * @since    1.0.0
 */
public function enqueue_scripts() {

	/**
	 * This function is provided for demonstration purposes only.
	 *
	 * An instance of this class should be passed to the run() function
	 * defined in Toptal_Save_Loader as all of the hooks are defined
	 * in that particular class.
	 *
	 * The Toptal_Save_Loader will then create the relationship
	 * between the defined hooks and the functions defined in this
	 * class.
	 */

	wp_enqueue_script( $this->plugin_name, plugin_dir_url( __FILE__ ) . 'js/toptal-save-public.js', array( 'jquery' ), $this->version, false );

	// Get our options
	$options = get_option( $this->plugin_name . '-settings' );

	// Get our text
	$item_save_text = $options['text-save'];
	$item_unsave_text = $options['text-unsave'];
	$item_saved_text = $options['text-saved'];
	$item_no_saved = $options['text-no-saved'];

	$saved_page_id = get_option( 'toptal_save_saved_page_id' );
	$saved_page_url = get_permalink( $saved_page_id );

	wp_localize_script(
		$this->plugin_name,
		'toptal_save_ajax',
		array(
			'ajax_url' => admin_url( 'admin-ajax.php' ),
			'item_save_text' => $item_save_text,
			'item_unsave_text' => $item_unsave_text,
			'item_saved_text' => $item_saved_text,
			'item_no_saved' => $item_no_saved,
			'saved_page_url' => $saved_page_url
		)
	);

}
Now, we can proceed with our AJAX call.
Our front-end script will look for elements with class “toptal-save-button.”
A click handler will be registered to all matching elements, which will perform the API call and update the UI accordingly.
You can find the code here and the necessary CSS here.
I have also added a function that will handle the notification when the item is added.
Here’s how it all works.

Next, we need to create a shortcode for users to insert wherever they want.
We can do that in public/class-toptal-save-public.php:
/**
 * Create Shortcode for Users to add the button.
 *
 * @since    1.0.0
 */
public function register_save_unsave_shortcode() {

	return $this->show_save_button();

}
We also need to register it, since the function by itself won’t do anything.
In includes/class-toptal-save.php add this code after that line where we appended our button.
// Add our Shortcodes
$this->loader->add_shortcode( 'toptal-save', $plugin_public, 'register_save_unsave_shortcode' );
Now, this isn’t going to work because we haven’t yet loaded the add_shortcode() method inside our loader class.
Here is the full code of the includes/class-toptal-save-loader.php file.
I have added a new protected variable called shortcodes, then in the constructor method of the class, I’ve turned it into an array.
On line 104, I’ve added a function that will be responsible for the creation of our shortcodes; you can see that it’s pretty much the same as the function above it (add_filter()), except I changed the “filter” into “shortcode” and “filters” into “shortcodes.”
Also, in the run() method, I have added another foreach that will go through our shortcodes array, and register them with WordPress.
That was easy.
Remember, in the beginning, we used a shortcode [toptal-saved], so let’s create a method that will show all of our saved items.
Find the full code for this method here.
Now, as always, we need to register the shortcode in includes/class-toptal-save.php:
/**
 * Register all of the hooks related to the public-facing functionality
 * of the plugin.
 *
 * @since    1.0.0
 * @access   private
 */
private function define_public_hooks() {

	$plugin_public = new Toptal_Save_Public( $this->get_plugin_name(), $this->get_version() );

	// Append our button
	$this->loader->add_action( 'the_content', $plugin_public, 'append_the_button', 45 );

	// Add our Shortcodes
	$this->loader->add_shortcode( 'toptal-save', $plugin_public, 'register_save_unsave_shortcode' );
	$this->loader->add_shortcode( 'toptal-saved', $plugin_public, 'register_saved_shortcode' );

	// Save/unsave AJAX
	$this->loader->add_action( 'wp_ajax_save_unsave_item', $plugin_public, 'save_unsave_item' );
	$this->loader->add_action( 'wp_ajax_nopriv_save_unsave_item', $plugin_public, 'save_unsave_item' );

	$this->loader->add_action( 'wp_enqueue_scripts', $plugin_public, 'enqueue_styles' );
	$this->loader->add_action( 'wp_enqueue_scripts', $plugin_public, 'enqueue_scripts' );

}
We have two more things to do here.
- Style our saved items page.
- Make sure that when a user removes a saved item, it disappears from the saved items page.
For the first task, you can find the necessary CSS code here.
For the second one, it involves a bit of front-end scripting.
The full JavaScript code for that can be found here.
As you’ll see on line 52, I searched for the div with a class “toptal-saved-item.”
Then, on lines 70-75, we check if that parent div has a class toptal-saved-item.
If it does, we hide our item with fadeOut and then, after the animation is over, we completely remove the item from the screen.
Now, let’s move on to the more difficult part – making it modular.
Make the plugin modular.
The basic definition of a modular plugin is:
Extensible, or modular code, is code that can be modified, interacted with, added to, or manipulated - all without ever modifying the core code base.
Now, when it comes to this plugin, I would make sure that users can change the HTML inside the saved item on the saved items page.
So, we’re going to need to make a few changes in our register_saved_shortcode() method:
- Change
html_to_returntoinner_html_to_returnwherever we want users to be able to change the HTML. Make sure that the first declaration of ourinner_html_to_returnvariable has “=” without a dot preceding it. - Use the
apply_filters()method to register our filter.
With these two changes, you should end up with something like this.
Now, if users want to interact with our code, they can add something like this inside their functions.php file:
<?php
add_filter( 'toptal_saved_item_html', 'change_toptal_saved_item_html');
function change_toptal_saved_item_html( $inner_html_to_return ) {
	// Some custom code

	return $inner_html_to_return;

}
Generate translation files.
Translation is very important because it allows WordPress community members and polyglots to translate your plugin, making it accessible to non-English sites.
That being said, let’s dive into some technical details about how WordPress handles translations.
WordPress uses the GNU gettext localization framework for translation. In this framework, there are three types of files:
- Portable Object Template (POT)
- Portable Object (PO)
- Machine Object (MO)
Each of these files represents a step in the translation process.
To generate a POT file, we need a program that will search through WordPress code, and get all the text passed to our translation functions, such as __e() and _e(). You can read more about the translation functions here.
Here we translate the text from POT file, saving both English and our translation in a PO file, and we convert the PO file into an MO file.
Doing this manually would take a lot of time since you would have to write a few lines of code for each translatable file you have in your plugin. Fortunately, there’s a better way, using a handy little plugin called Loco Translate.
Once you install and activate it, go to Loco Translate > Plugins > Toptal Save.
From there, click Edit template, then Sync and Save. This will edit our toptal-save.pot file inside our languages folder.
Now, the plugin is available for translation.
Build your WordPress plugin now.
We have built a rather simple plugin in this article, but in the process, we followed the practices and standards that would allow us to maintain and extend this plugin easily.
We’ve used WordPress functionalities in ways that won’t hamper the overall performance of the platform.
Whether it is a simple plugin or a complicated one, whether you are an individual developer or a WordPress development company, planning and following best practices is key to building a robust plugin.
Further Reading on the Toptal Blog:
Ratko Solaja
Novi Sad, Vojvodina, Serbia
Member since September 7, 2016
About the author
Ratko enjoys creating compelling websites that excite users. He is a regular WordCamp and WordPress Metup speaker.
PREVIOUSLY AT


