ReactiveUI and the MVVM Pattern in WPF Applications
Wikipedia describes Reactive Programming as “an asynchronous programming paradigm concerned with data streams and the propagation of change,” but what is it really?
In this article, Toptal Freelance WPF Developer Denis Jesus Gonzalez Sanchez demonstrates a WPF app using ReactiveUI with the MVVM pattern and uses it to access a REST API.
Denis is a certified C# specialist and MS certified professional, experienced in several programming languages and business domains.
Expertise
Reactive Programming is an asynchronous programming paradigm concerned with data streams and the propagation of change. – Wikipedia
Once you’ve read that sentence, you might still end up the same way I did when I first read it: Nowhere closer to understanding its relevance. A little more dedication into the basic concepts and you’ll quickly understand its importance. Basically, you could think of Reactive Programming at first as: “Event-driven programming on steroids.” Picture an event handler as a stream, and think of each firing of the handler as a new datum in the stream. In a nutshell, what you end up with is Reactive Programming.
There are some concepts you might want to understand before delving into Reactive Programming a bit more. Observables are the objects that give you access to the streams we’ve been talking about. Their purpose is to give you a window into the data in the stream. Once that window has been opened, you can look at the data in any way you choose by using Operators on it and thus decide when and how your application reacts to the stream. Lastly, you define the Observers on the resulting stream to define the action that will happen every time a new datum is emitted by the stream.
In practical terms, that just means you get more control on the way your application reacts to what’s happening, whether it be your user clicking on a button, your app receiving an HTTP response, or recovering from exceptions. Once you start seeing the benefits of using Reactive Programming (of which there are many), you will hardly be able to go back. That’s simply because most of the things an app does is reacting in a certain way to a given eventuality.
Now, this doesn’t mean there aren’t downsides to this new approach. First of all, its learning curve can be pretty steep. I’ve seen firsthand how developers (juniors, seniors, and architects, among others) struggle to figure out what they’re supposed to write first, in which order their code is being executed, or how to debug errors. My recommendation when first introducing these concepts is to show lots of examples. When developers start seeing how things are supposed to work and be used, they’ll get the hang of it.
I had been working with desktop apps for over 10 years (mostly Visual Basic 6, Java Swing, and Windows Forms) before I ever laid hands on Windows Presentation Foundation (WPF) for the first time back in 2010. Basically, WPF was created to supersede Windows Forms, which is .NET’s first desktop development framework.
The major differences between WPF and Windows Forms are substantial, but the most important ones are:
- WPF uses new development paradigms which are more robust and have been thoroughly tested.
- With WPF, you can have a strong decoupling of the design and coding for the UI.
- WPF allows for lots of customization and control over your UI.
Once I began learning WPF and its capabilities, I absolutely loved it! I couldn’t believe how easy the MVVM pattern was to implement and how well property binding worked. I didn’t think I’d find anything to improve that way of working until I stumbled upon Reactive Programming and its usage with WPF:
In this post, I hope to be able to show a very simple implementation of a WPF app using Reactive Programming with the MVVM pattern and to access a REST API.
The application will be able to:
- Track cars and their locations
- Take information pulled from a simulated source
- Display this information to the user in a Bing Maps WPF Control
The Architecture
You will build a WPF client that consumes a RESTful Web API Core 2 service.
The client side:
- WPF
- ReactiveUI
- Dependency injection
- MVVM pattern
- Refit
- Bing Maps WPF Control
- For testing purposes only, we’ll be using Postman
The server side:
- .NET C# Web API Core 2
- Dependency injection
- JWT authentication
What you’ll need:
- Visual Studio 2017 Community (Or any edition you may have)
The back-end
Quick Start
Start a new Visual Studio Solution with an ASP.NET Core web application.
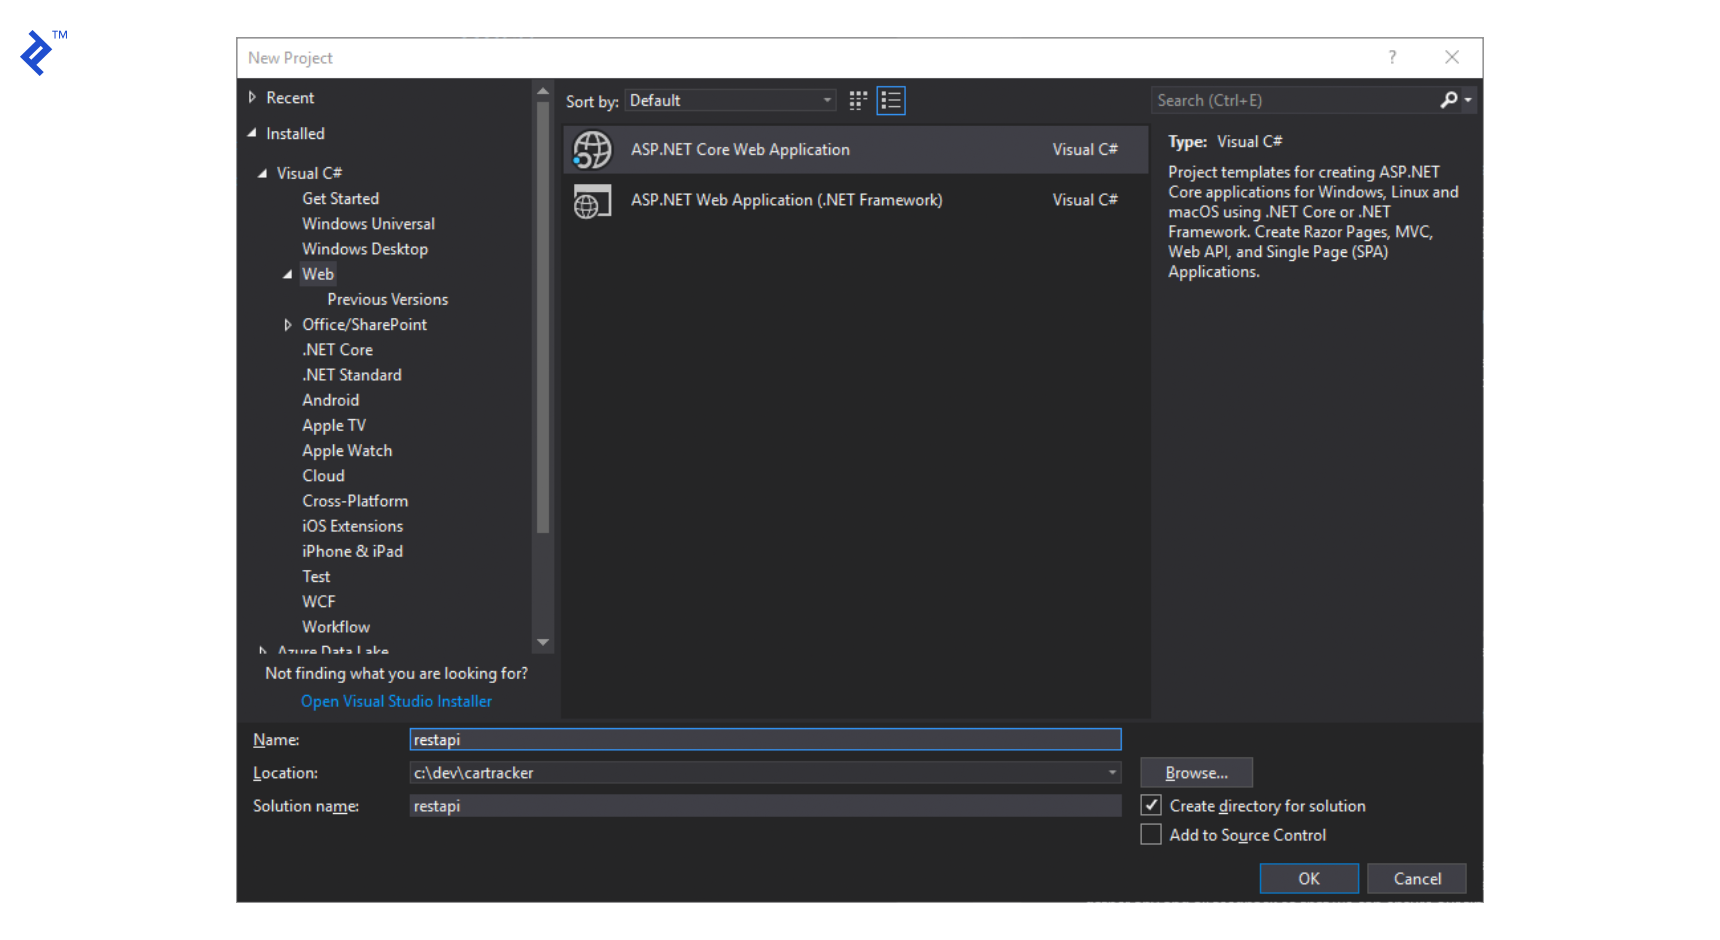
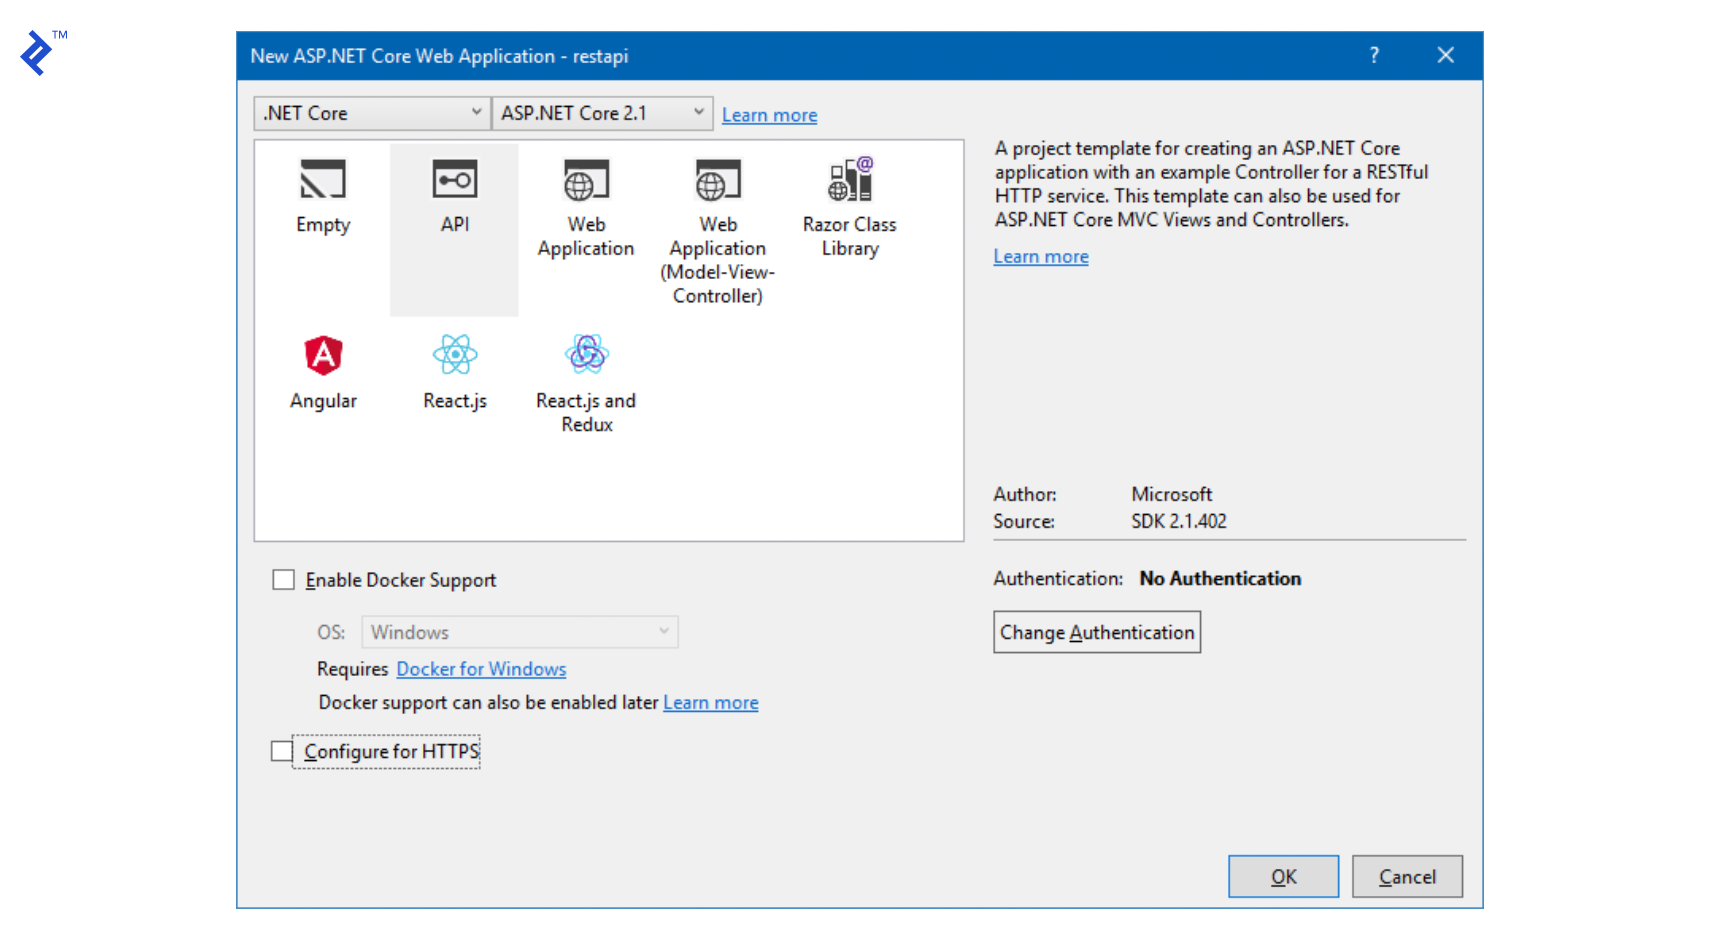
Configure it to be an API since we’ll only be using it as a back end for our WPF app.
We should end up with a VS solution with a structure similar to this:
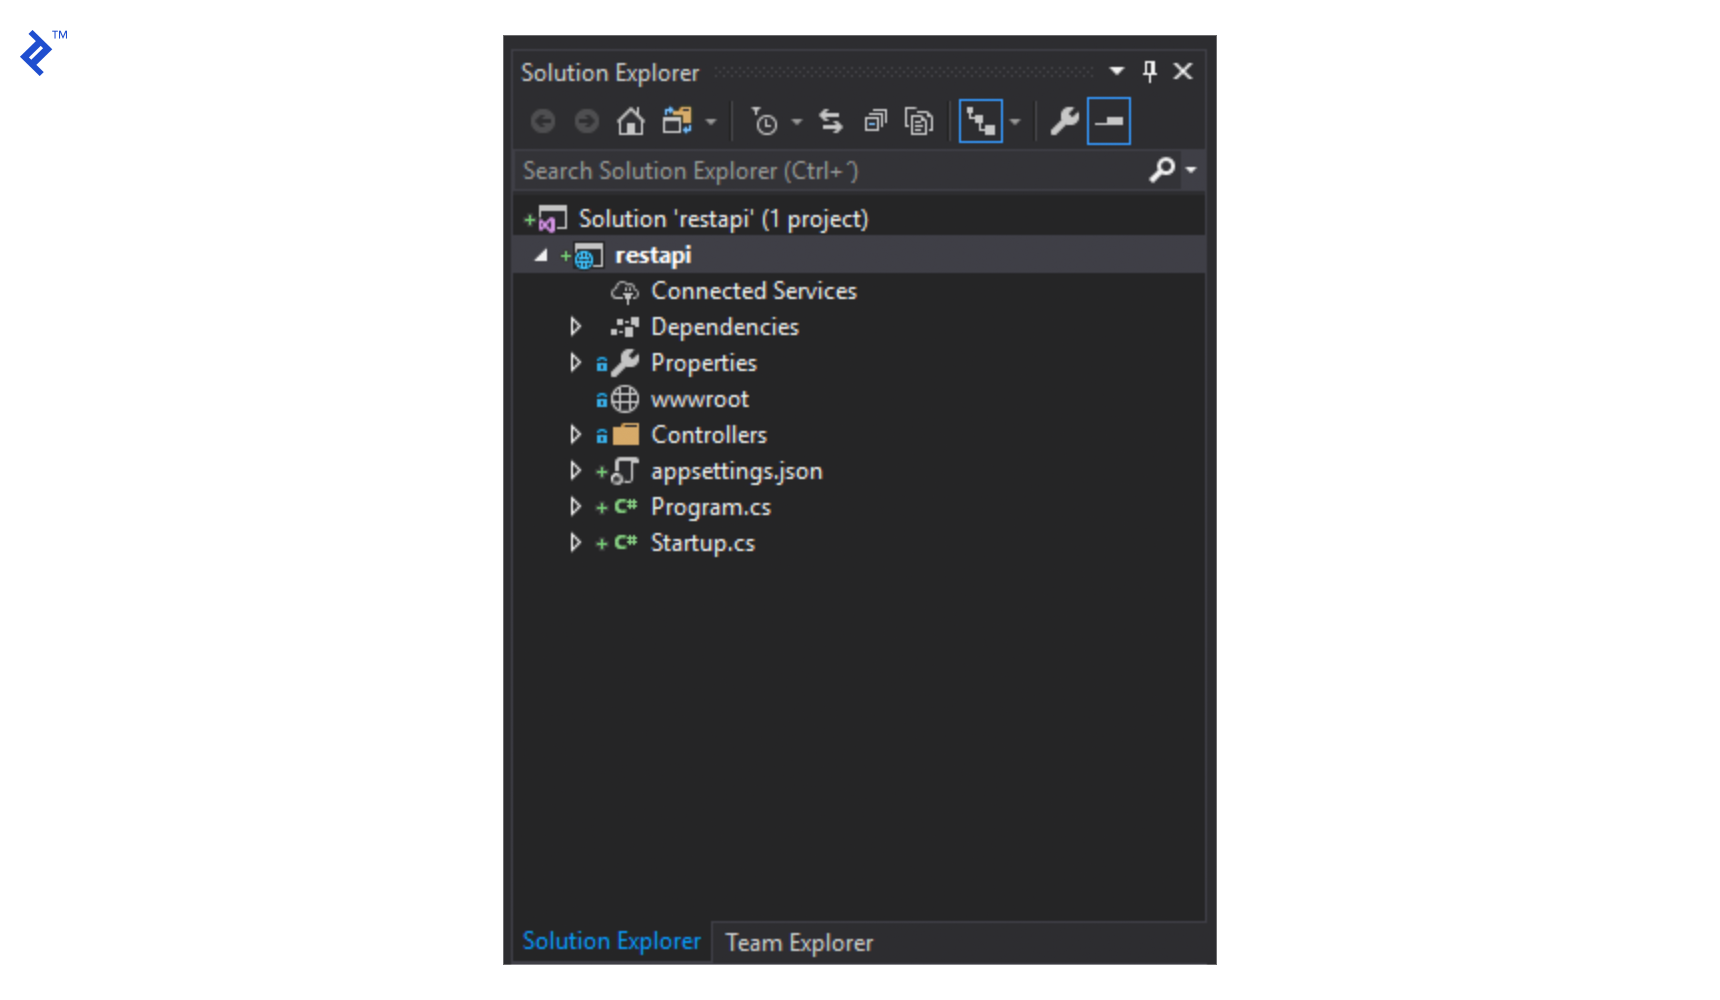
So far, we’ve got everything we need to start our REST API back end. If we run our project, it’ll load a web browser (the one we’ve got set on Visual Studio) pointing to a website hosted on IIS Express that will show a response to a REST call with a JSON object.
Now, we’ll set up JWT Authentication for our REST Service.
At the end of the startup.cs file, add the following lines.
static readonly byte[] JwtKey = Encoding.ASCII.GetBytes(@"this is a test key");

private void LoadJwtAuthorization(IServiceCollection services)
{
        services.AddAuthentication(x =>
        {
                x.DefaultAuthenticateScheme = JwtBearerDefaults.AuthenticationScheme;
                x.DefaultChallengeScheme = JwtBearerDefaults.AuthenticationScheme;
        })
        .AddJwtBearer(x =>
        {
                x.Events = new JwtBearerEvents
                {
                        OnTokenValidated = context =>
                        {
                                var userId = int.Parse(context.Principal.Identity.Name);
                                if (userId == 0)
                                {
                                        //Handle user validation against DB
                                        context.Fail("Unauthorized");
                                }
                                return Task.CompletedTask;
                        }
                };
                x.RequireHttpsMetadata = false;
                x.SaveToken = true;
                x.TokenValidationParameters = new TokenValidationParameters
                {
                        ValidateIssuerSigningKey = true,
                        IssuerSigningKey = new SymmetricSecurityKey(JwtKey),
                        ValidateIssuer = false,
                        ValidateAudience = false
                };
        });
}
Also, inside the ConfigureServices method, call the method we just created before the AddMvc method gets called.
public void ConfigureServices(IServiceCollection services)
{
        LoadJwtAuthorization(services);

        services.AddMvc().SetCompatibilityVersion(CompatibilityVersion.Version_2_1);
}
Lastly, adjust the Configure method so it looks like this:
public void Configure(IApplicationBuilder app, IHostingEnvironment env)
{
        if (env.IsDevelopment())
        {
                app.UseDeveloperExceptionPage();
        }

        app.UseAuthentication();
        app.UseMvc();
}
So far, we’ve established the JWT Authentication to be used on our controllers if it is defined. Next, we’ll adjust out controller so it uses the authentication we described.
On the ValuesController, we’ll add the AuthorizeAttribute so it resembles this:
[Route("api/[controller]")]
[ApiController]
[Authorize]
public class ValuesController : ControllerBase
{
...
}
Now, if we try to run our service, we’ll get a 401 Unauthorized error like this:
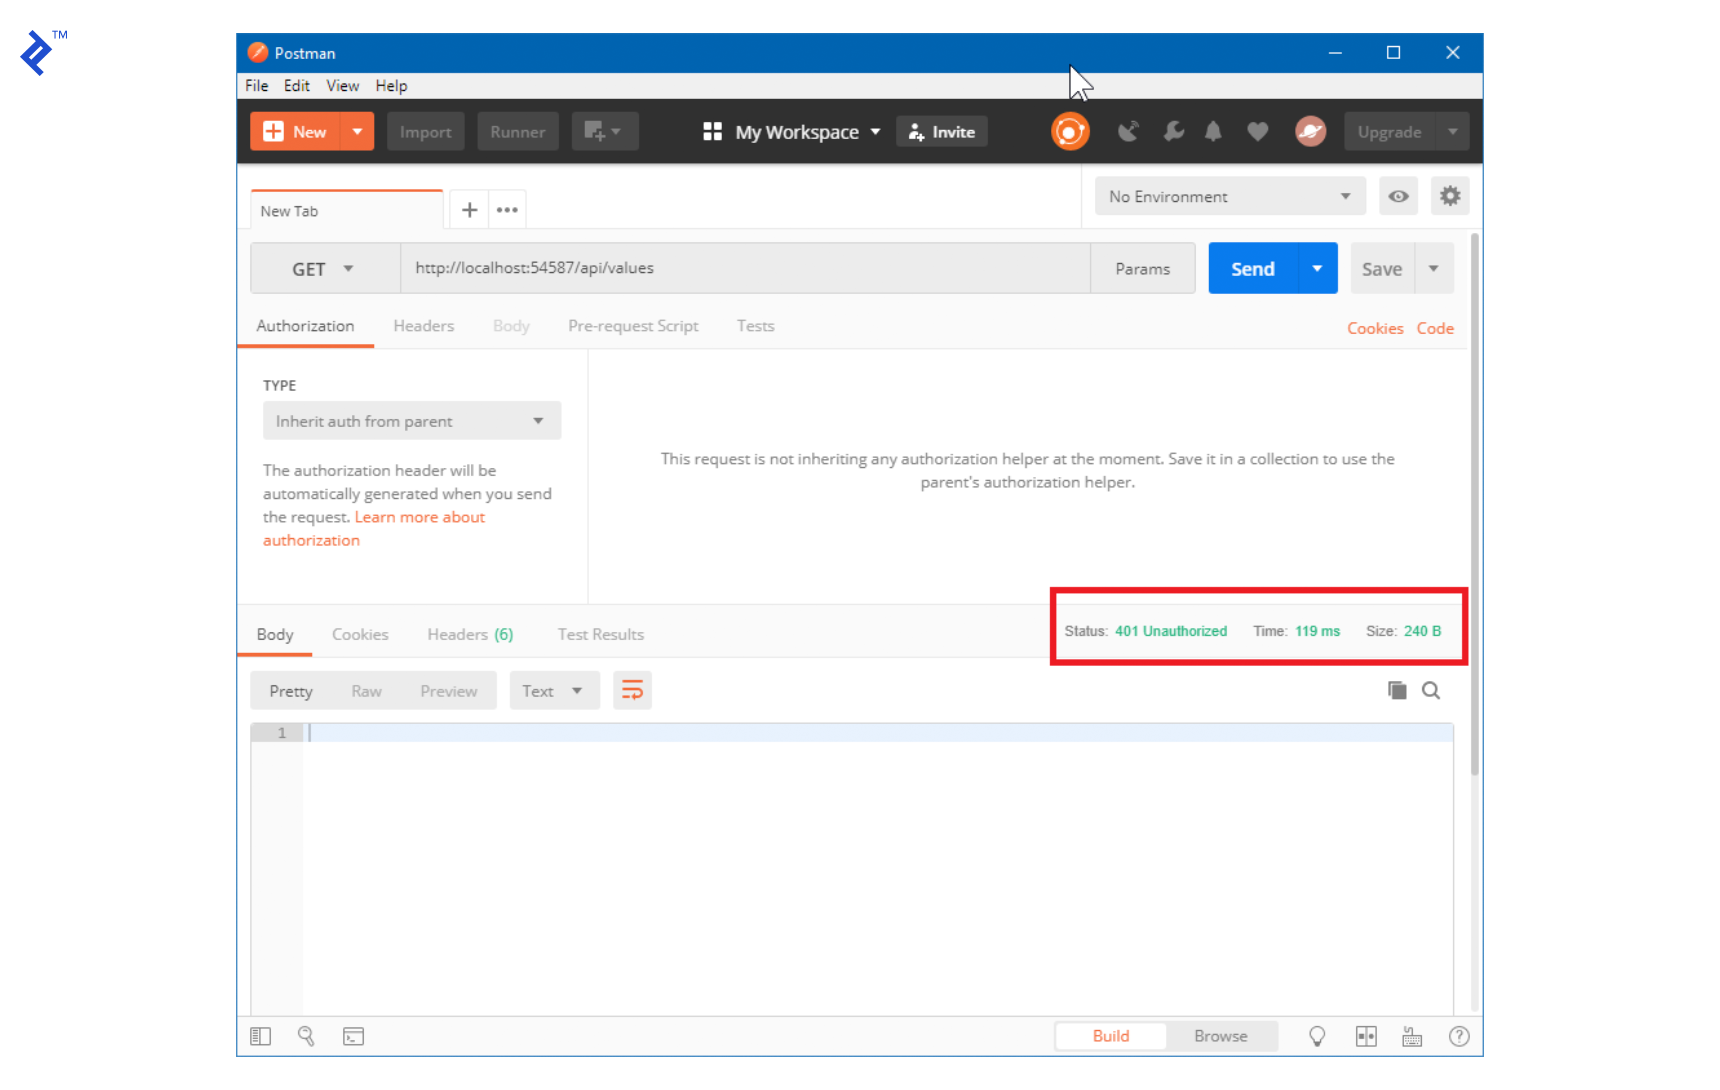
So, we’ll need to add a method to authenticate our users. For the sake of simplicity here, we’ll do it on the same ValuesController class.
[AllowAnonymous]
[HttpPost("authenticate")]
public IActionResult Authenticate([FromBody]JObject userInfo)
{
        var username = userInfo["username"].ToString();
        var password = userInfo["password"].ToString();

        //We would validate against the DB
        if (username != "user" || password != "123")
        {
                return BadRequest(new { message = "Username or password is incorrect" });
        }

        // return basic user info (without password) and token to store on the front-end
        return Ok(CreateUserToken(1));
}

private string CreateUserToken(int userId)
{
        var tokenHandler = new JwtSecurityTokenHandler();
        var tokenDescriptor = new SecurityTokenDescriptor
        {
                Subject = new ClaimsIdentity(new[]
                {
                        new Claim(ClaimTypes.Name, userId.ToString())
                }),
                Expires = DateTime.UtcNow.AddDays(7),
                SigningCredentials = new SigningCredentials(new SymmetricSecurityKey(Startup.JwtKey), SecurityAlgorithms.HmacSha256Signature)
        };
        var token = tokenHandler.CreateToken(tokenDescriptor);
        return tokenHandler.WriteToken(token);
}
Now we’ve created a method with Anonymous access, which means that all clients, even those not authenticated, will be able to call it using a POST message containing a JSON object and passing a string for its username and a string for its password.
When we review it with Postman, we get this:
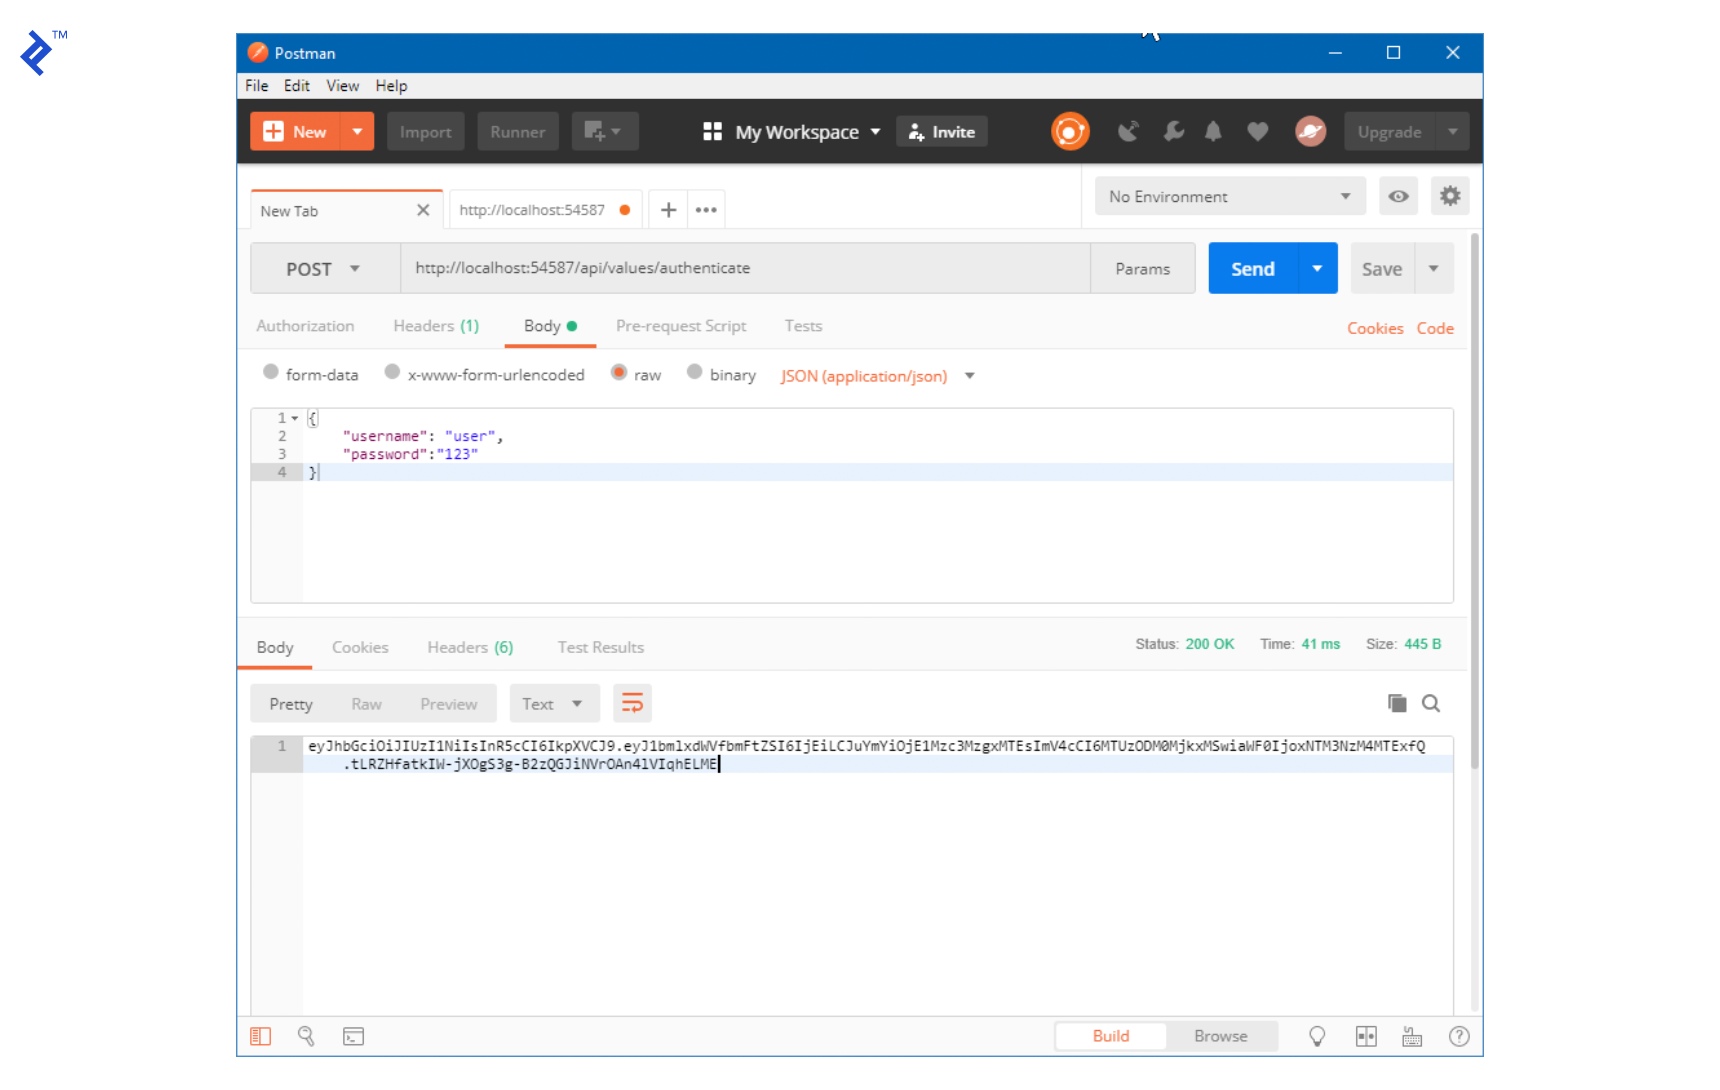
As we can see, the result of the authenticate method was the very string we now need to use as a token for every call we want to do to the API.
Once the token is included in the headers of the message, the validation takes place and, if the correct parameters are passed, the service runs the method and returns its value. For example, if we now call the values controller and pass the token, we get the same result as before:
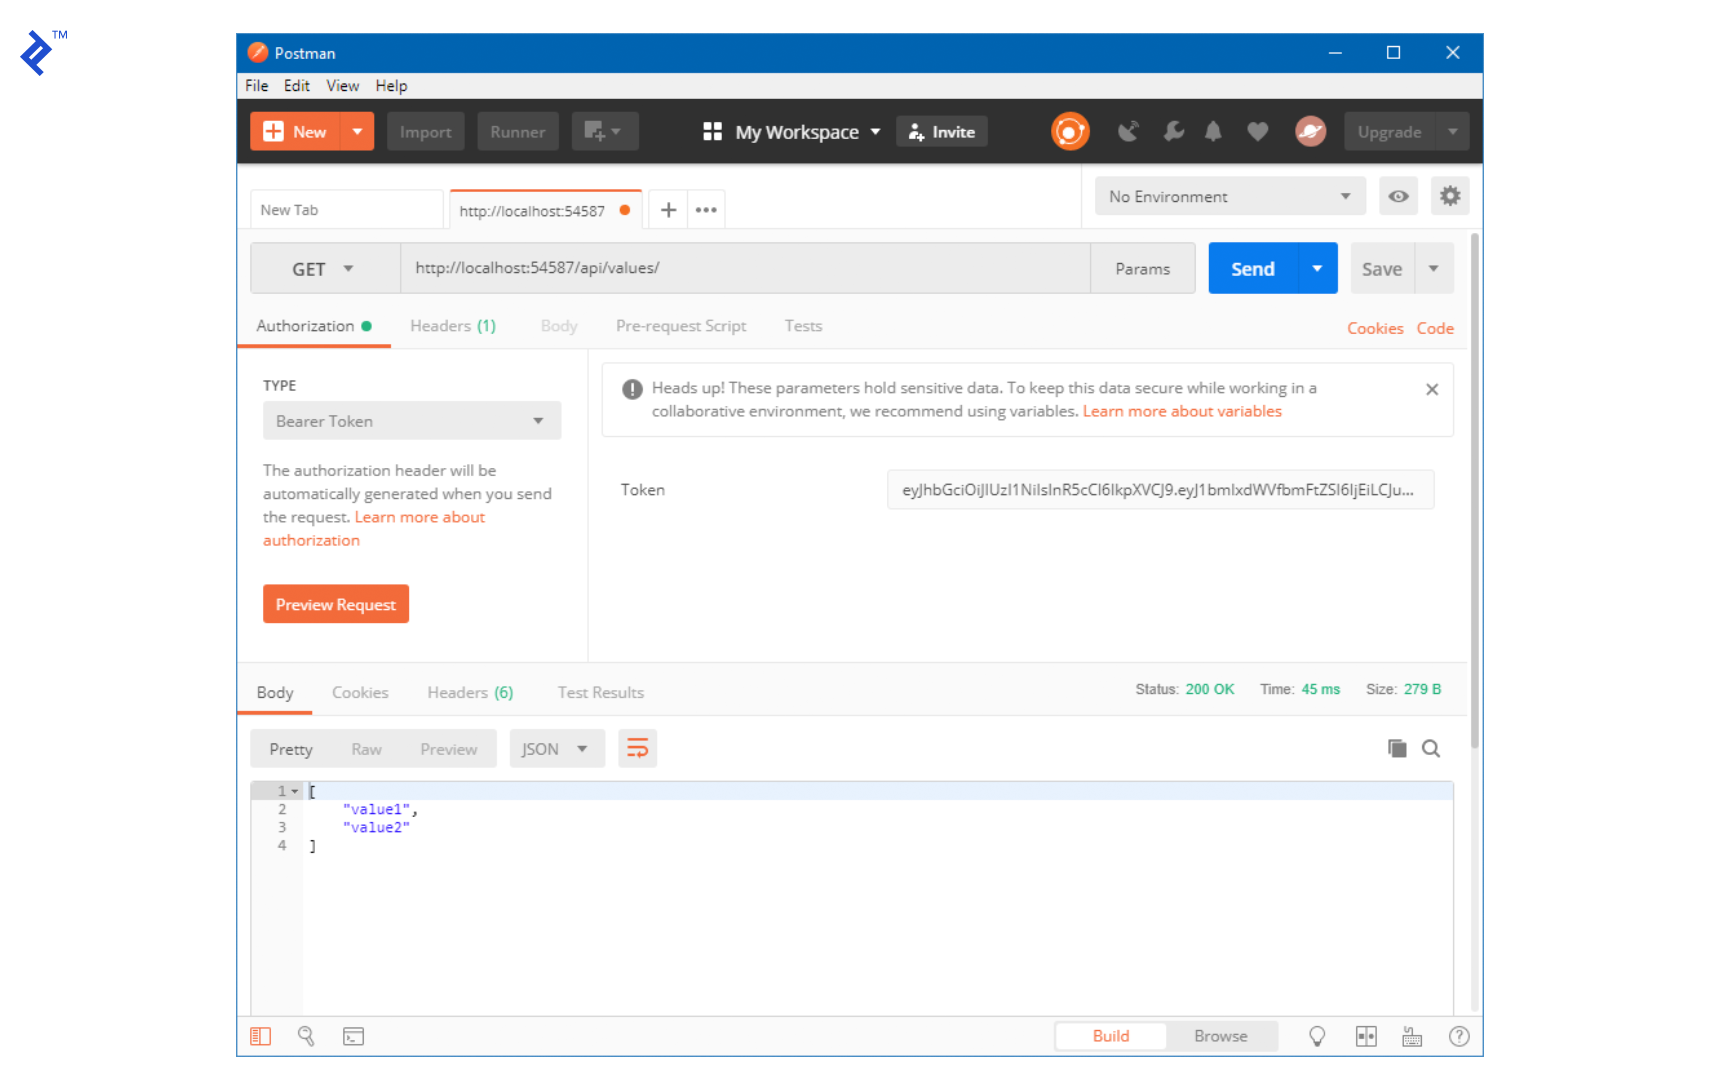
Now, we’ll create a method to get the latitude and longitude for the current car we’re tracking. Again, for simplicity, it’ll just be a dummy method that will return at first a random location and start moving the car a fixed amount of distance every time the method is called.
First, we adjust the Get(int id) method in the ValuesController class to make it look like this:
[HttpGet("{id}")]
public ActionResult<string> Get(int id)
{
        var location = LocationHelper.GetCurrentLocation(id);

        dynamic jsonObject = new JObject();
        jsonObject.Latitude = location.latitude;
        jsonObject.Longitude = location.longitude;

        return jsonObject.ToString();
}
Then, we add a new LocationHelper class that will handle the current and future locations of the cars being tracked.
public static class LocationHelper
{
private static readonly Random Randomizer = new Random();
private const double PositionDelta = 0.0001d;


internal static (double latitude, double longitude) GetCurrentLocation(int id)
{

        if (!Locations.ContainsKey(id))
        {
                Locations.Add(id, default((double latitude, double longitude)));
        }

        //This method updates the last known location for the car and simulates its movement
        UpdateLocation(id);

        return Locations[id];
}

private static void UpdateLocation(int id)
{
        (double latitude, double longitude)loc = Locations[id];

        //If the default value is found, randomly assign a starting point.
        if (loc.latitude == default(double) && loc.longitude == default(double))
        {
                loc = Locations[id] = GetRandomStartingPoint();
        }

        if (Randomizer.Next(2) > 0)
        {
                //In this scenario we simulate an updated latitude
                loc.latitude = loc.latitude + PositionDelta;
        }
        else
        {
                //Simulated longitude change
                loc.longitude = loc.longitude + PositionDelta;
        }

        Locations[id] = loc;
}


private static (double latitude, double longitude) GetRandomStartingPoint()
{
        //Set inside the continental US
        return (Randomizer.Next(31, 49), Randomizer.Next(-121, -75));
}

private static readonly Dictionary<int, (double latitude, double longitude)> Locations = new Dictionary<int, (double latitude, double longitude)>();

}
That’s it for the back end.
The front end:
We’ll now create a new WPF app. Once we’ve created it, Visual Studio will add a new project with the following structure to our solution.

Bing Maps Control:
To use the WPF control for Bing Maps, we’ll need to install the SDK (referenced above) and add it as a reference to our WPF application. Depending on where you installed it, the DLL might be on a different path. I installed it on the default location and added it as follows:
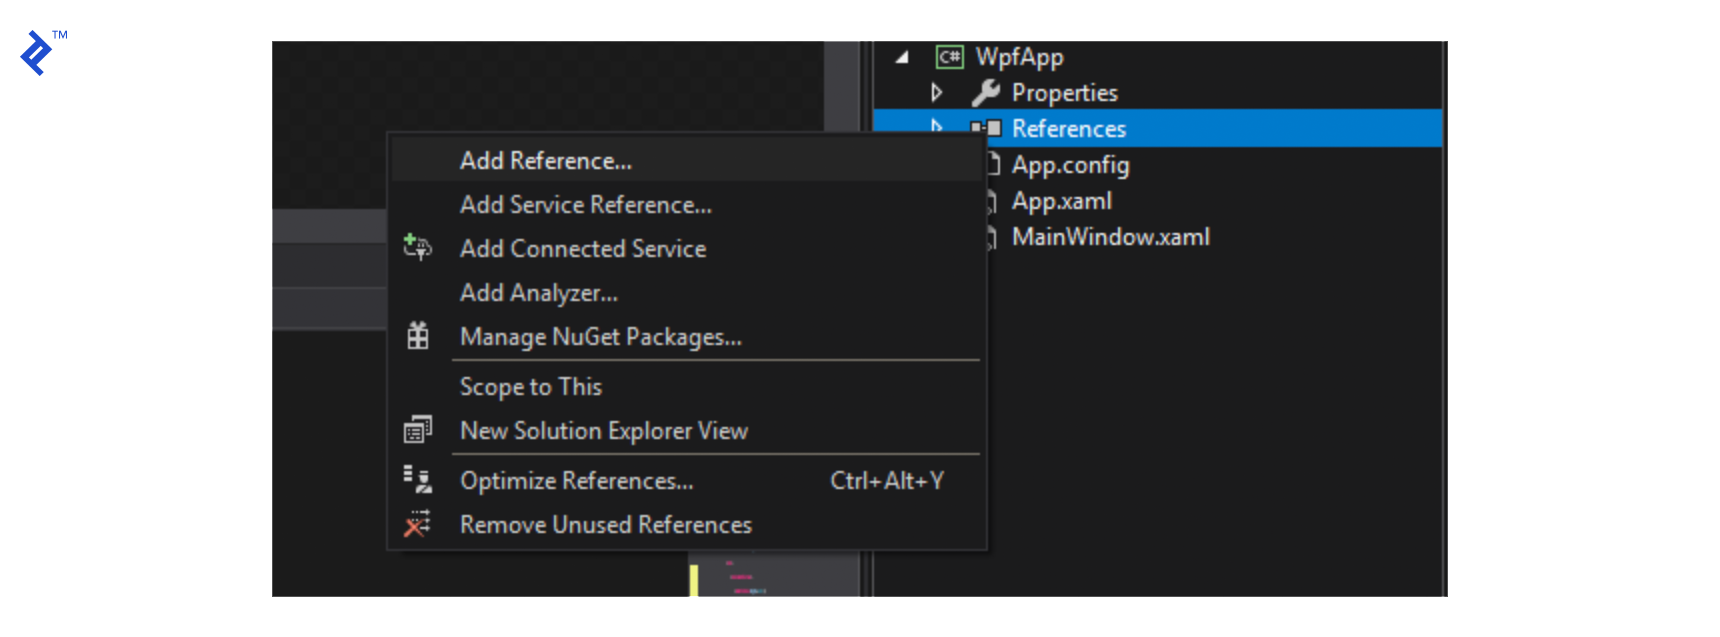

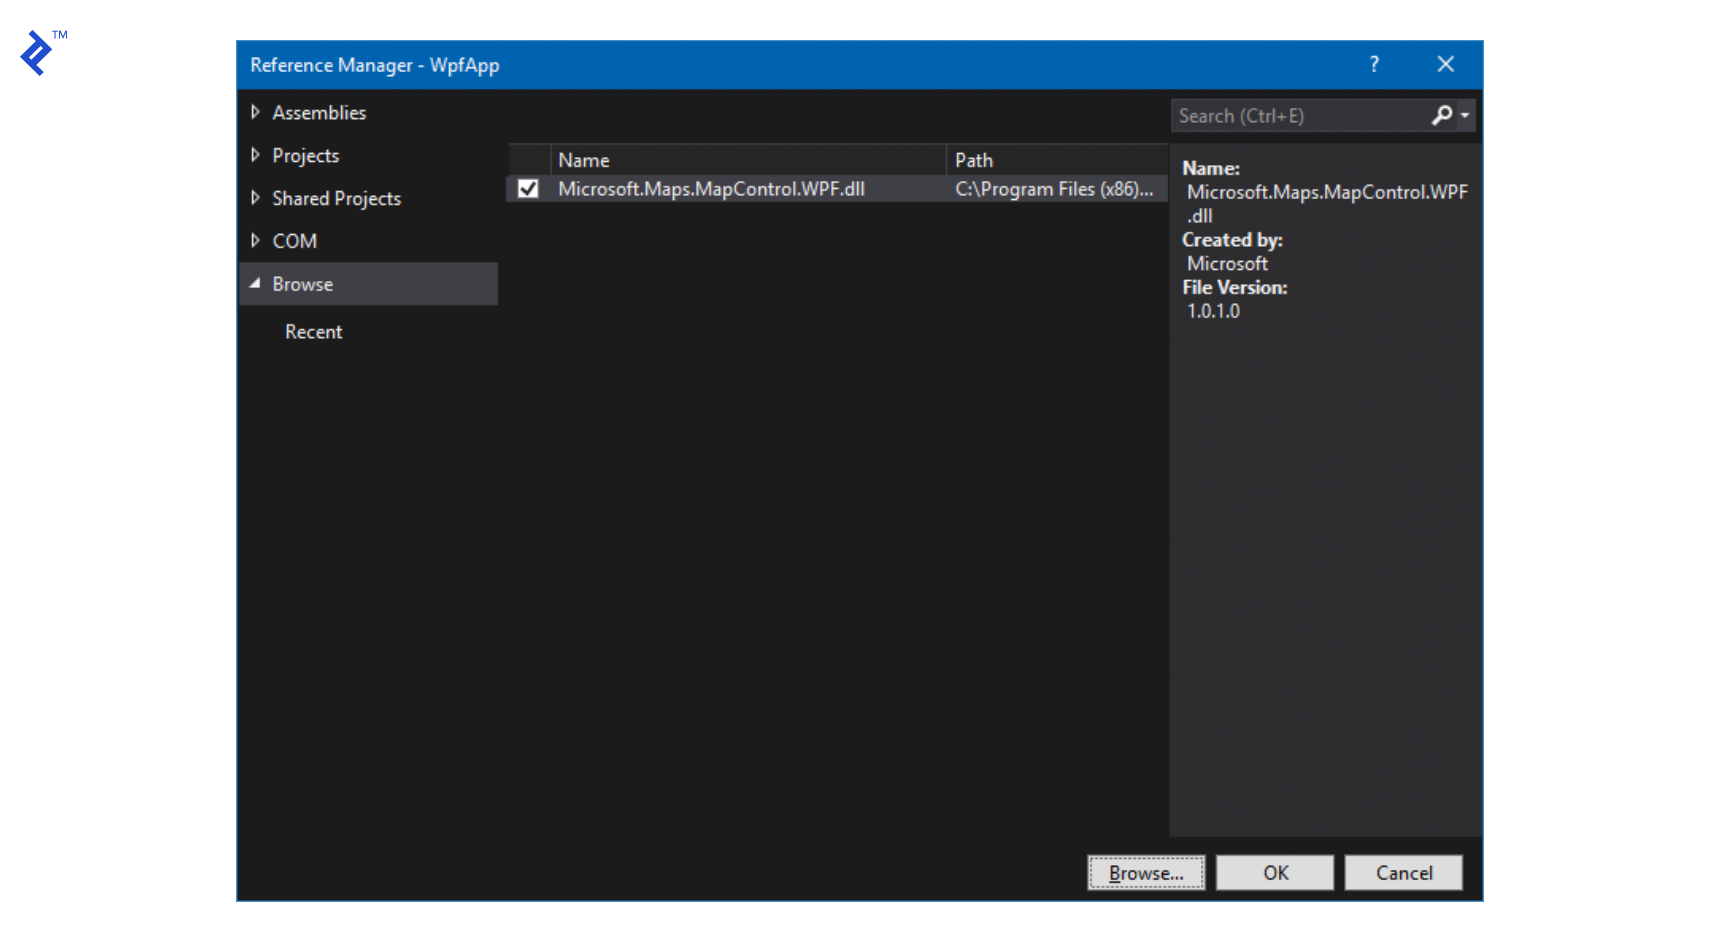
Next, we’ll add nuget packages for reactiveui, reactiveui-wpf and refit to our WPF project, which will allow us to create view models using Reactive Programming as well as consuming our REST API.


We’ll now create our ViewModel. Add a new class called MainViewModel.cs and make it look like this:
public class MainViewModel : ReactiveObject
{
#region Private Members

private readonly ITrackingService _service;
private readonly ISubject<(double latitude, double longitude)> _locationUpdate;

#endregion

#region Methods

public MainViewModel()
{
        _service = Locator.Current.GetService<ITrackingService>();
        _locationUpdate = new Subject<(double latitude, double longitude)>();

        UpdateCar = ReactiveCommand.Create(() =>
                {
                        var parsedCorrectly = int.TryParse(NewCarToFollow, out int newCar);
                        NewCarToFollow = null;
                        if (!parsedCorrectly)
                        {
                                MessageBox.Show("There was an error reading the number of the car to follow. Please, review it.",
                                                "Car Tracking Service", MessageBoxButton.OK, MessageBoxImage.Warning);

                                return;
                        }

                        FollowedCar = newCar;
                }, canExecute: this.WhenAnyValue(x => x.NewCarToFollow).Select(x => !string.IsNullOrWhiteSpace(x)));


/*This Scheduled method is where we get the location for the car being followed every 500 ms. We call the service with the car id, our JWT Token, and transform the result to a ValueTuple (double latitude, double longitude) to pass to our Subject's OnNext method so it can be received by the view */

        Scheduler.Default.SchedulePeriodic(TimeSpan.FromMilliseconds(500),
                                           () => _service.GetLocation(FollowedCar, App.GetToken())
                                           .Select(jo =>
                                                   (
                                                           latitude: double.Parse(jo["Latitude"].ToString()),
                                                           longitude: double.Parse(jo["Longitude"].ToString())
                                                   )).Subscribe(newLocation => _locationUpdate.OnNext(newLocation)));
}

#endregion

#region Properties

private string _newCarToFollow;
public string NewCarToFollow
{
        get => _newCarToFollow;
        set => this.RaiseAndSetIfChanged(ref _newCarToFollow, value);
}

private int _followedCar = 1;
public int FollowedCar
{
        get => _followedCar;
        set => this.RaiseAndSetIfChanged(ref _followedCar, value);
}

public IObservable<(double latitude, double longitude)> LocationUpdate => _locationUpdate;

private ReactiveCommand _updateCar;
public ReactiveCommand UpdateCar
{
        get => _updateCar;
        set => this.RaiseAndSetIfChanged(ref _updateCar, value);
}

#endregion

}
To let the view know there’s a ViewModel attached to it and be able to use, we’ll need to make a few changes to the MainView.xaml.cs file.
public partial class MainWindow : IViewFor<MainViewModel>
{
public MainWindow()
{
        InitializeComponent();
        ViewModel = Locator.CurrentMutable.GetService<MainViewModel>();

        /*Our ViewModel exposes an IObservable with a parameter of type ValueTuple (double latitude, double longitude) and it gets called every time the ViewModel updates the car's location from the REST API.*/

        ViewModel.LocationUpdate
        .ObserveOn(RxApp.MainThreadScheduler)
        .Subscribe(SetLocation);
}

private void SetLocation((double latitude, double longitude) newLocation)
{
        //New location for the tracked vehicle.
        var location = new Location(newLocation.latitude, newLocation.longitude);
        //Remove previous pin
        myMap.Children.Clear();
        //Center pin and keep same Zoom Level
        myMap.SetView(location, myMap.ZoomLevel);

        var pin = new Pushpin
        {
                Location = location,
                Background = Brushes.Green
        };
        //Add new pin to the map
        myMap.Children.Add(pin);
}

/// <summary>
/// Allows the ViewModel to be used on the XAML via a dependency property
/// </summary>
public static readonly DependencyProperty ViewModelProperty =
        DependencyProperty.Register("ViewModel", typeof(MainViewModel), typeof(MainWindow),
                                    new PropertyMetadata(default(MainViewModel)));

/// <summary>
/// Implementation for the IViewFor interface
/// </summary>
object IViewFor.ViewModel
{
        get => ViewModel;
        set => ViewModel = (MainViewModel)value;
}

/// <summary>
/// Regular property to use the ViewModel from this class
/// </summary>
public MainViewModel ViewModel
{
        get => (MainViewModel)GetValue(ViewModelProperty);
        set => SetValue(ViewModelProperty, value);
}
}
Then, we’ll modify the MainWindow.xaml file to make it look like this:
<Window x:Class="WpfApp.MainWindow"
        xmlns="http://schemas.microsoft.com/winfx/2006/xaml/presentation"
        xmlns:x="http://schemas.microsoft.com/winfx/2006/xaml"
        xmlns:d="http://schemas.microsoft.com/expression/blend/2008"
        xmlns:mc="http://schemas.openxmlformats.org/markup-compatibility/2006"
        xmlns:wpf="clr-namespace:Microsoft.Maps.MapControl.WPF;assembly=Microsoft.Maps.MapControl.WPF"
        xmlns:local="clr-namespace:WpfApp"
        DataContext="{Binding ViewModel,RelativeSource={RelativeSource Self}}"
        d:DataContext="{d:DesignInstance Type=local:MainViewModel, IsDesignTimeCreatable=True}"
        mc:Ignorable="d" WindowStartupLocation="CenterScreen"
        Title="Car Tracker" Height="800" Width="1200">
    <Grid>
        <Grid.RowDefinitions>
            <RowDefinition Height="Auto"/>
            <RowDefinition Height="*"/>
        </Grid.RowDefinitions>

        <DockPanel>
            <StackPanel Orientation="Horizontal" Margin="10" DockPanel.Dock="Left">
                <Label>Car to follow</Label>
                <TextBox Width="50" Text="{Binding NewCarToFollow, UpdateSourceTrigger=PropertyChanged}" VerticalAlignment="Center"/>
                <Button Margin="15,0,0,0" Content="Update Followed Car"
                        Command="{Binding UpdateCar}"/>
            </StackPanel>

            <TextBlock Text="{Binding FollowedCar,StringFormat=Following Car: {0}}"
                       Margin="0,0,10,0"
                       HorizontalAlignment="Right" VerticalAlignment="Center" DockPanel.Dock="Right"/>

        </DockPanel>

        <wpf:Map x:Name="myMap" ZoomLevel="15" Grid.Row="1" Margin="10"
                 CredentialsProvider="ENTER-YOUR-BING-MAPS-CREDENTIAL-HERE"/>

    </Grid>
</Window>
It is important to adjust the CredentialsProvider property with your own Bing Maps key.
To be able to access our REST API, we’ll be using refit. All we need to do is create an interface that describes the APIs methods we’ll be using. So, we create a new interface called ITrackingService with the following content:
public interface ITrackingService
{

[Post("/api/values/authenticate")]
IObservable<string> Authenticate([Body] JObject user);


[Get("/api/values/{id}")]
IObservable<JObject> GetLocation(int id, [Header("Authorization")] string authorization);
}
Finally, we modify the App class to include dependency injection (using Splat, which was added when we included the reference to reactiveui), set the ServerUri (which you should change to whatever port you get when you run the REST API) and simulate our login at the very start of the application.
public partial class App : Application
{

protected override void OnStartup(StartupEventArgs e)
{
        base.OnStartup(e);
        SetDependencyInjection();
        LogIn();

}

private void SetDependencyInjection()
{
        Locator.CurrentMutable.RegisterLazySingleton(() => RestService.For<ITrackingService>(ServerUri), typeof(ITrackingService));
        Locator.CurrentMutable.RegisterLazySingleton(() => new MainViewModel(), typeof(MainViewModel));
}

private static string Token;
private const string ServerUri = "http://localhost:54587";
private void LogIn()
{
        try
        {
                var userInfo = new JObject {
                        ["username"] = "user", ["password"] = "123"
                };

                Token = Locator.Current.GetService<ITrackingService>()
                        .Authenticate(userInfo)
                        .Wait();
        }
        catch
        {
                MessageBox.Show("There was an error validating the user. Is the service up?");
                Shutdown();
        }
}

internal static string GetToken()
{
        return $"Bearer {Token}";
}

}
Finally, when we run our application, we’ll be able to see a real-time simulation of a moving car with its coordinates being taken from the REST API every 500ms. The user is also able to change the car being followed to any other ID, and a new set of data will be created for it.
I hope this small example has shown the basics of handling a REST API with Reactive Programming in WPF in an accessible way.
You can always download the entire source project from this repository.
There are some areas to continue with this example that might help you further your understanding:
- Create a login window and allow the user to log in and out.
- Validate the user data from a database.
- Create different user roles and restrict certain methods in the REST API so that only a user with a certain role can access them.
- Understand more of Reactive Programming going through all the operators and their behavior with Rx Marbles. Rx Marbles is a neat application that allows you to interact with streams and apply operators to the data points in them.
Conclusion
Reactive Programming can prove beneficial when striving to achieve a controlled way of using event-driven programming without running into the usual problems inherent to this paradigm. Using it for new developments is as simple as adding a couple of references to well-supported open source libraries. But, most importantly, incorporating it into existing codebases can be progressive and it should not break backwards compatibility with components that don’t implement it. This article dealt with Reactive Programming for WPF, but there are ports to most major languages and frameworks which makes Reactive Programming a good adventure for any kind of developer.
As an exercise, next, you should:
- Extend the behavior of the project by
- Adding a database for Users, Cars, and Locations
- Getting the location for the cars from the database and showing those to the user. Allow the user to explore a car’s movements over a period of time
- Adding user permissions. Let admin users create new cars and users and give read-only access to regular users. Add roles to JWT Authentication.
- Review source code for .NET reactive extensions in https://github.com/dotnet/reactive
Further Reading on the Toptal Blog:
- Anticipatory Design: How to Create Magical User Experiences
- Ngrx and Angular 2 Tutorial: Building a Reactive Application
- Building Reactive Apps with Redux, RxJS, and Redux-Observable in React Native
- Meet RxJava: The Missing Reactive Programming Library for Android
- Design Psychology and the Neuroscience of Awesome UX
Understanding the basics
What is JWT?
JSON Web Tokens are JSON objects that are a safe way to represent a set of information between two parties.
Why use JWT-based Authentication?
JWT is one of the most popular alternatives for modern applications to use authentication for its safety and robustness.
What is the use of observables?
They provide an easy way to tackle event-driven and async programming in an orderly fashion and without much overhead.
What are the benefits of dependency injection?
The construction of new objects can be defined in a single point in your code base and, from then on, you can assume your objects will be available for you to use.
Is WPF a programming language?
No. The Windows Presentation Foundation is a graphical subsystem by Microsoft for rendering user interfaces in Windows-based applications.
What is the use of WPF?
It’s one of the ways in which you can design desktop applications for Windows. In that respect, it can be thought of as an alternative to Windows Forms.
Is WPF worth learning?
WPF is Microsoft’s recommended way to develop new desktop applications. With a decade of stability, it’s a flexible set of tools used to create beautiful and modern applications and allows for an easy separation of concerns (look & feel vs design) like no other for the Windows environment.
Mexico City, Mexico
Member since September 12, 2018
About the author
Denis is a certified C# specialist and MS certified professional, experienced in several programming languages and business domains.

