
Working With TypeScript and Jest Support: An AWS SAM Tutorial
JavaScript boilerplate is easy enough to come by, but there’s a bit more to starting AWS SAM projects with TypeScript. Here’s how to create an AWS SAM TypeScript project from scratch with Jest support.

JavaScript boilerplate is easy enough to come by, but there’s a bit more to starting AWS SAM projects with TypeScript. Here’s how to create an AWS SAM TypeScript project from scratch with Jest support.

Mohammad is a full-stack developer who has architected several applications on AWS using Lambda, NoSQL, and Node.js. He has extensive experience in optimizing AWS infrastructure for midsized companies.
Expertise
Previously At

A powerful tool for building serverless applications, the AWS Serverless Application Model (SAM) frequently pairs with JavaScript: 62% of developers across medium and large companies choose JavaScript for their serverless code. However, TypeScript is soaring in popularity and far outranks JavaScript as developers’ third-most-loved language.
While JavaScript boilerplate isn’t hard to find, starting AWS SAM projects with TypeScript is more complex. The following tutorial shows how to create an AWS SAM TypeScript project from scratch as well as how the different parts work together. Readers need be only somewhat familiar with AWS Lambda functions to follow along.
Starting Our AWS SAM TypeScript Project
The groundwork of our serverless application includes various components. We will first configure the AWS environment, our npm package, and Webpack functionality–then we can create, invoke, and test our Lambda function to see our application in action.
Prepare the Environment
To set up the AWS environment, we need to install the following:
Note that this tutorial requires installing Docker during step 2 above to test our application locally.
Initialize an Empty Project
Let’s create the project directory, aws-sam-typescript-boilerplate, and a src subfolder to hold code. From the project directory, we’ll set up a new npm package:
npm init -y # -y option skips over project questionnaire
This command will create a package.json file inside our project.
Add the Webpack Configuration
Webpack is a module bundler primarily used for JavaScript applications. Since TypeScript compiles to plain JavaScript, Webpack will effectively prepare our code for the web browser. We will install two libraries and a custom loader:
- webpack: Core library
- webpack-cli: Command-line utilities for Webpack
- ts-loader: TypeScript loader for Webpack
npm i --save-dev webpack webpack-cli ts-loader
The AWS SAM CLI build command, sam build, slows the development process because it tries to run npm install for each function, causing duplication. We will use an alternate build command from the aws-sam-webpack-plugin library to speed up our environment.
npm i --save-dev aws-sam-webpack-plugin
By default, Webpack doesn’t provide a configuration file. Let’s make a custom config file named webpack.config.js in the root folder:
/* eslint-disable @typescript-eslint/no-var-requires */
const path = require('path');
const AwsSamPlugin = require('aws-sam-webpack-plugin');

const awsSamPlugin = new AwsSamPlugin();

module.exports = {
    entry: () => awsSamPlugin.entry(),
    output: {
        filename: (chunkData) => awsSamPlugin.filename(chunkData),
        libraryTarget: 'commonjs2',
        path: path.resolve('.')
    },
    devtool: 'source-map',
    resolve: {
        extensions: ['.ts', '.js']
    },
    target: 'node',
    mode: process.env.NODE_ENV || 'development',
    module: {
        rules: [{ test: /\.tsx?$/, loader: 'ts-loader' }]
    },
    plugins: [awsSamPlugin]
};
Now let’s examine the various parts:
-
entry: This loads the entry object (where Webpack starts building the bundle) from theAWS::Serverless::Functionresource. -
output: This points to the destination of the build output (in this case,.aws-sam/build). Here we also specify the target library ascommonjs2, which assigns the return value of the entry point tomodule.exports. This entry point is the default for Node.js environments. -
devtool: This creates a source map,app.js.map, in our build output destination. It maps our original code to the code running in the web browser and will help with debugging if we set the environment variableNODE_OPTIONSto--enable-source-mapsfor our Lambda. -
resolve: This tells Webpack to process TypeScript files before JavaScript files. -
target: This tells Webpack to target Node.js as our environment. This means Webpack will use the Node.jsrequirefunction for loading chunks when it compiles. -
module: This applies the TypeScript loader to all files that meet thetestcondition. In other words, it ensures that all files with a.tsor.tsxextension will be handled by the loader. -
plugins: This helps Webpack identify and use ouraws-sam-webpack-plugin.
In the first line, we have disabled a particular ESLint rule for this file. The standard ESLint rules we will configure later discourage using the require statement. We prefer require to import in Webpack so we will make an exception.
Set Up TypeScript Support
Adding TypeScript support will improve the developer experience by:
- Preventing warning messages about missing type declarations.
- Providing type validation.
- Offering autocompletion inside the IDE.
First, we’ll install TypeScript for our project locally (skip this step if you have TypeScript installed globally):
npm i --save-dev typescript
We’ll include the types for the libraries we’re using:
npm i --save-dev @types/node @types/webpack @types/aws-lambda
Now, we’ll create the TypeScript configuration file, tsconfig.json, in the project root:
{
    "compilerOptions": {
        "target": "ES2015",
        "module": "commonjs",
        "sourceMap": true,
        "strict": true,
        "esModuleInterop": true,
        "skipLibCheck": true,
        "forceConsistentCasingInFileNames": true,
    },
    "include": ["src/**/*.ts", "src/**/*.js"],
    "exclude": ["node_modules"]
}
Here we are following the default configuration recommended by the TypeScript community. We have added include to append the files under the src folder to the program and exclude to avoid TypeScript compilation for the node_modules folder—we won’t touch this code directly.
Create a Lambda Function
We haven’t written any Lambda code for our serverless application until now, so let’s jump in. In the src folder we created earlier, we’ll create a test-lambda subfolder containing an app.ts file with this Lambda function:
import { APIGatewayEvent } from 'aws-lambda';

export const handler = async (event: APIGatewayEvent) => {
    console.log('incoming event is', JSON.stringify(event));
    const response = {
        statusCode: 200,
        body: JSON.stringify({ message: 'Request was successful.' })
    };
    return response;
};
This simple placeholder function returns a 200 response with a body. We will be able to run the code after one more step.
Include the AWS Template File
AWS SAM requires a template file to transpile our code and deploy it to the cloud. Create the file template.yaml in the root folder:
AWSTemplateFormatVersion: "2010-09-09"
Transform: AWS::Serverless-2016-10-31
Description: AWS SAM Boilerplate Using TypeScript

Globals:
  Function:
    Runtime: nodejs14.x # modify the version according to your need
    Timeout: 30

Resources:
  TestLambda:
    Type: AWS::Serverless::Function
    Properties:
      Handler: app.handler
      FunctionName: "Test-Lambda"
      CodeUri: src/test-lambda/
      Events:
        ApiEvent:
          Type: Api
          Properties:
            Path: /test
            Method: get
This template file generates a Lambda function accessible from an HTTP GET API. Note that the version referenced on the Runtime: line may need customizing.
Run the Application
To run the application, we must add a new script in the package.json file for building the project with Webpack. The file may have existing scripts, such as an empty test script. We can add the build script like this:
"scripts": {
   "build": "webpack-cli"
}
If you run npm run build from the project’s root, you should see the build folder, .aws-sam, created. Those of us in a Mac environment may need to make hidden files visible by pressing Command + Shift + . to see the folder.
We will now start a local HTTP server to test our function:
sam local start-api
When we visit the test endpoint in a web browser, we should see a success message.

The console should show that the function gets mounted in a Docker container before it runs, which is why we installed Docker earlier:
Invoking app.handler (nodejs14.x)
Skip pulling image and use local one: public.ecr.aws/sam/emulation-nodejs14.x:rapid-1.37.0-x86_64.

Mounting /Users/mohammadfaisal/Documents/learning/aws-sam-typescript-boilerplate/.aws-sam/build/TestLambda as /var/task:ro, delegated inside runtime container
Enhancing Our Development Workflow for a Professional Setting
Our project is up and running, adding a few finishing touches will ensure an exceptional developer experience that will boost productivity and collaboration.
Optimize the Build With Hot Reloading
It’s tedious to run the build command after each code change. Hot reloading will fix this problem. We can add another script in our package.json to watch for file changes:
"watch": "webpack-cli -w"
Open a separate terminal and run npm run watch. Now, your project will automatically compile when you change any code. Modify the message of the code, refresh your webpage, and see the updated result.
Improve Code Quality With ESLint and Prettier
No TypeScript or JavaScript project is complete without ESLint and Prettier. These tools will maintain your project’s code quality and consistency.
Let’s install the core dependencies first:
npm i --save-dev eslint prettier
We will add some helper dependencies so ESLint and Prettier can work together in our TypeScript project:
npm i --save-dev \
eslint-config-prettier \
eslint-plugin-prettier \
@typescript-eslint/parser \
@typescript-eslint/eslint-plugin
Next, we will add our linter by creating an ESLint configuration file, .eslintrc, inside the project root:
{
    "root": true,
    "env": {
        "es2020": true,
        "node": true,
        "jest": true
    },
    "parser": "@typescript-eslint/parser",
    "extends": [
        "eslint:recommended",
        "plugin:@typescript-eslint/recommended",
        "plugin:prettier/recommended"
    ],
    "ignorePatterns": ["src/**/*.test.ts", "dist/", "coverage/", "test/"],
    "parserOptions": {
        "ecmaVersion": 2018,
        "sourceType": "module",
        "ecmaFeatures": {
            "impliedStrict": true
        }
    },
    "rules": {
        "quotes": ["error", "single", { "allowTemplateLiterals": true }],
        "default-case": "warn",
        "no-param-reassign": "warn",
        "no-await-in-loop": "warn",
        "@typescript-eslint/no-unused-vars": [
            "error",
            {
                "vars": "all",
                "args": "none"
            }
        ]
    },
    "settings": {
        "import/resolver": {
            "node": {
                "extensions": [".js", ".jsx", ".ts", ".tsx"]
            }
        }
    }
}
Note that the extends section of our file must keep the Prettier plugin configuration as the last line in order to display Prettier errors as ESLint errors visible in our editor. We are following the ESLint recommended settings for TypeScript, with some custom preferences added in the rules section. Feel free to browse available rules and further customize your settings. We chose to include:
- An error if we don’t use single-quoted strings.
- A warning when we provide no
defaultcase inswitchstatements. - A warning if we reassign any parameter of a function.
- A warning if we call an
awaitstatement inside a loop. - An error for unused variables, which make code unreadable and bug-prone over time.
We have already set up our ESLint configuration to work with Prettier formatting. (More information is available in the eslint-config-prettier GitHub project.) Now, we can create the Prettier configuration file, .prettierrc:
{
    "trailingComma": "none",
    "tabWidth": 4,
    "semi": true,
    "singleQuote": true
}
These settings are from Prettier’s official documentation; you can modify them as you desire. We updated the following properties:
-
trailingComma: We changed this fromes5tononeto avoid trailing commas. -
semi: We changed this fromfalsetotruebecause we prefer to have a semicolon at the end of each line.
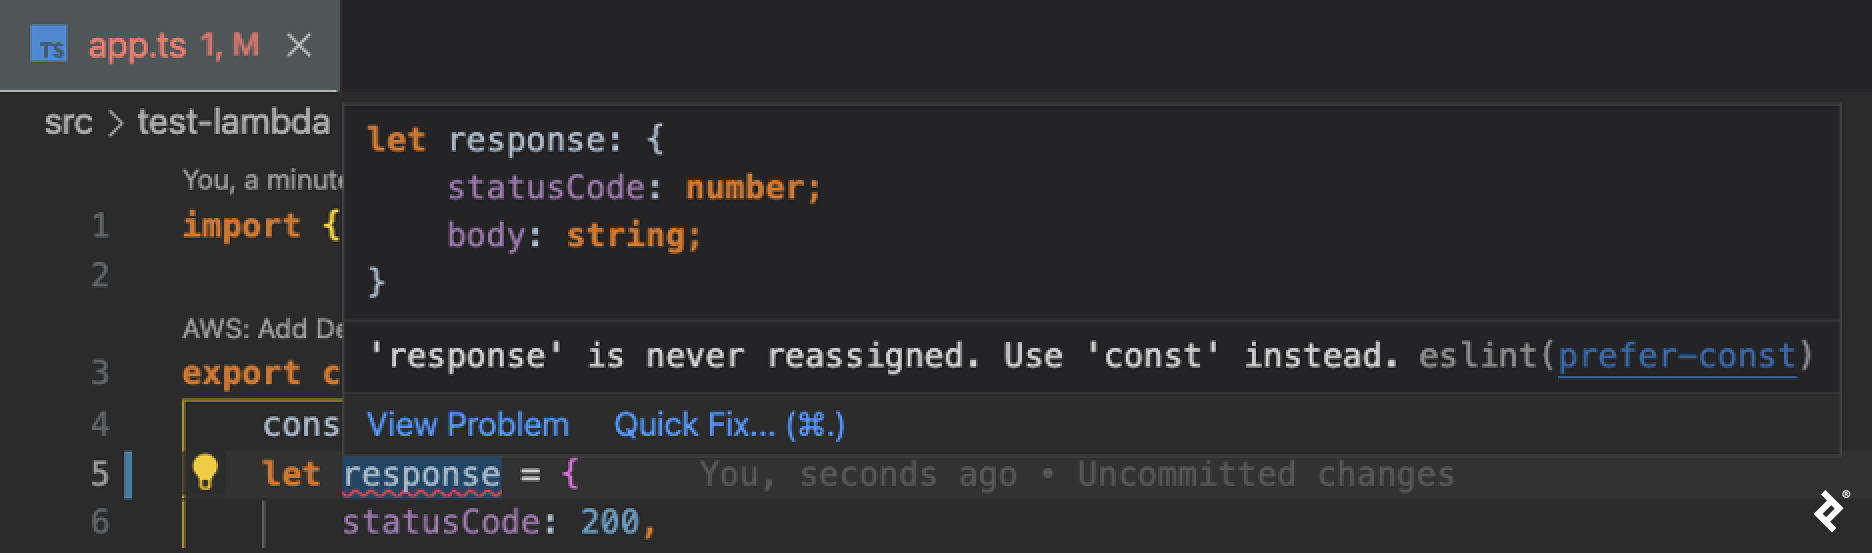
Finally, it’s time to see ESLint and Prettier in action. In our app.ts file, we’ll change the response variable type from const to let. Using let is not good practice in this case since we do not modify the value of response. The editor should display an error, the broken rule, and suggestions to fix the code. Don’t forget to enable ESLint and Prettier on your editor if they are not set up already.
Maintain Code With Jest Testing
Many libraries are available for testing, such as Jest, Mocha, and Storybook. We will use Jest in our project for a few reasons:
- It’s fast to learn.
- It requires minimal setup.
- It offers easy-to-use snapshot testing.
Let’s install the required dependencies:
npm i --save-dev jest ts-jest @types/jest
Next, we’ll create a Jest configuration file, jest.config.js, inside the project root:
module.exports = {
    roots: ['src'],
    testMatch: ['**/__tests__/**/*.+(ts|tsx|js)'],
    transform: {
        '^.+\\.(ts|tsx)$': 'ts-jest'
    }
};
We are customizing three options in our file:
-
roots: This array contains the folders that will be searched for test files—it only checks beneath oursrcsubfolder. -
testMatch: This array of glob patterns includes the file extensions that will be considered Jest files. -
transform: This option lets us write our tests in TypeScript using thets-jestpackage.
Let’s make a new __tests__ folder inside src/test-lambda. Inside that, we’ll add the file handler.test.ts, where we will create our first test:
import { handler } from '../app';
const event: any = {
    body: JSON.stringify({}),
    headers: {}
};

describe('Demo test', () => {
    test('This is the proof of concept that the test works.', async () => {
        const res = await handler(event);
        expect(res.statusCode).toBe(200);
    });
});
We will return to our package.json file and update it with the test script:
"test": "jest"
When we go to the terminal and run npm run test, we should be greeted with a passing test:

Handle Source Control With .gitignore
We should configure Git to exclude certain files from source control. We can create a .gitignore file using gitignore.io to skip over files that are not required:
# Logs
logs
*.log
npm-debug.log*
yarn-debug.log*
yarn-error.log*
lerna-debug.log*
.pnpm-debug.log*

# Runtime data
pids
*.pid
*.seed
*.pid.lock

npm-debug.log
package.lock.json
/node_modules
.aws-sam
.vscode

# TypeScript cache
*.tsbuildinfo

# Optional npm cache directory
.npm

# Optional ESLint cache
.eslintcache
Ready, Set, Build: Our Blueprint for Success
We now have a complete AWS SAM boilerplate project with TypeScript. We’ve focused on getting the basics right and maintaining high code quality with ESLint, Prettier, and Jest support. The example from this AWS SAM tutorial can serve as a blueprint, putting your next big project on track from the start.
The Toptal Engineering Blog extends its gratitude to Christian Loef for reviewing the code samples presented in this article.

Further Reading on the Toptal Blog:
Understanding the basics
The AWS Serverless Application Model (SAM) is an open-source AWS framework that allows developers to more efficiently build serverless applications. It includes SAM CLI options for local testing and integrates with various AWS serverless tools.
AWS SAM uses simple syntax to express functions, APIs, databases, and event source mappings. It provides a YAML template to model the application and offers single deployment configuration.
Jest is a testing framework; TypeScript is a programming language. More specifically, Jest checks the correctness of a codebase with tests (typically, JavaScript codebases). TypeScript enables IDEs to catch mistakes while coding and improves development workflow; it is a strict syntactical superset of JavaScript.

Mohammad Faisal
Dhaka, Dhaka Division, Bangladesh
Member since July 19, 2021
About the author
Mohammad is a full-stack developer who has architected several applications on AWS using Lambda, NoSQL, and Node.js. He has extensive experience in optimizing AWS infrastructure for midsized companies.
Expertise
PREVIOUSLY AT