A Vital Guide to Qmake
Qmake is a build system tool shipped with Qt library that simplifies the build process across different platforms.
In this guide, Freelance Qt Developer Andrei Smirnov describes the most useful qmake features and provides real-world examples for each of them.
Qmake is a build system tool shipped with Qt library that simplifies the build process across different platforms.
In this guide, Freelance Qt Developer Andrei Smirnov describes the most useful qmake features and provides real-world examples for each of them.
Andrei has 15+ years working for the likes of Microsoft, EMC, Motorola, and Deutsche Bank on mobile, desktop, and web using C++, C#, and JS.
Expertise
PREVIOUSLY AT

Introduction
qmake is a build system tool shipped with Qt library that simplifies the build process across different platforms. Unlike CMake and Qbs, qmake was a part of Qt since the very beginning and shall be considered as a “native” tool. Needless to say, Qt’s default IDE—Qt Creator—has the best support of qmake out of the box. Yes, you can also choose CMake and Qbs build systems for a new project there, but these are not that well integrated. It is likely that CMake support in Qt Creator will be improved over time, and this will be a good reason to issue the second edition of this guide, aimed specifically at CMake. Even if you do not intend to use Qt Creator, you may still want to consider qmake as a second build system in case you are building public libraries or plugins. Virtually all third-party Qt-based libraries or plugins supply qmake files used to integrate into qmake-based projects seamlessly. Only a few of them supply dual configuration, e.g., qmake and CMake. You might prefer using qmake if the following apply to you:
- You are building a cross-platform Qt-based project
- You are using Qt Creator IDE and most of its features
- You are building a standalone library/plugin to be used by other qmake projects
This guide describes the most useful qmake features and provides real-world examples for each of them. Readers that are new to Qt can use this guide as a tutorial to Qt’s build system. Qt developers can treat this as a cookbook when starting a new project or can selectively apply some of the features to any of the existing projects with low impact.

Basic Qmake Usage
The qmake specification is written in .pro (“project”) files. This is an example of the simplest possible .pro file:
SOURCES = hello.cpp
By default, this will create a Makefile that would build an executable from the single source code file hello.cpp.
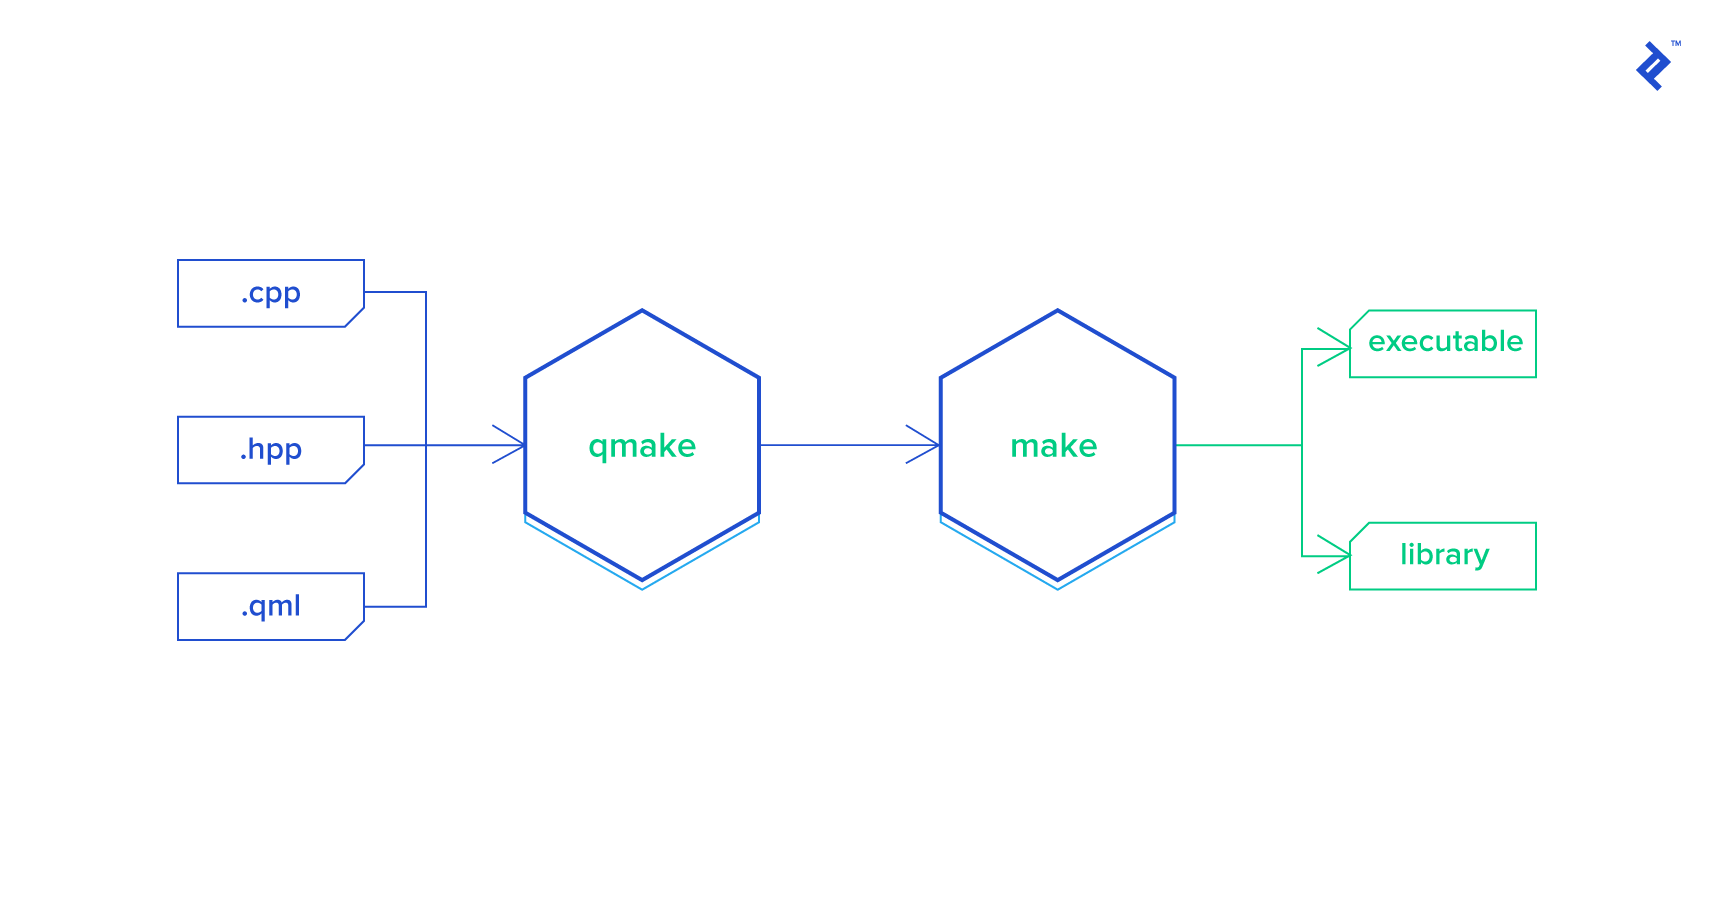
To build the binary (executable in this case), you need to run qmake first to produce a Makefile and then make (or nmake, or mingw32-make depending on your toolchain) to build the target.
In a nutshell, a qmake specification is nothing more than a list of variable definitions mixed with optional control flow statements. Each variable, in general, holds a list of strings. Control flow statements allow you to include other qmake specification files, control conditional sections, and even call functions.
Understanding the Syntax of Variables
When learning existing qmake projects, you may be surprised how different variables can be referenced: \(VAR,\){VAR} or $$(VAR)…
Use this mini cheat-sheet while adopting the rules:
-
VAR = valueAssign value to VAR -
VAR += valueAppend value to VAR list -
VAR -= valueRemove value from VAR list -
$$VARor$${VAR}Gets VAR’s value at the time qmake is running -
$(VAR)Contents of an Environment VAR at the time Makefile (not qmake) is running -
$$(VAR)Contents of an Environment VAR at the time qmake (not Makefile) is running
Common Templates
The complete list of qmake variables can be found in the spec: http://doc.qt.io/qt-5/qmake-variable-reference.html
Let’s review a few common templates for projects:
# Windows application
TEMPLATE = app
CONFIG += windows

# Shared library (.so or .dll)
TEMPLATE = lib
CONFIG += shared

# Static library (.a or .lib)
TEMPLATE = lib
CONFIG += static

# Console application
TEMPLATE = app
CONFIG += console
Just add SOURCES += … and HEADERS += … to list all your source code files, and you are done.
So far, we have reviewed very basic templates. More complex projects usually include several sub-projects with dependencies on each other. Let’s see how to manage this with qmake.
Sub-projects
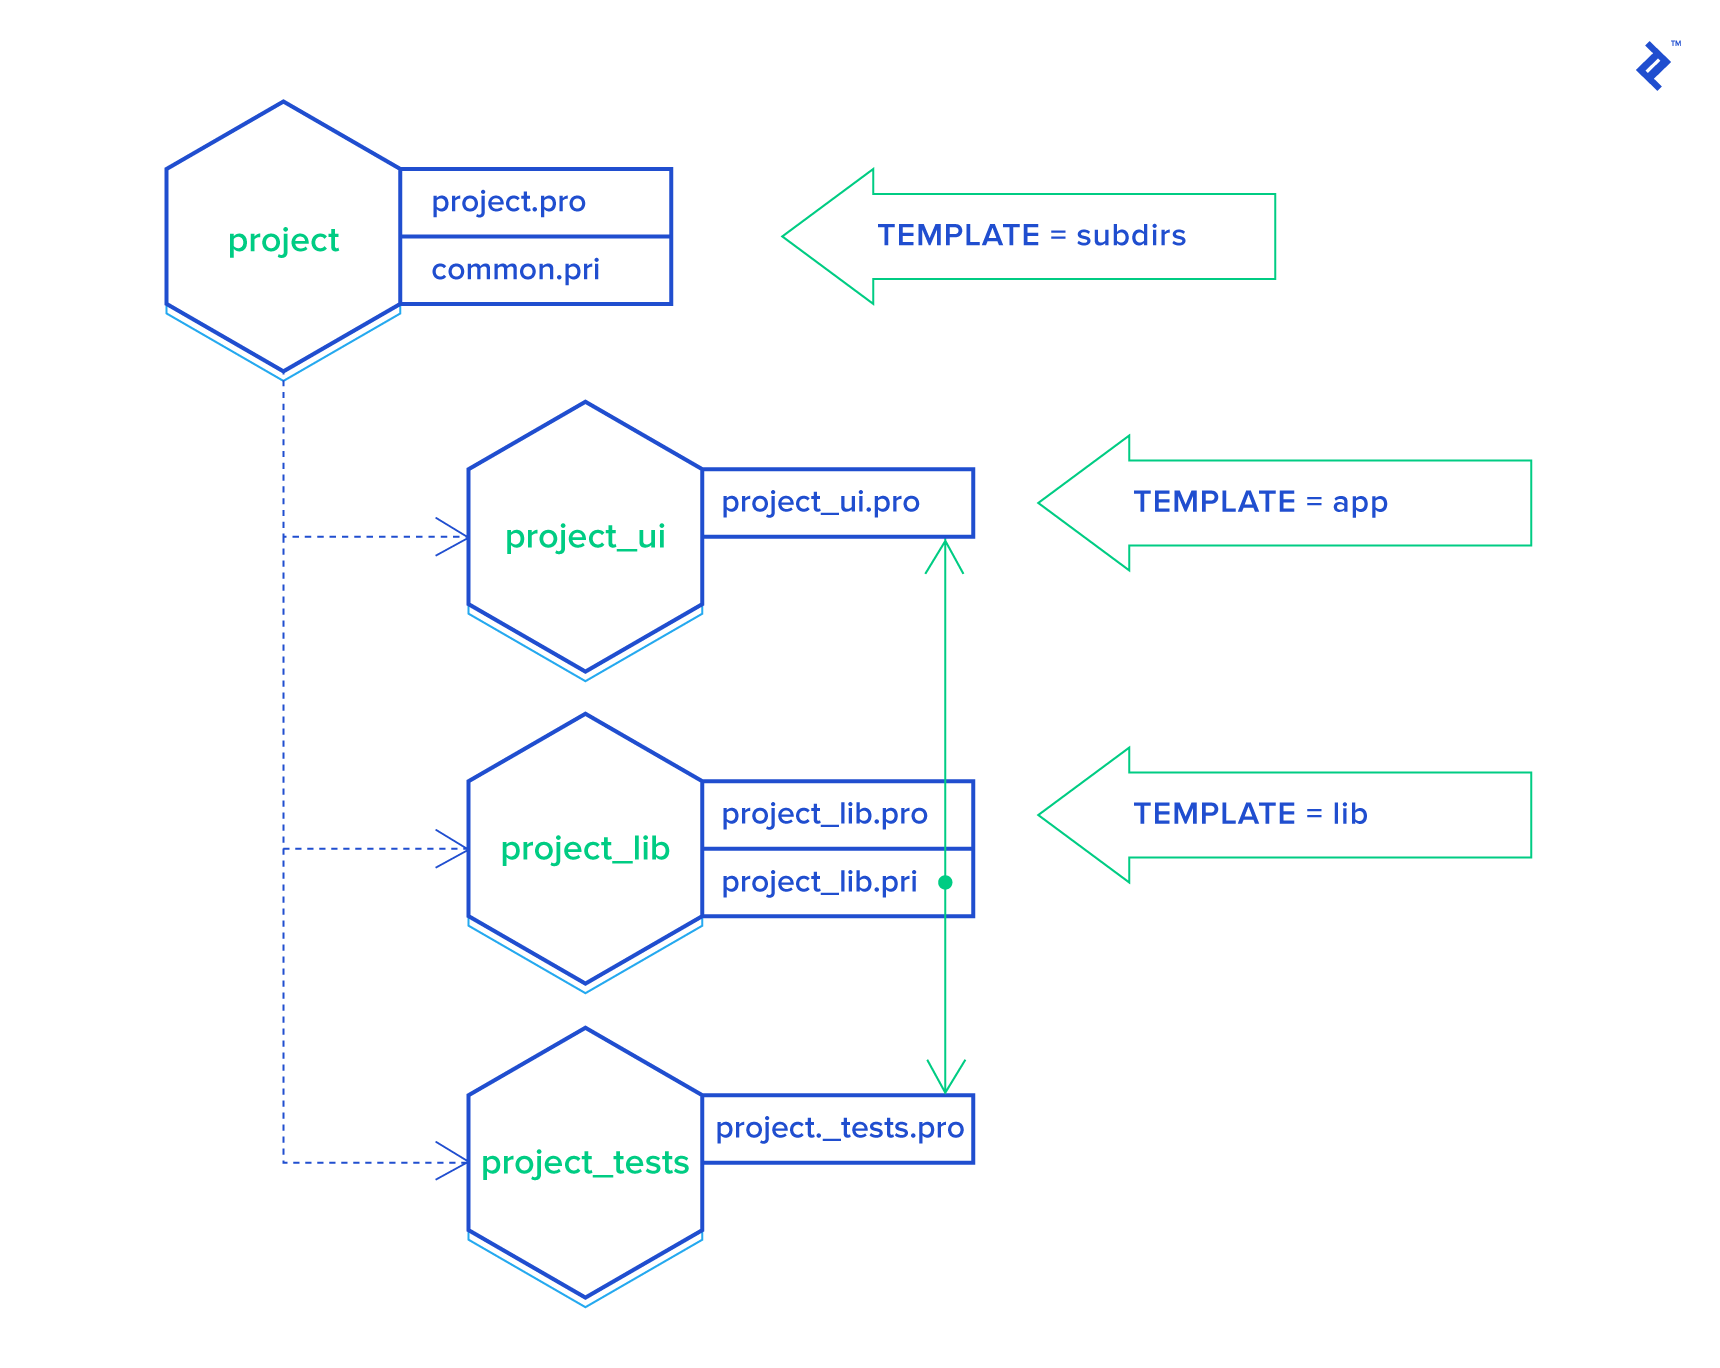
The most common use case is an application that is shipped with one or several libraries and test projects. Consider the following structure:
/project
../library
..../include
../library-tests
../application
Obviously, we want to be able to build everything at once, like this:
cd project
qmake && make
To achieve this goal, we need a qmake project file under the /project folder:
TEMPLATE = subdirs
SUBDIRS = library library-tests application
library-tests.depends = library
application.depends = library
NOTE: using CONFIG += ordered is considered a bad practice—prefer using .depends instead.
This specification instructs qmake to build a library sub-project first because other targets depend on it. Then it can build library-tests and the application in an arbitrary order because these two are dependent.

Linking Libraries
In the above example, we have a library that needs to be linked to the application. In C/C++, this means we need to have a few more things configured:
- Specify
-Ito provide search paths for #include directives. - Specify
-Lto provide search paths for the linker. - Specify
-lto provide what library needs to be linked.
Because we want all sub-projects to be movable, we cannot use absolute or relative paths. For example, we shall not do this: INCLUDEPATH += ../library/include and of course we cannot reference library binary (.a file) from a temporary build folder. Following the “separation of concerns” principle, we can quickly realize that the application project file shall abstract from library details. Instead, it is the library’s responsibility to tell where to find header files, etc.
Let’s leverage qmake’s include() directive to solve this problem. In the library project, we will be adding another qmake specification in a new file with the extension .pri (the extension can be anything, but here i stands for include). So, the library would have two specifications: library.pro and library.pri. The first one is used to build the library, the second is used to provide all details needed by a consuming project.
The content of library.pri file would be as following:
LIBTARGET = library
BASEDIR   = $${PWD}
INCLUDEPATH *= $${BASEDIR}/include
LIBS += -L$${DESTDIR} -llibrary
BASEDIR specifies the library project’s folder (to be exact, the location of the current qmake specification file, which is library.pri in our case). As you might guess, INCLUDEPATH will be evaluated to /project/library/include. DESTDIR is the directory where the build system is placing the output artifacts, such as (.o .a .so .dll or .exe files). This is usually configured in your IDE, so you should never put any assumptions on where the output files are located.
In the application.pro file just add include(../library/library.pri) and you are done.
Let’s review how the application project is getting built in this case:
- Topmost
project.prois a subdirs project. It tells us that the library project needs to be built first. So qmake enters the library’s folder and builds it usinglibrary.pro. At this stage,library.ais produced and placed intoDESTDIRfolder. - Then qmake enters the application sub-folder and parses the
application.profile. It finds theinclude(../library/library.pri)directive, which instructs qmake to read and interpret it immediately. This adds new definitions toINCLUDEPATHandLIBSvariables, so now the compiler and linker know where to search for include files, the library binaries, and what library to link.
We skipped the building of the library-tests project, but it is identical to the application project. Obviously, our test project would also need to link the library that it is supposed to test.
With this setup, you can easily move the library project to another qmake project and include it, thereby referencing the .pri file. This is exactly how third-party libraries are distributed by the community.
config.pri
It is very common to a complex project to have some shared configuration parameters that are used by many sub-projects. To avoid duplication, you can again leverage the include() directive and create config.pri in the top-level folder. You may also have common qmake “utilities” shared to your sub-projects, similar to what we discuss next in this guide.
Copying Artifacts to DESTDIR
Often, projects have some “other” files that need to be distributed along with a library or application. We just need to be able to copy all such files into DESTDIR during the build process. Consider the following snippet:
defineTest(copyToDestDir) {
    files = $$1

    for(FILE, files) {
        DDIR = $$DESTDIR
		    FILE = $$absolute_path($$FILE)

        # Replace slashes in paths with backslashes for Windows
        win32:FILE ~= s,/,\\,g
        win32:DDIR ~= s,/,\\,g

        QMAKE_POST_LINK += $$QMAKE_COPY $$quote($$FILE) $$quote($$DDIR) $$escape_expand(\\n\\t)
    }

    export(QMAKE_POST_LINK)
}
Note: Using this pattern, you can define your own reusable functions that work on files.
Place this code into /project/copyToDestDir.pri so you can include() it in demanding sub-projects as following:
include(../copyToDestDir.pri)

MYFILES += \
    parameters.conf \
    testdata.db

## this is copying all files listed in MYFILES variable
copyToDestDir($$MYFILES)

## this is copying a single file, a required DLL in this example
copyToDestDir($${3RDPARTY}/openssl/bin/crypto.dll)
Note: DISTFILES was introduced for the same purpose, but it only works in Unix.
Code Generation
A great example of code generation as a pre-built step is when a C++ project is using Google protobuf. Let’s see how can we inject protoc execution into the build process.
You can easily Google a suitable solution, but you need to be aware of one important corner case. Imagine you have two contracts, where A is referencing B.
A.proto <= B.proto
If we would generate code for A.proto first (to produce A.pb.h and A.pb.cxx) and feed it to the compiler, it will just fail because the dependency B.pb.h does not exist yet. To solve this, we need to pass all proto code generation stage prior to building the resulting source code.
I found a great snippet for this task here: https://github.com/jmesmon/qmake-protobuf-example/blob/master/protobuf.pri
It is a fairly large script, but you should already know how to use it:
PROTOS = A.proto B.proto
include(protobuf.pri)
When looking into protobuf.pri, you may notice the generic pattern that can be easily applied to any custom compilation or code generation:
my_custom_compiler.name = my custom compiler name
my_custom_compiler.input = input variable (list)
my_custom_compiler.output = output file path + pattern
my_custom_compiler.commands = custom compilation command
my_custom_compiler.variable_out = output variable (list)
QMAKE_EXTRA_COMPILERS += my_custom_compiler
Scopes and Conditions
Often, we need to define declarations specifically for a given platform, such as Windows or MacOS. Qmake offers three predefined platform indicators: win32, macx, and unix. Here is the syntax:
win32 {
    # add Windows application icon, not applicable to unix/macx platform
    RC_ICONS += icon.ico
}
Scopes can be nested, can use operators !, | and even wildcards:
macx:debug {
    # include only on Mac and only for debug build
    HEADERS += debugging.h
}

win32|macx {
    HEADERS += windows_or_macx.h
}

win32-msvc* {
    # same as win32-msvc|win32-mscv.net
}
Note: Unix is defined on Mac OS! If you want to test for Mac OS (not generic Unix), then use the unix:!macx condition.
In Qt Creator, the scope conditions debug and release are not working as expected. To make these work properly, use the following pattern:
CONFIG(debug, debug|release) {
    LIBS += ...
}

CONFIG(release, debug|release) {
    LIBS += ...
}
Useful Functions
Qmake has a number of embedded functions that add more automation.
The first example is the files() function. Assuming you have a code generation step that produces a variable number of source files. Here is how you can include them all in SOURCES:
SOURCES += $$files(generated/*.c)
This will find all files with the extension .c in sub-folder generated and add them to the SOURCES variable.
The second example is similar to the previous, but now the code generation produced a text file containing output file names (list of files):
SOURCES += $$cat(generated/filelist, lines)
This will just read the file content and treat each line as an entry for SOURCES.
Note: The complete list of embedded functions can be found here: http://doc.qt.io/qt-5/qmake-function-reference.html
Treating Warnings as Errors
The following snippet uses the conditional scope feature described previously:
*g++*: QMAKE_CXXFLAGS += -Werror
*msvc*: QMAKE_CXXFLAGS += /WX
The reason for this complication is because MSVC has a different flag to enable this option.
Generating Git Version
The following snippet is useful when you need to create a preprocessor definition containing the current SW version obtained from Git:
DEFINES += SW_VERSION=\\\"$$system(git describe --always --abbrev=0)\\\"
This works on any platform as long as the git command is available. If you use Git tags, then this will peek the most recent tag, even though the branch went ahead. Modify the git describe command to get the output of your choice.
Conclusion
Qmake is a great tool that is focused on building your cross-platform Qt-based projects. In this guide, we reviewed the basic tool usage and the most commonly used patterns that will keep your project structure flexible and build specification easy to read and maintain.
Want to learn how to make your Qt app look better? Try: How to Get Rounded Corner Shapes In C++ Using Bezier Curves and QPainter: A Step by Step Guide
Understanding the basics
Is Qt cross-platform?
Qt is a cross-platform application development framework for desktop, embedded, and mobile. Supported Platforms include Linux, OS X, Windows, VxWorks, QNX, Android, iOS, BlackBerry, Sailfish OS, and others.
What is Qt C++?
Qt is written in C++, and therefore, C++ is the best programming language that allows it to gain all benefits of the framework. However, there are bindings for other languages such as Python (https://wiki.python.org/moin/PyQt).
What is Qt open source?
Qt has a rich licensing model that includes Commercial, LGPL3, and GPLv2 (aka open-source).
What is a Qt application?
A Qt application is software built with Qt framework.
What is the difference between CMake and Make?
CMake and Make have many ideas in common, but CMake is a much more advanced tool. But essentially these two have the same purpose.
Is CMake a compiler?
CMake is another build tool widely used by the community. CMake itself is not a compiler.
What does qmake do?
Qmake generates a Makefile based on the information in a project file. Project files are created by the developer and are usually simple, but more sophisticated project files can be created for complex projects.
Andrei Smirnov
Ankara, Turkey
Member since December 11, 2014
About the author
Andrei has 15+ years working for the likes of Microsoft, EMC, Motorola, and Deutsche Bank on mobile, desktop, and web using C++, C#, and JS.
Expertise
PREVIOUSLY AT


