Prototype With Ease: An InVision Studio Tutorial
Follow this tutorial to create an interactive prototype with slick animated transitions in minutes using InVision Studio, the exciting new free interface design tool.
Follow this tutorial to create an interactive prototype with slick animated transitions in minutes using InVision Studio, the exciting new free interface design tool.
Bree’s a passionate designer and problem-solver with 10+ years of experience in product, UX/UI design for web and native mobile applications.
Expertise
PREVIOUSLY AT

Unless you were asleep for the first half of 2018, you were probably keenly aware of the feverish anticipation in the interactive design community leading up to the release of the InVision Studio app. InVision is best known for their Sketch and Photoshop plugin suites like Craft, and for being the go-to platform for quickly turning static interface designs into clickable and shareable prototypes. In a bold step last year, they announced the development of their own digital design software to compete with industry favorites like Sketch and Figma.
The product was hyped as revolutionary and made some weighty promises for a seamless design-to-prototype workflow, complex interaction functionality, breathtaking transitional animation—and it would be free. InVision put out some pretty exciting teaser videos and demos in order to get designers pumped. Anticipation ratcheted up further as the initial beta release got pushed back more than a few times in the beginning of the year.
As more designers have begun to play around with the software, more and more tutorials and guides are popping up to demonstrate the basics of the app interface design tool. InVision has also created a few of its own to onboard users to InVision Studio basics.
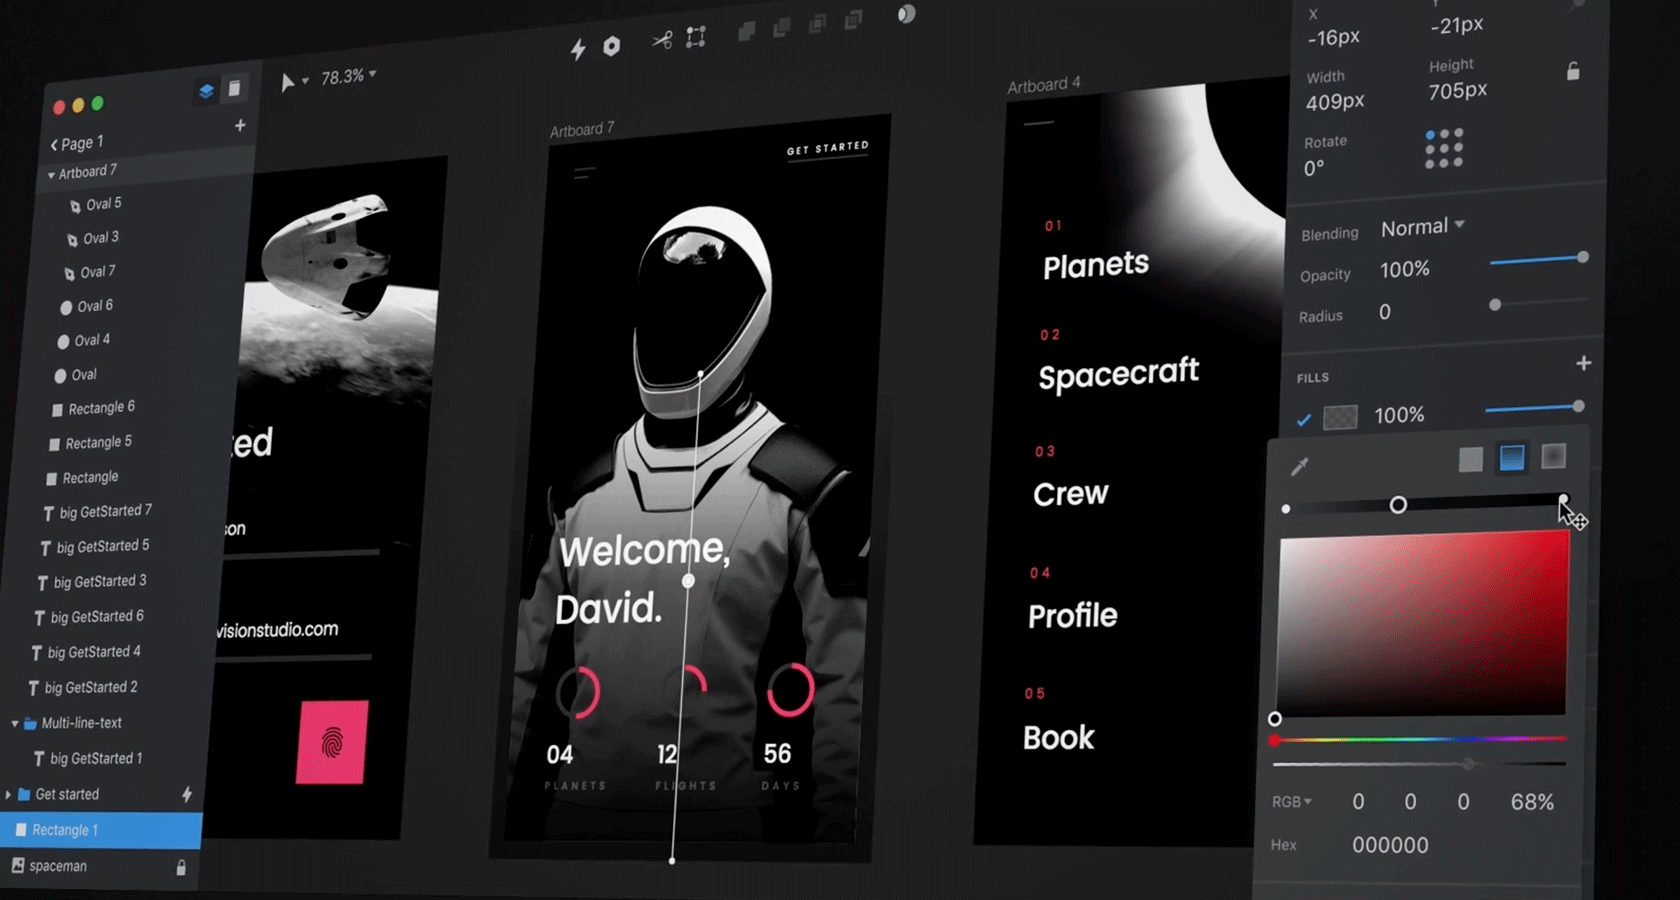
Even though the early access releases are getting mixed reviews, Studio has some interesting features and a lot of potential. This tutorial is aimed at walking early adopters through the basics of InVision Studio prototyping and adding some basic prototype animation.
Create an interactive prototype with slick animated transitions in no time at all by following along with this InVision Studio tutorial!
The Nickel Tour of the InVision Studio Workspace
Much of Studio should be familiar to UI designers and anyone who’s been using digital design software like Sketch. Much of the workspace borrows cues from Sketch’s UI, with the left side panel housing pages, layers, and groups; the right side panel for inspectors; and a contextual toolbar along the top.
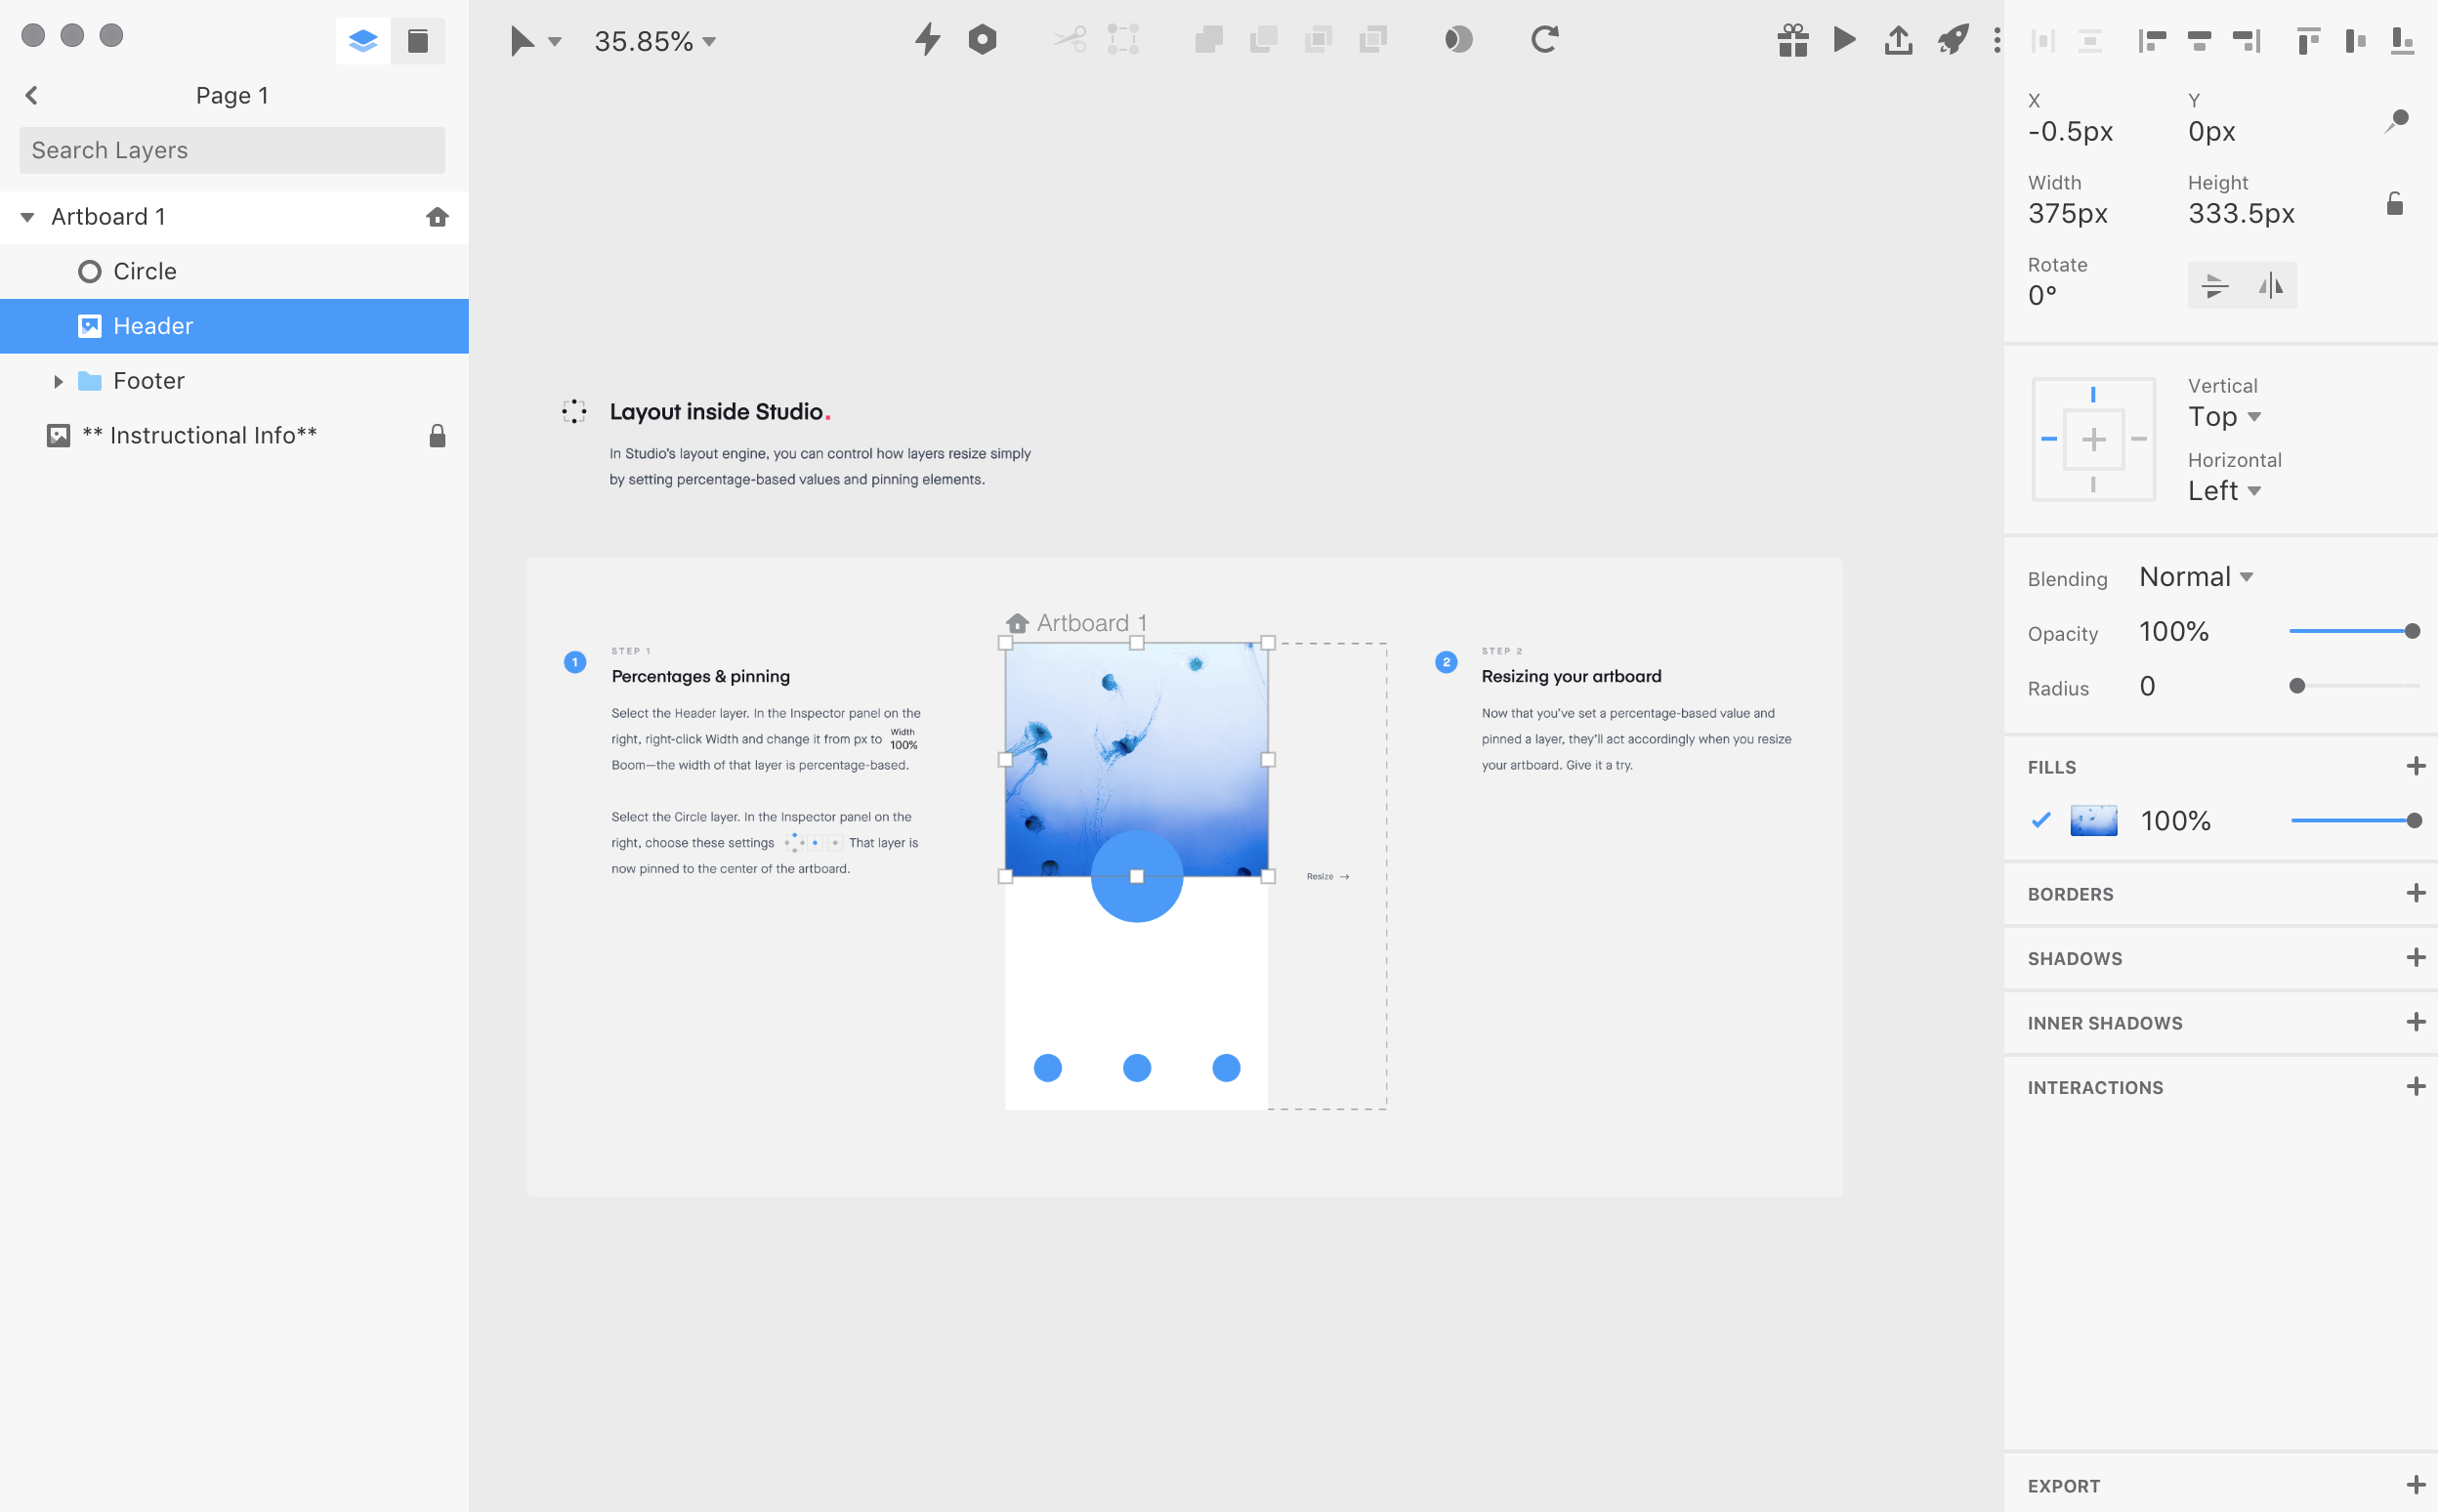
You will also find many of the same tools, even though some functionalities are named differently. For example, a Sketch “symbol” is called a component in Studio.
The Interactions Panel
For the purposes of this tutorial, we will be focusing on utilizing the interaction tools to create interactive hotspots between screens and create smooth transitions between them. A lot of the magic will be happening in the “interactions panel” on the right-hand side of the Studio workspace.
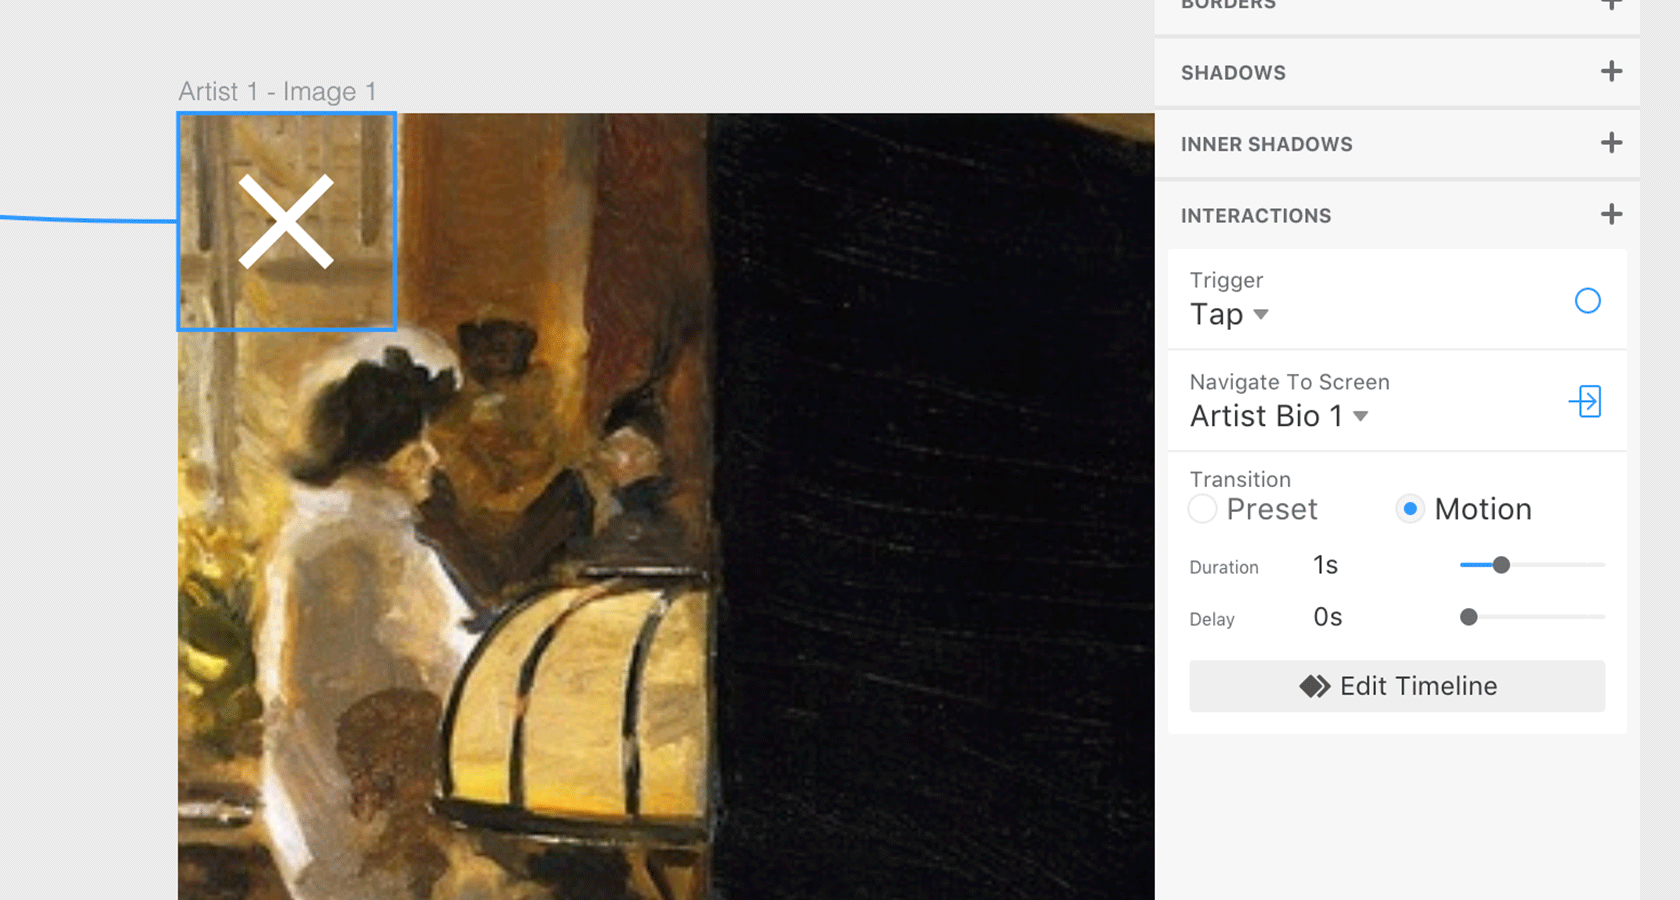
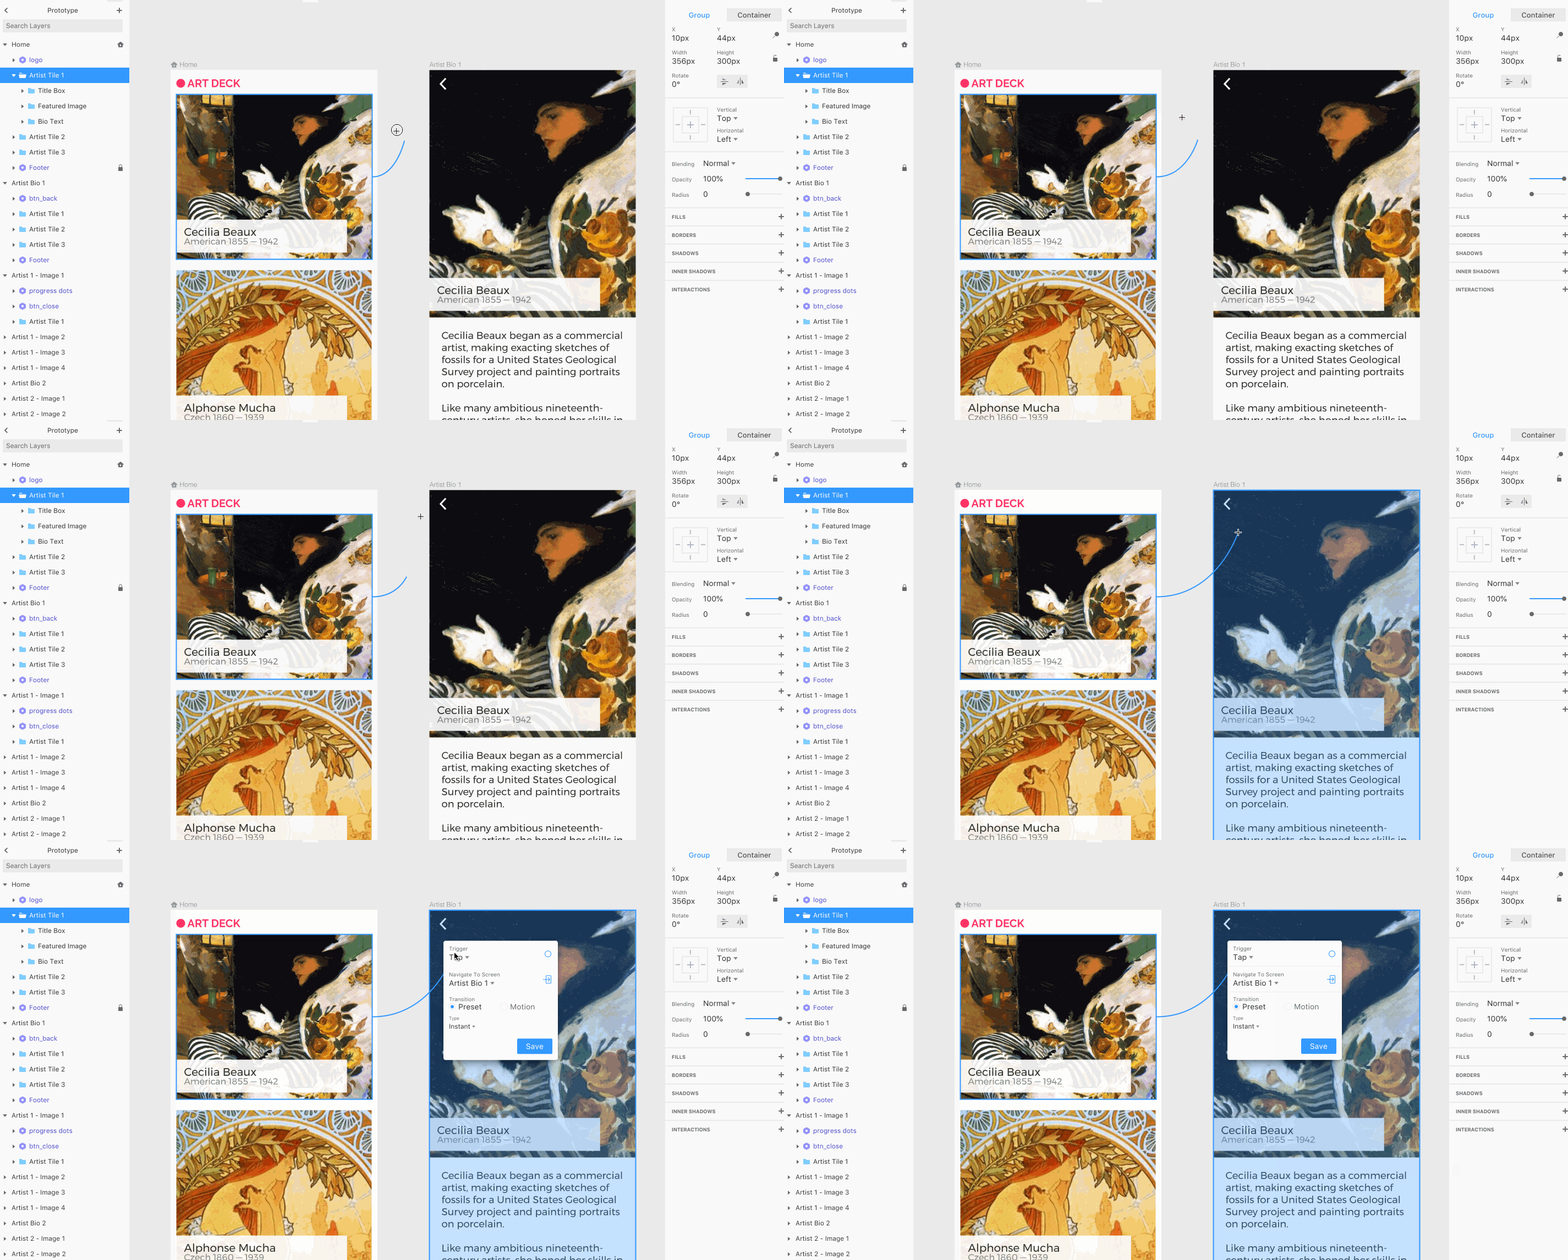
The simple way to create interactions is to select a trigger layer or group and hit “c” on the keyboard (or click the lightning bolt icon in the top toolbar), which initiates a blue pick whip with which to select a destination screen. Studio will then prompt the designer to select the gesture or user input triggering the event and to choose between a set of preset transitions or a “motion” transition.
InVision Studio Animation
There are many elements to great interaction design, but the correct use of animated transitions and microinteractions in a user interface is more than just window-dressing.
They enhance usability and can mean the difference between a beloved product and a confusing mess.
Throughout this tutorial, we use a combination of preset transitions and motion transitions to create our app prototype. The preset transitions are fairly straightforward and will be familiar to users of the InVision online prototype platform.
The rules that govern how the motion transitions work between screens are a bit more mysterious. While there are lots of obvious designer considerations taken into account in building the tool—for example, the auto-linking of elements between screens—it takes some trial and error to achieve certain effects when adding motion to transitions. Hopefully, this tutorial will help designers become a little more comfortable experimenting with what InVision Studio has to offer.
Things to Keep in Mind
Studio promises a lot of smart functionality around animations. For instance, it can create motion transitions between objects duplicated from one artboard to another when connected through an interaction. Designers can then tweak these animations as desired to accomplish some beautiful easing and other motion effects. Learning the eccentricities of how this works when trying to transition a stack of objects in a specific sequence can take patience and some practice.
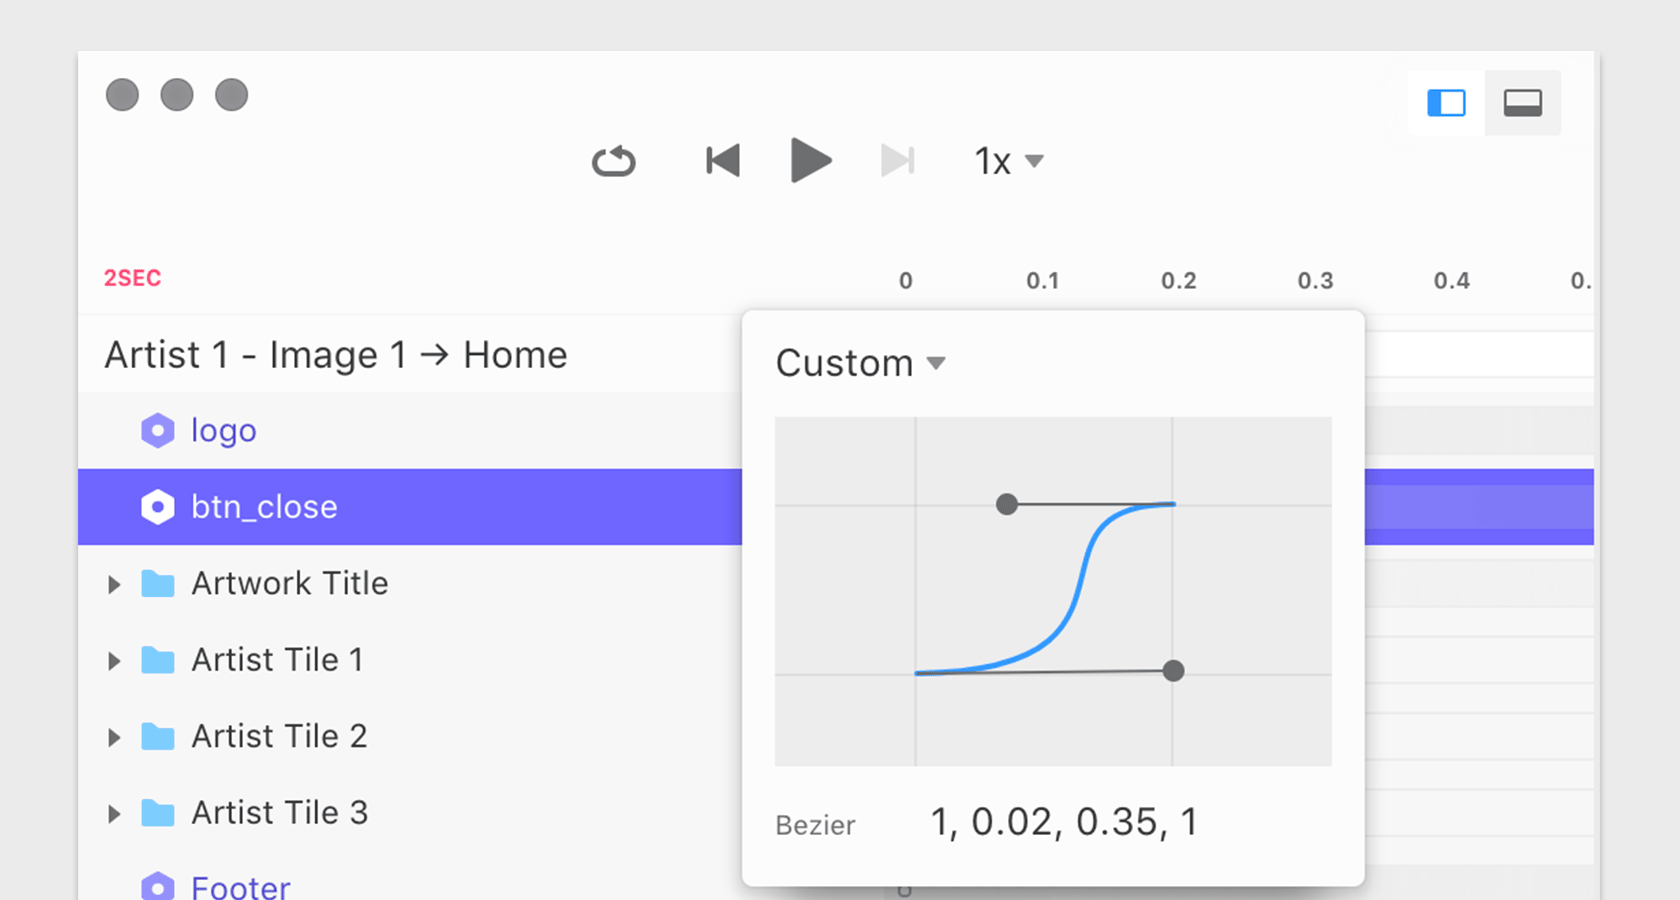
Motion transitions work best with objects on artboards that have been duplicated one from another. The animation feature is “smart” in that it recognizes duplicated objects with the same layer names, so take care not to remove or rename key layers between screens (which is a frustratingly easy way to ruin a great animation).
Keep in mind that Studio is still in its infancy, so designers should be prepared to encounter a fair share of bugs. For example, the “preview” button launches an interactive preview of the prototype, but occasionally the interactions don’t trigger at all, in which case you will need to save and re-open the file.
While learning the software, I have had more than one file seem to strangely corrupt itself—deleting all artboards and making all tool panels inaccessible. I’ve reported the bug, and have learned to save multiple versions of my files so as not to lose too much work.
Finally, it always helps to be organized. When creating a prototype on any platform, whether it’s Studio or Sketch or Marvel, keeping track of objects and layer labels will save time and frustration—especially if you’re working with a team or handing the file off at some point. Make note of the ordering of layers and layer groups when building interactions; this often makes a big difference in achieving the desired animation effect.
The Tutorial!
Let’s begin! If you haven’t already, go to InVision Studio to download an early access version of the Studio app. Once you have InVision Studio on your computer, download the tutorial files here. Once you launch the Studio software, choose to open the file from wherever you saved it.
Step 1: Open the File and Take a Look
This interactive prototype will be for a mobile app about modern artists from the late 19th to early 20th centuries. All of the screens have been created in advance using careful artboard duplication, which is necessary for proper use of the motion transition feature.
The hierarchy has 3 levels of depth, starting at “Home,” then into each individual artist’s bio, and finally down to a carousel of four examples of the artist’s work. You will notice that the “Home” artboard has a small icon of a house, which designates the starting artboard for the prototype.
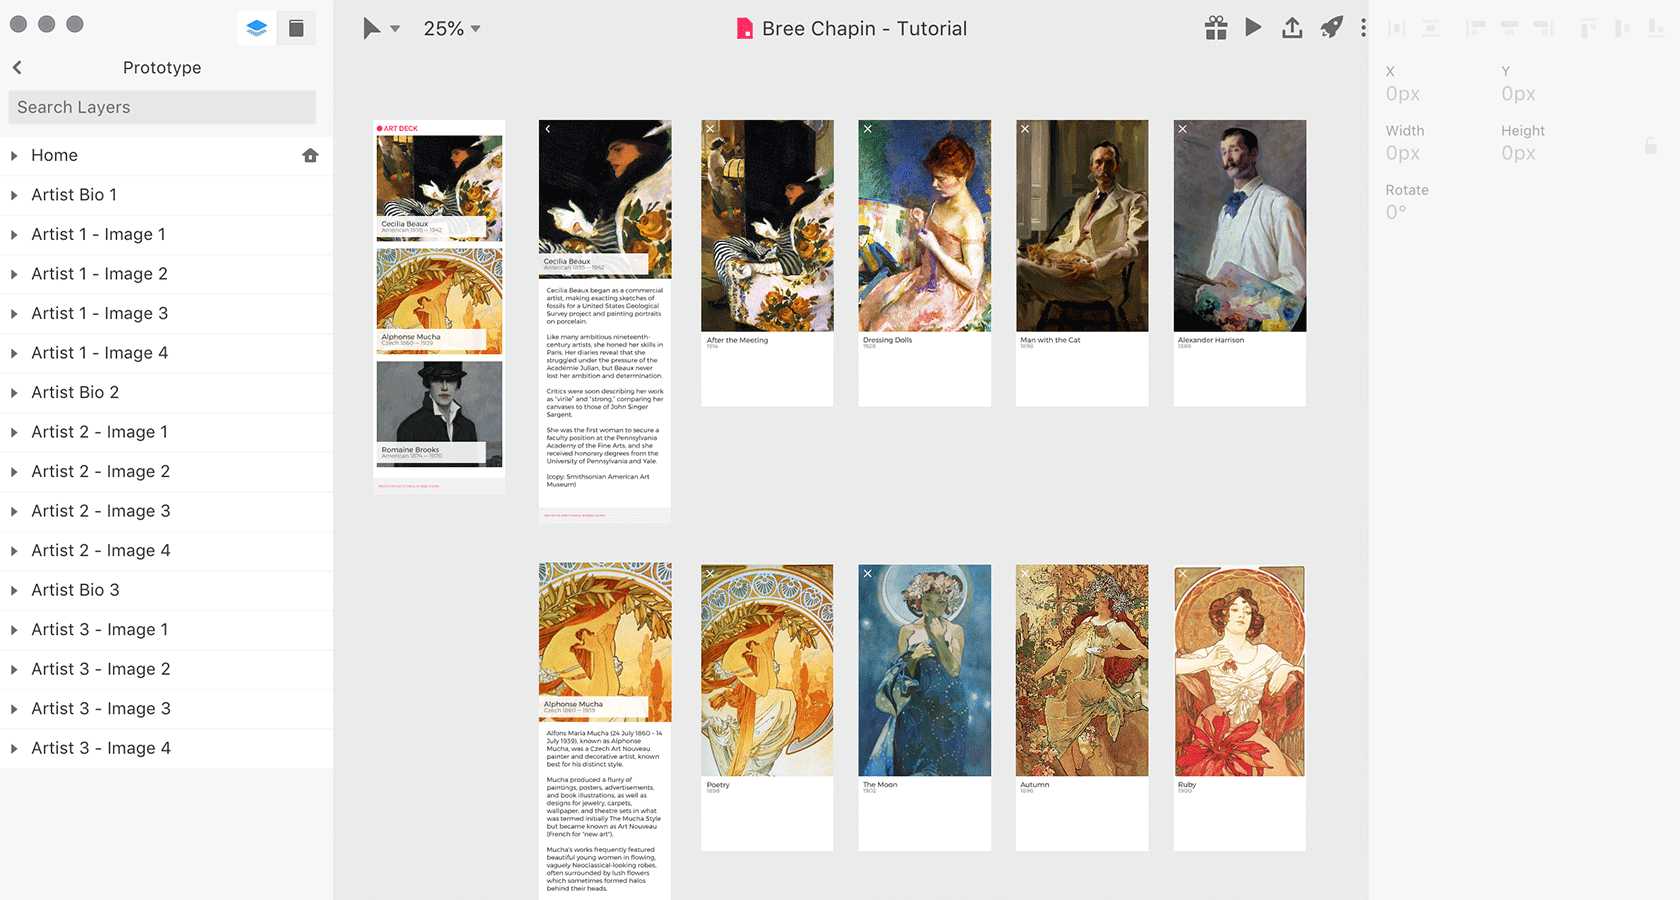
The tutorial will focus on creating simple navigation paths that connect these three levels of depth. We will make use of Studio’s interaction and transition tools to make the prototype feel like a properly interactive app.
Step 2: Connect Artist Tile to Artist Bio
Go to the first artboard. Take a moment to expand the layer group “Artist Tile 1.” You will notice three nested groups: one for the artist name, one for a featured image, and a third layer containing “Bio Text.”
Looking at the artboard screen, the third layer group is not immediately visible because of the way Studio handles motion transitions—which we will get to in a moment. Just make a note of it for now.
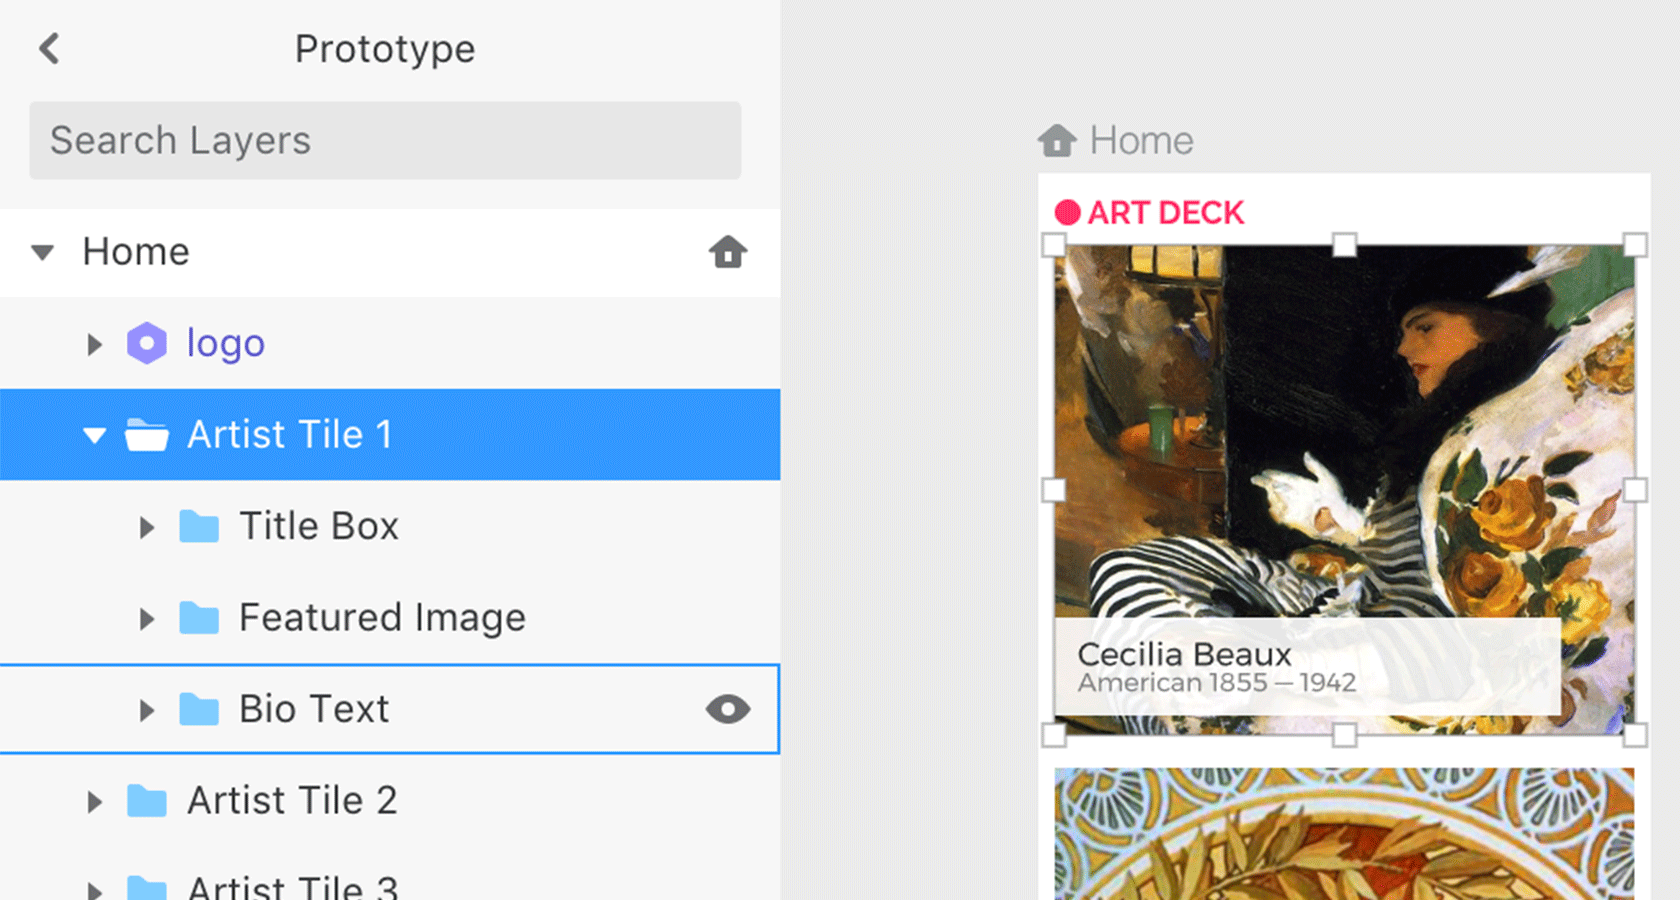
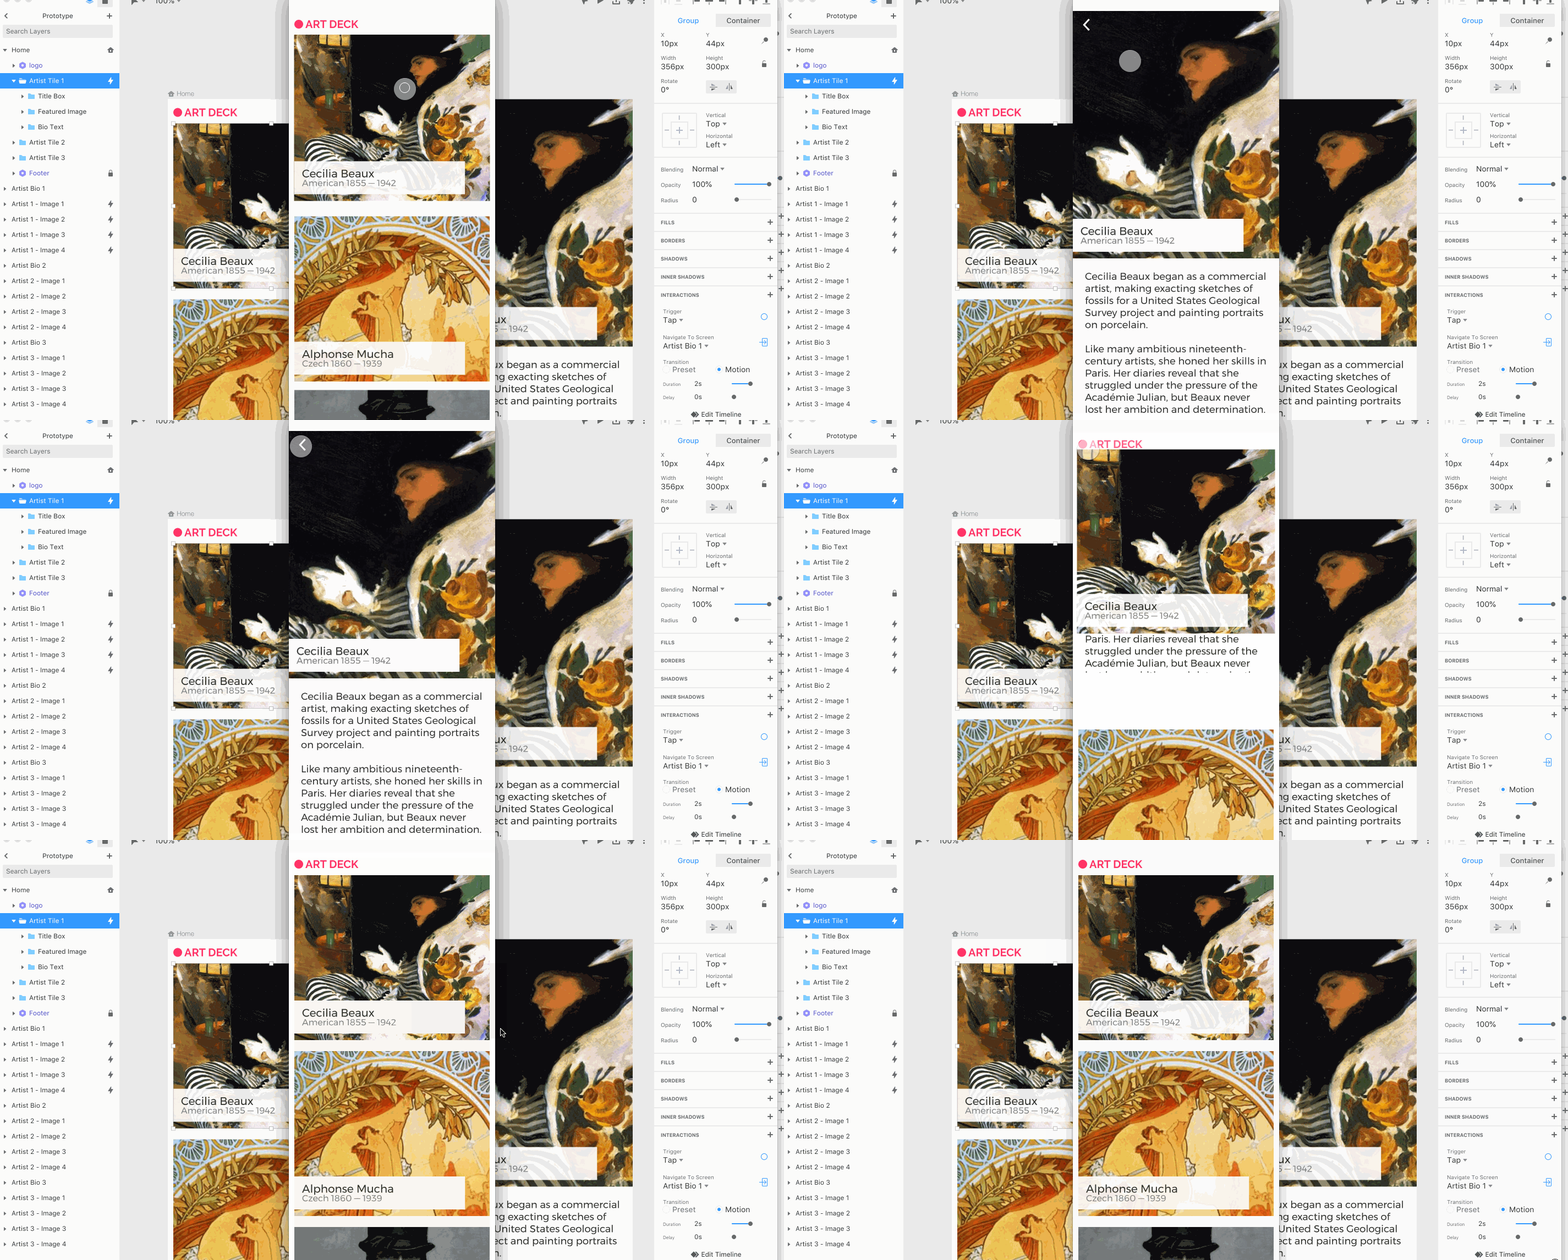
Select the layer group containing all of these elements: “Artist Tile 1.” With this group selected, hit “c” on your keyboard (or click on the lightning bolt icon in the top toolbar) to initiate the interaction tool. Your cursor will be followed by a blue pick whip to choose the destination screen for your interaction.
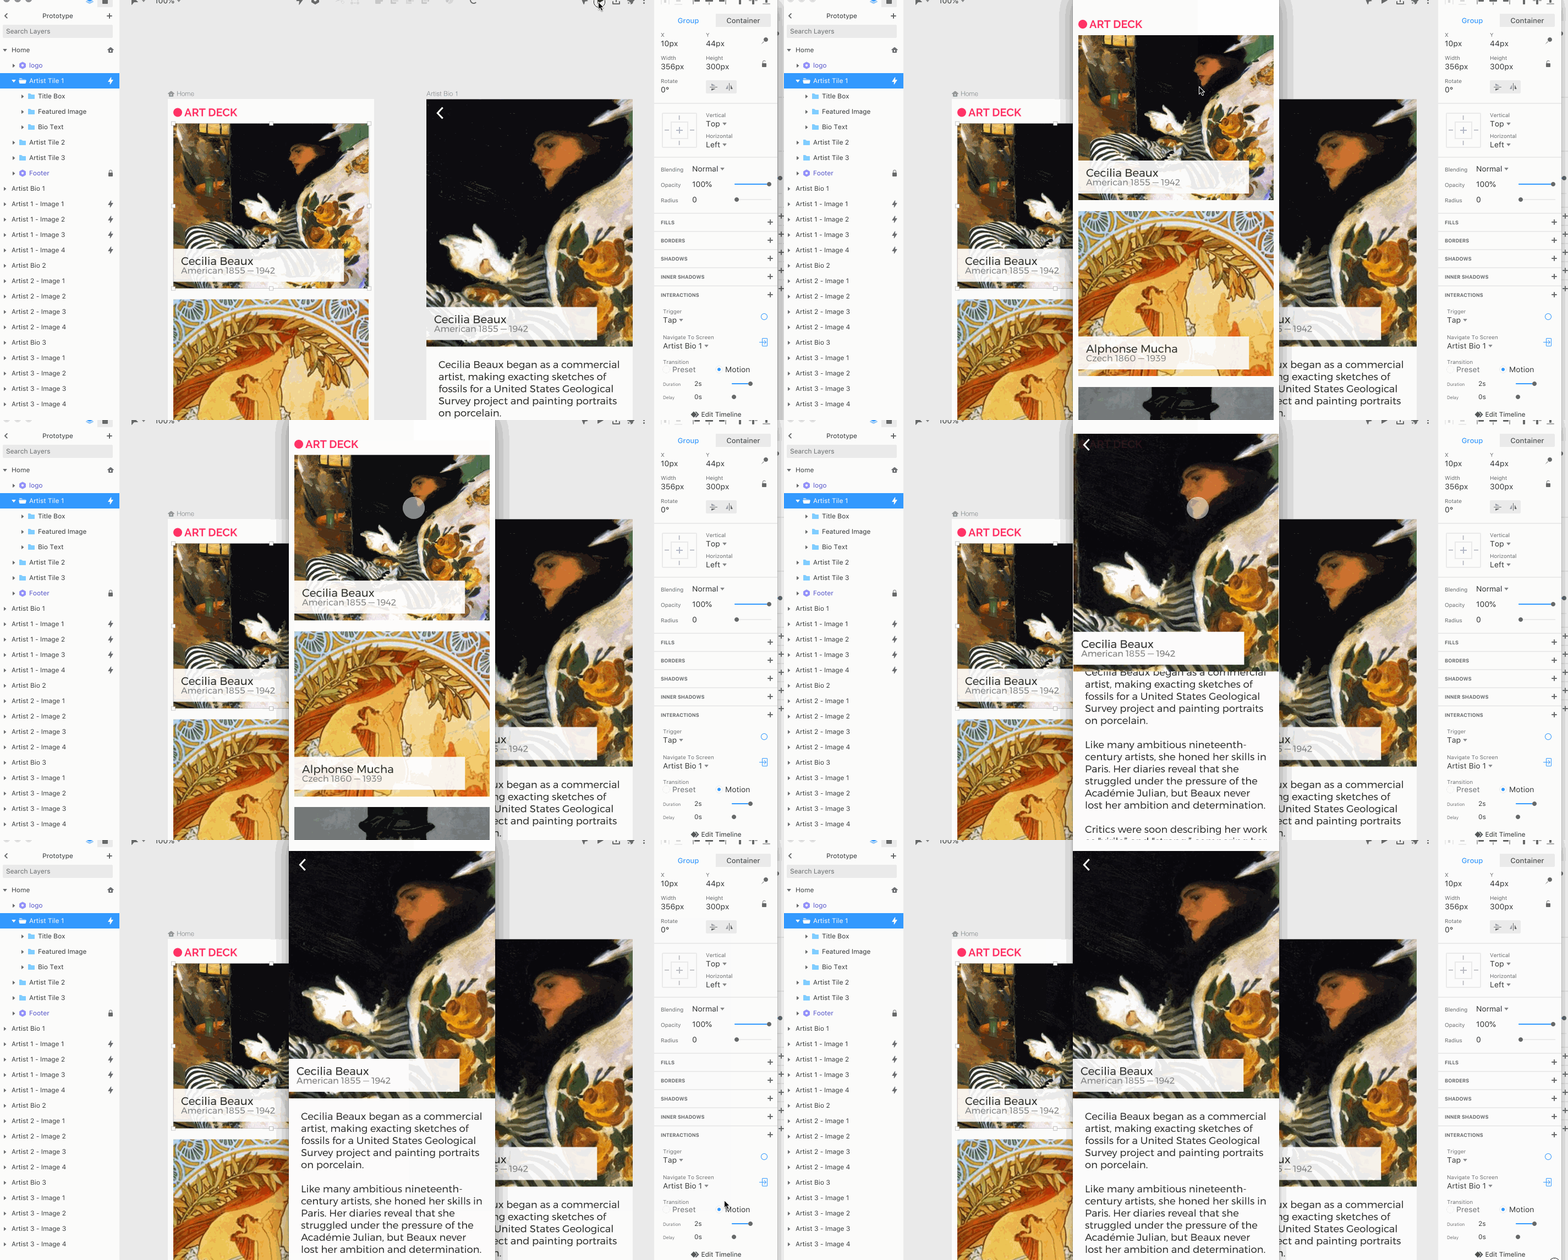
Select the artboard immediately to the right titled “Artist Bio 1” and you will be prompted to choose the trigger and type of transition. For the trigger, choose “Tap,” and then choose “Motion” as the transition. You can then choose the duration of the transition. Let’s set this transition to 2 seconds and hit “Save.”
Click the play button to preview the prototype. Did you see the way things move along the screen and how the bio layer slid down from beneath the image? Congratulations—you’ve created a pretty slick interaction transition!
Step 3: Connect a Back Button to the Home Screen
Now we should give users a way to get back to the home screen. Go to the “Artist Bio 1” artboard and select the “btn_back” component in the upper left corner. Create a trigger here by hitting “c” and selecting the “Home” artboard.
Again, let’s set the trigger to “Tap,” interaction to “Motion,” and duration to 2 seconds. Click Preview and delight at the slick open and close transitions you just created. Notice how the animation triggered by closing the tile is a reversal of the animation played when opening the tile.
Step 4: Connect the Gallery
If you’re taking note of the layer names in the first and second artboards, you may notice that they are identical. This is because, as mentioned before, Studio animations automatically link duplicated layers from one artboard to the next if they share a name. Changing the name of these layers will break the animation link and the transition will default to a simple fade—especially challenging for those obsessed with meaningful layer labels.
We want to apply one more neat motion transition to opening the carousel gallery of images. The artboard titled “Artist 1 - Image 1” contains elements duplicated from the “Artist Bio 1” artboard, re-sized to show more of the example image.
Start by clicking into the “Artist Bio 1” layer to select the “Featured Image” group. This will be the trigger for opening the gallery. Create a “Tap” interaction here connecting to the first artboard in the gallery and select “Motion.” This time, set the duration to be a little faster: 1 second.
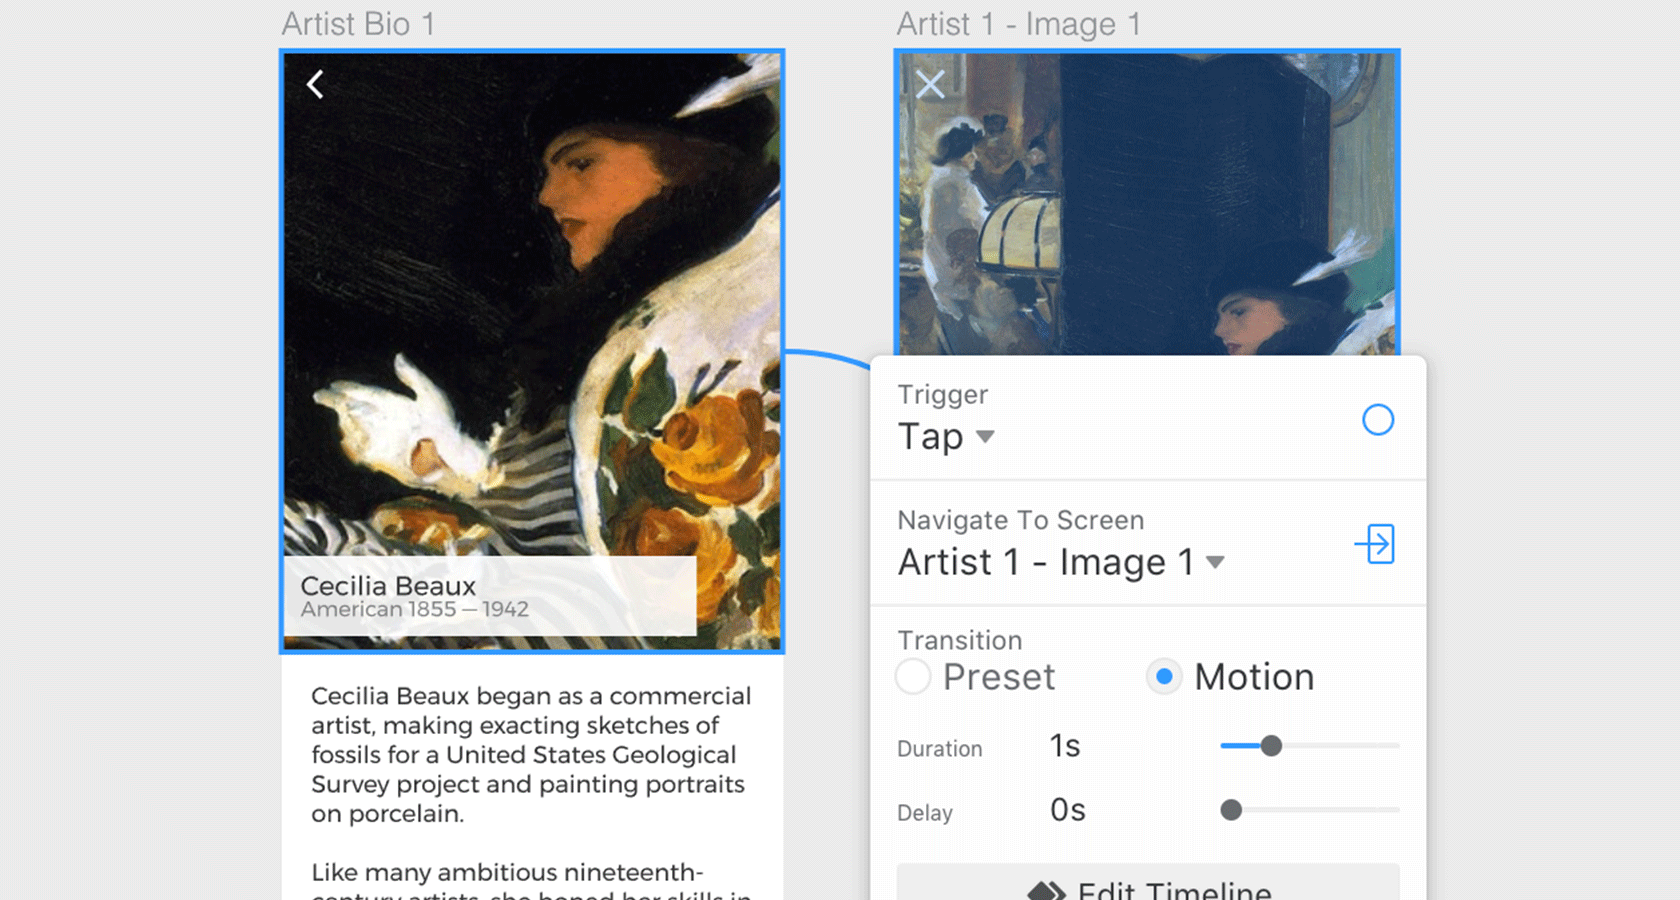
To create a nice transition for closing the gallery, simply select the close button layer in the “Artist 1 - Image 1” artboard and connect it back to the “Artist Bio 1” artboard, with the same settings as before.
Preview this animation and marvel at how nicely the prototype transitions from the artist bio screen to the carousel of images and back. We’ve now connected navigation through three levels of our app’s hierarchy!
Step 5: Connect All of the Gallery Images
We’ve done most of the motion transitions we will need to do, and will now start using some of the animation presets for the rest of the gallery.
The interaction pattern here for our user to flip through this carousel of images will be a familiar swipe gesture. The good news is that this last part is pretty simple and will take no time at all using Studio’s animation presets.
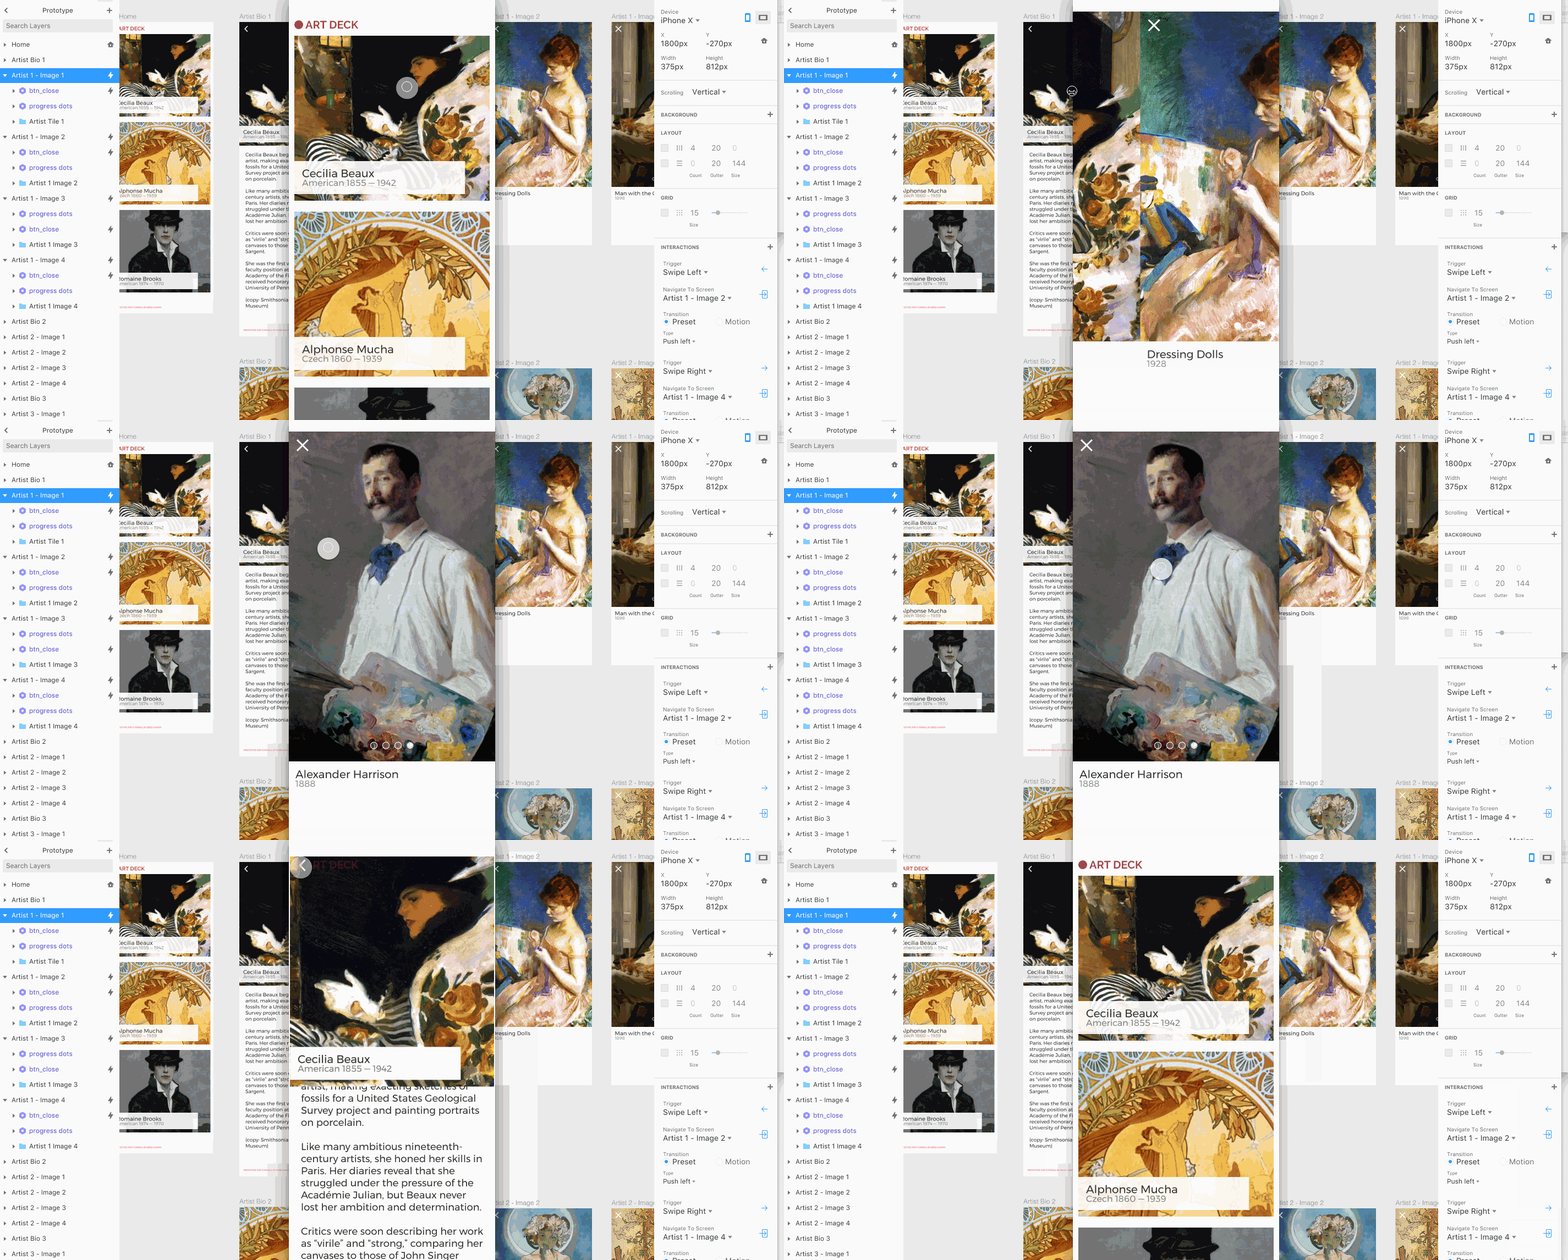
Select the “Artist 1 - Image 1” art board and create an interaction that leads to the next artboard, “Artist 1 - Image 2.” This time, set the trigger to “Swipe Left.” For the transition, select “Preset” and choose “Push Left” from the drop-down.
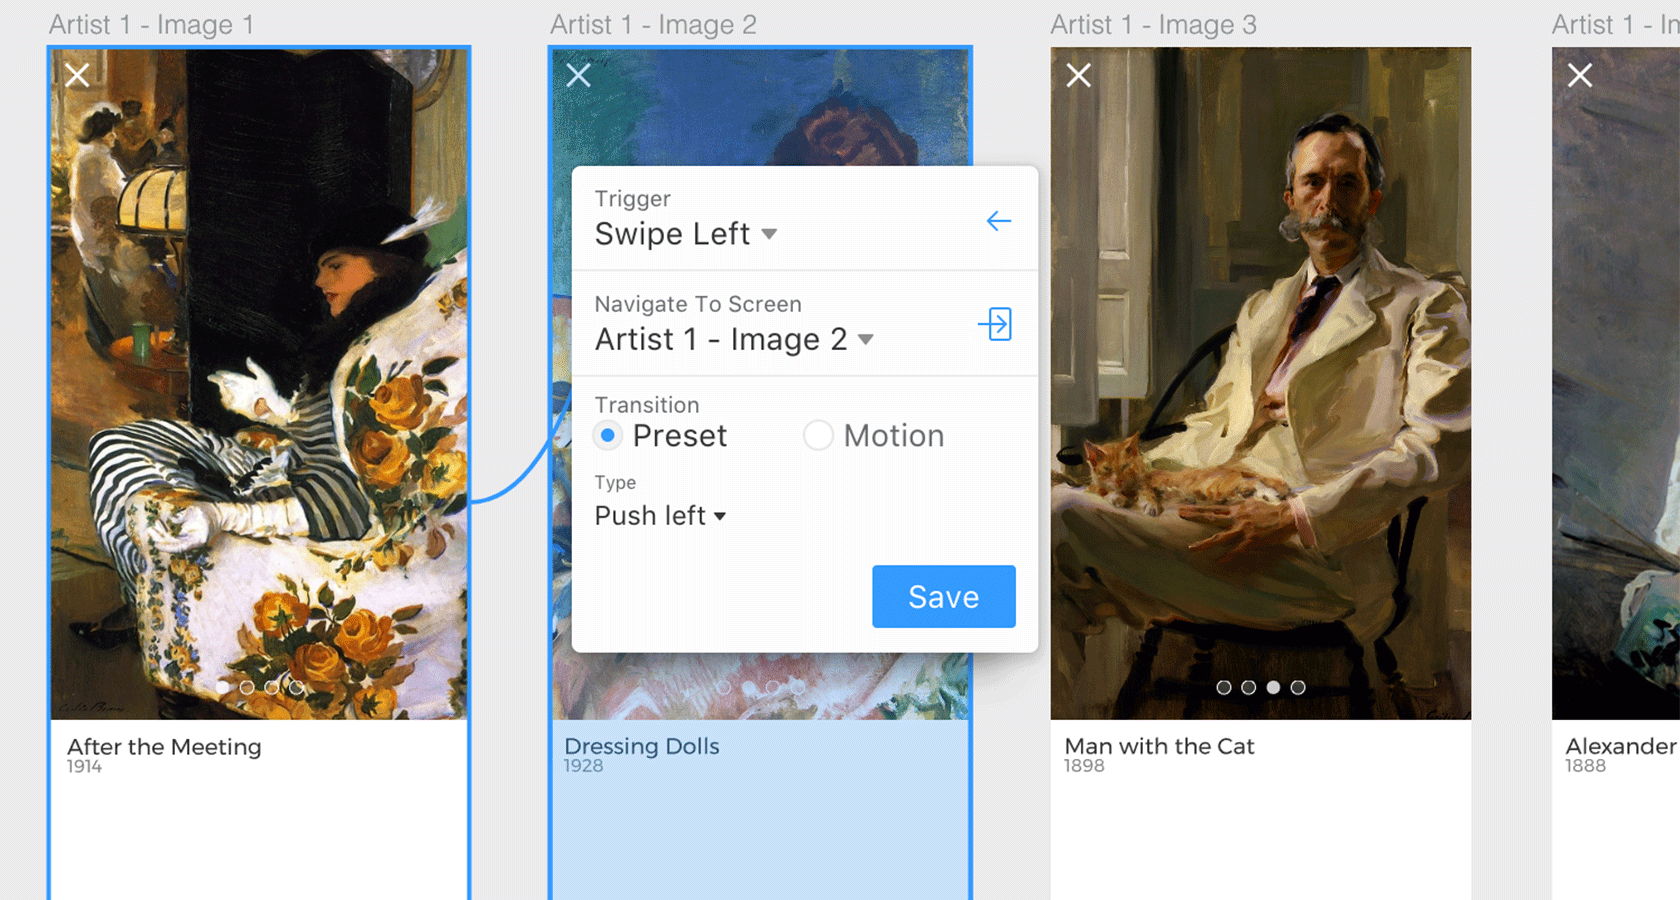
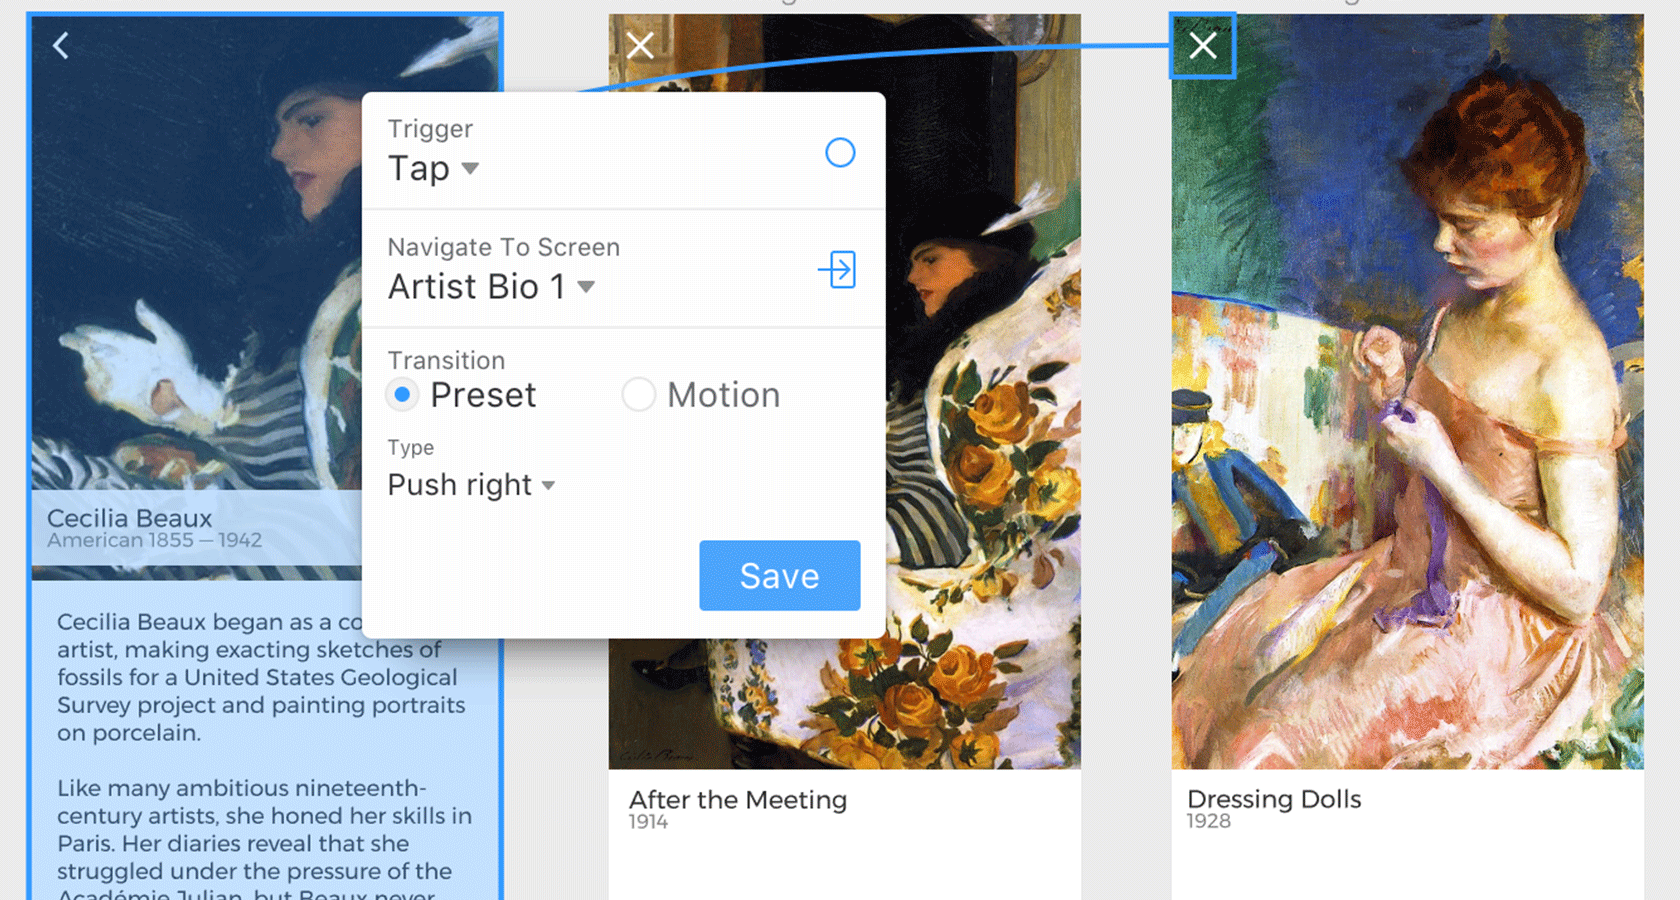
To create a reverse interaction, select the “Artist 1 - Image 2” artboard and connect it to the previous artboard, only this time using a “Swipe Right” gesture and “Push Right” transition.
Repeat this pattern with the next few artboards, connecting the artboards for Image 2 to Image 3, and Image 3 to Image 4. Easy!
To make this even more realistic, let’s close the loop between Image 1 and Image 4. Select the artboard for Image 4 and connect it to Image 1. Choose a “Swipe Left” trigger and “Push Left” transition just as you would for the next image in a series. Connect the Image 1 artboard to Image 4 with the reverse and presto—you’ve created a looping gallery!
Finally, select each of the “btn_close” components in the image gallery artboards and link them back to the bio artboard. You can choose whichever transition you like here, but I went with “Push Right.”
By now you have a pretty well-sequenced navigation path to show off. Click preview and try it out; your prototype should work a lot like the gif at the beginning of this tutorial. Give yourself a well-earned pat on the back.
Step 6: Repeat
Now that you’ve linked all of the screens for the first artist example with slick interactions, repeat the steps for the other two sets of screens in the tutorial file. They are organized in a similar way and it will be good practice for getting used to the way Studio works.
Next Steps
Hopefully, this tutorial provided an introduction to some of the cool features of InVision Studio prototyping. While getting the hang of Studio, you should try tweaking transitions using the advanced animation tools. Experiment with the other tools in the workspace, and try following some other InVision Studio tutorials out there. With practice, you can become one of the front-running InVision Studio design gurus.
You may have encountered some bugs or unexpected behavior along the way, but such is the nature of trying out new software. The folks at InVision have been very responsive to feedback and will definitely continue to improve Studio, making it ever more stable and useful.
Studio is a fun tool to try out—and there’s no reason not experiment with a free app prototyping tool. While it’s not likely to replace go-to software like Sketch in the design community today, it has a lot of potential.
Further Reading on the Toptal Blog:
Understanding the basics
What is UI prototype?
A UI prototype is created for the purpose of demonstrating and testing a user interface. Tools like InVision Studio, Sketch, and Figma are available to designers for making interactive prototypes without needing to write code.
What is InVision?
InVision is a platform for creating and sharing clickable prototypes for web and mobile. In recent years, InVision has expanded its platform to include more robust sharing and collaboration tools, plugins, and now its own interface design app.
What is a mobile app prototype?
A mobile app prototype is a prototype created for the purpose of demonstrating and/or testing a mobile app. Prototypes can range in complexity depending on the aspect of the app needing to be tested.
What is a clickable prototype?
A clickable prototype is a prototype that has some interactivity. Often, these are created by imposing interactive “hot spots” onto designed elements, such as buttons, and linking them to screens in a progression.
Why is it important to have a prototype?
There are many reasons to have prototypes of interaction designs. Prototypes allow designers and their collaborators to see and validate how something is meant to work, look, and feel often without requiring a fully developed release.
Bree Chapin
New York, NY, United States
Member since May 15, 2016
About the author
Bree’s a passionate designer and problem-solver with 10+ years of experience in product, UX/UI design for web and native mobile applications.
Expertise
PREVIOUSLY AT

